 |
|
Covington Innovations Home > Astronomy and Astrophotography > Links > Digital SLR Notes > Combining Images


Combining Images with Photoshop
The following instructions are exact for Photoshop CS and Elements 2.0. I believe they apply to everything since Photoshop 5.0 if not earlier.
Making a "double exposure"
(1) Get your pictures ready. Areas that should not look "double" should be black in one of the pictures.(2) Open both pictures in Photoshop.
(3) Go to the picture that you want to paste on top of the other one, and click on its title bar.
(4) In the toolbar, choose the Marquee tool (dotted box).
(5) Select the area you want to copy, or right-click on the picture and choose Select All.
(6) In the menu at the top of the screen, choose Edit, Copy.
(7) Go to the other picture and click on its title bar.
(8) At the top of the screen, choose Edit, Paste. Optionally, move the pasted area around to suit your wishes.
(9) At the top of the screen, choose Window, Show Layers. (This may already be set.) Then look at the layer blending controls, which look like this:
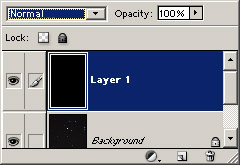
(10) Change the opacity from 100% to 50%, or whatever looks best.
(12) At the top of the screen, choose Layer, Merge Down (or Flatten Image).
(13) Save the resulting picture.
Here's a rather silly example:
+
=

Combining two identical pictures
In astrophotography, it is common practice to take the same picture more than once and then combine the images. It is usual to aim the telescope a bit differently for the two exposures so that hot pixels, dust specks, or other CCD quirks will not hit both of them in the same place.The same technique has other uses. It's a great way to eliminate grain.
Here's how to combine the images. First, do dark frame subtraction (below) on each of the images separately, since the hot pixels are in fixed positions relative to the camera rather than the object being photographed.
Then proceed as above, but you will need to register (superimpose) the two images precisely. Here's a shortcut for doing that. In step 8, choose the arrow tool for moving objects around. Go to the top of the Layers window and set opacity to 100% and blending mode to Difference. Then push the second image around one pixel at a time using the arrow keys.
When the two images are perfectly aligned, you will see nothing - they will cancel out. Then change the blending mode back to Normal and the opacity to 50%, and you're done.
If you want to do this automatically, and if you need the ability to rotate the image automatically as well as shift it, use ImagesPlus.
Note that rotation will be needed if you are using a telescope on an alt-azimuth mount (with computerized tracking) or if you are taking successive exposures on a fixed tripod. Only a polar-aligned equatorial mount produces non-rotating images of the sky.
Subtracting a dark frame with Photoshop
All digital cameras have a certain number of "hot pixels" which show up in long exposures. These are pixels that register lighter than they should, due to electrical leakage. They look like tiny specks which are often vividly colored.The sure way to eliminate hot pixels is to take a dark frame exposure and subtract it out. Some cameras will do this automatically (e.g., Nikon D70, Noise Mode 2).
To make a dark frame exposure manually, just take a picture with the lenscap on. Be sure to use exactly the same camera settings as for the main exposure, and do both exposures within a few minutes if possible, with the camera at the same temperature.
Use the technique above; paste the dark frame onto the main picture. But in step 10, change the blending mode from Normal to Difference, and set the opacity anywhere from 50% to 100% to get best results.
(For best results, you should be working with a linear TIFF created by Canon File Viewer Utility 1.3.2 or later with the "linear" option checked. In that case, an opacity of 100% is correct. Otherwise you will have to experiment.)
You can also get a handy free dark-frame subtraction utility from Mediachance.com. I strongly recommend it.
Copyright 2004, 2005 Michael A. Covington. Caching in search engines is explicitly permitted. Please link to this page rather than reproducing copies of it. This page is not in any way connected with or endorsed by any photographic manufacturer. Many of the product names that appear on this page are registered trademarks of their respective owners.