 |
|
Covington Innovations Home > Astronomy and Astrophotography > Links > Digital SLR Notes > Processing with MaxDSLR and MaxIm DL


Processing DSLR Raw Images with MaxDSLR and MaxIm DL
Michael A. Covington
Revised December 25, 2006
Contents:
Preliminaries
How to avoid all this work
The input
Screen stretch
Subtracting dark frames
Converting to color (de-Bayerization, demosaicing)
Stacking images
Gamma correction (lightening the midtones)
Saving the result
Preliminaries
These are some hastily written notes about how I process DSLR images of deep-sky objects using MaxDSLR and MaxIm DL.
See also my tutorial on image processing with Stark Labs' Nebulosity.
MaxIm DL is a time-honored astronomical image processing and camera control program and MaxDSLR is a proper subset of it, omitting features that are seldom needed with DSLRs. For the purposes of these notes, they are the same. Everything that I say about MaxDSLR also applies to MaxIm DL.
I normally do the final processing of my pictures in Adobe Photoshop. My main goal here is to show you how to calibrate and stack images, then convert them to a format that is easy to handle in Photoshop and similar packages.
I know I'm leaving many things out. At the same time, if you are using this software and you think I'm omitting something vital, I'd be glad to hear from you.
Note about camera support:
10-megapixel CR2 files from the Digital Rebel XTi (400D) are supported in MaxIm DL 4.57 and MaxDSLR 4.07. Earlier versions support only 8-megapixel CR2 files such as those from the XT (350D). Several other software packages, including Microsoft Raw Image Thumbnailer and Viewer, also support only the smaller version of CR2.How to avoid doing all this work
To get the camera to do all this work for you, take one exposure of your deep-sky object (not a set of them) and use the camera with long-exposure noise reduction turned on. (On Nikons, this is an obvious menu setting; on Canons, it is a "custom function," and on the original Digital Rebel, it is a missing feature.)
Then, as soon as you close the shutter, the camera will automatically take a matching dark frame, subtract it, gamma-correct the result, and save it as a JPEG file.
You can still adjust the contrast of your JPEG in Photoshop (or even MaxDSLR) and combine multiple JPEGs of the same object.
The rest of this document assumes you want to do things the hard way. Why? To be able to stack (combine) multiple images with maximum precision, and also to avoid having to spend as much time on dark frames as you do on actual exposures. You can take three or four dark frames, combine them into one, and apply them to all the pictures taken with the same exposure time, ISO setting, and camera temperature.
The input
I assume you're starting with:
- One or more (identical) exposures of a deep-sky object, taken with the camera set to raw mode with long-exposure noise reduction turned off;
- One or more (identical) dark frames, which are exposures taken with the lenscap on, matching the original exposures in duration and ISO setting, with the camera at the same or a slightly lower temperature.
Screen stretch
MaxDSLR will mystify you if you don't know about screen stretch. The key idea is that you view the image with much more contrast than the image actually has. That is, the contrast on the screen is much higher than in the image file, and you see only a portion of the image's brightness range (hence the term "stretch"). Think of it like magnification in the dimension of contrast rather than height or width.
Screen stretch only affects how you view the image, not the image itself. Changes to screen stretch do not affect the image and will not be saved when you save it to disk.
Screen stretch is controlled by a little window that looks like this:
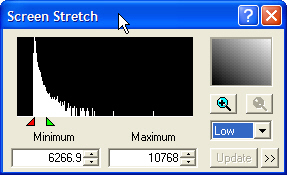
What you are looking at is a histogram of the image. It usually takes the form of a big pileup at the left (consisting of very dark background pixels) and a few much brighter pixels trailing off to the right.
The red and green sliders control how much of this brightness range you are looking at. MaxDSLR tries to set them automatically to help you see the detail in your image (not to make it look good — it often looks awful!). You can pull them to the left or right manually. You can also set the amount of automatic stretching; I usually set it to "Low."
If the screen stretch window is not visible, go to View, Screen Stretch Window.
Subtracting dark frames
This is a 2-step process: first tell MaxDSLR where the dark frames are and how to combine them, and then make MaxDSLR apply them to all your pictures.
It is customary to take more than one dark frame so that the random noise between them will even out. However, the newest DSLRs have very little noise in the first place, and one dark frame is often enough if your exposure time is no more than 3 to 5 minutes.
In this example we will not use flat fields or bias frames. A flat field is a picture of a uniformly bright object (such as a cloudy sky), used to counteract vignetting and dust. A bias frame is a zero-length exposure and is only needed if the dark frames are going to be scaled (multiplied) because they do not match the exposure time or ISO setting of the actual images.
Telling MaxDSLR about your dark frames
Telling MaxDSLR about your dark frames seems complex. First go to Process, Set Calibration. You may find it easier to go through the Calibration Wizard, which will take you to the same menu and tell you how to fill in the items. But here I'll do it the hard way.
You'll see this menu:
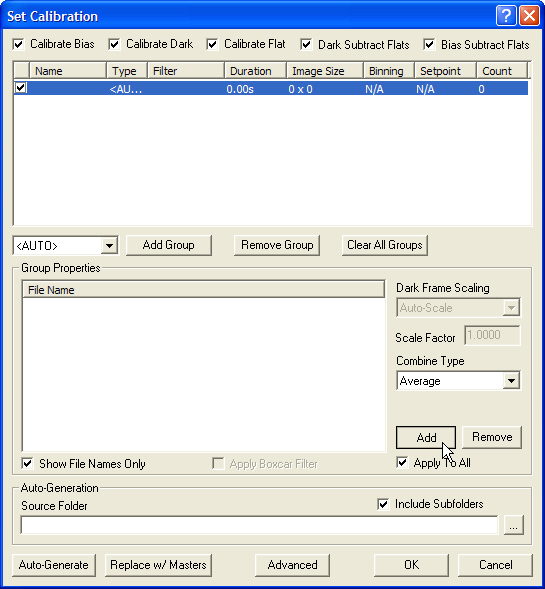
Here you see that there is one group of files, it contains 0 files (look at the "Count" column). If that's not the case, click Clear All Groups and then click Add Group.
Next, add your files to the group. Click Add (in the lower right of the window). You'll get an open file dialog. Navigate to your dark frames and add them to the group (only the raw files, not other flotsam and jetsam that might be in the same folder).
Then click OK. You don't have to tell MaxDSLR whether these are dark, bias, or flat-field images because it figures this out for itself. You can open up the Set Calibration menu again if you want to inspect it; you don't have to change anything.
Performing dark frame subtraction
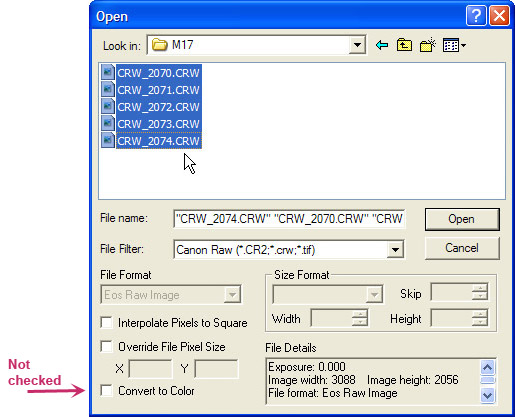
Now it's time to open your image files. Go to File, Open, tell the file dialog what kind of files you want (Canon or Nikon raw), and make sure "Convert to Color" is not checked. With all your image files selected, click "Open."
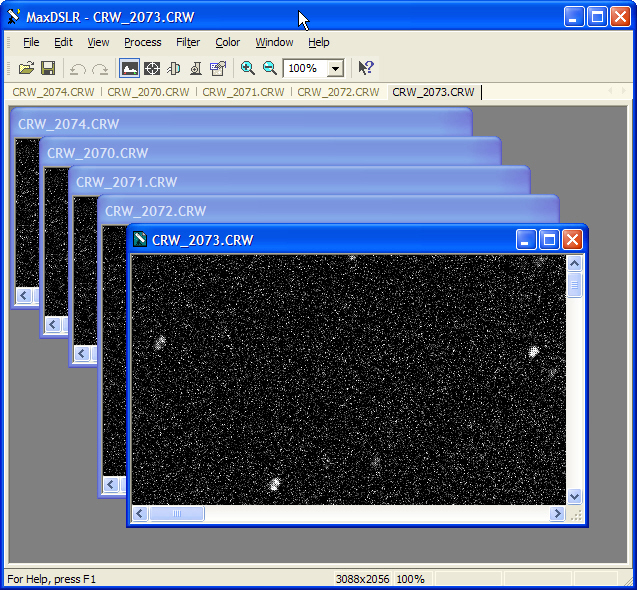
The images will first be displayed at 100% magnification, so you'll see only the upper left corner of each image, with blurry corner-of-field star images, something like this:
Now go to Process, Calibrate All. This actually performs the subtraction. After a moment, the images are appreciably less speckled:
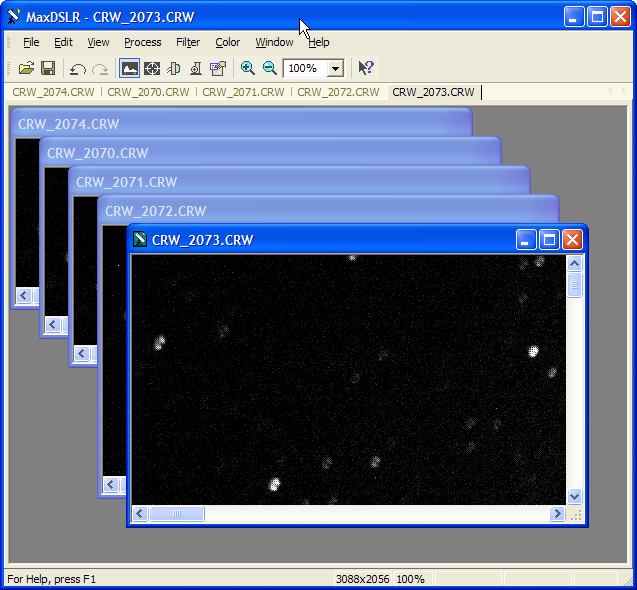
I know the images don't look like much yet, but please bear with me.
Converting to color (de-Bayerization, demosaicing)
So far you've been looking at black-and-white raw images. Now it's time to interpret the pixels as red, green, or blue, and combine them according to the Bayer algorithm.
This is slightly tricky, and I urge you to process a daytime picture or two (skipping the dark-frame step, of course) so that you know you have everything set correctly for your camera.
Unfortunately, there is no "Convert RGB All" command, so you are going to have to click on each image and convert it individually. For each of the images, do the following:
- Click on the image.
- Go to Color, Convert RGB and look carefully at the menu:
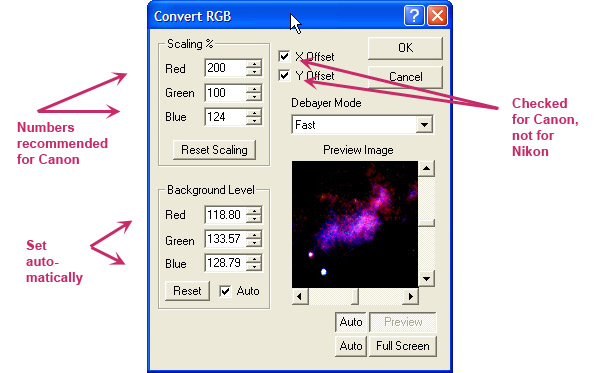
The vital settings are X Offset and Y Offset; both should be checked for Canon, unchecked for Nikon, or you will get very bizarre colors. (If using a later model camera, please test this by experimenting on a daytime picture. It's OK if the result has an overall color cast, but red should not be swapped with blue, or anything strange like that.)
- Click OK.
Go on to the next image and do the same thing. (The settings won't need to be changed; just click "OK.") Although they may not look like much, you should now be able to tell that you have color images:
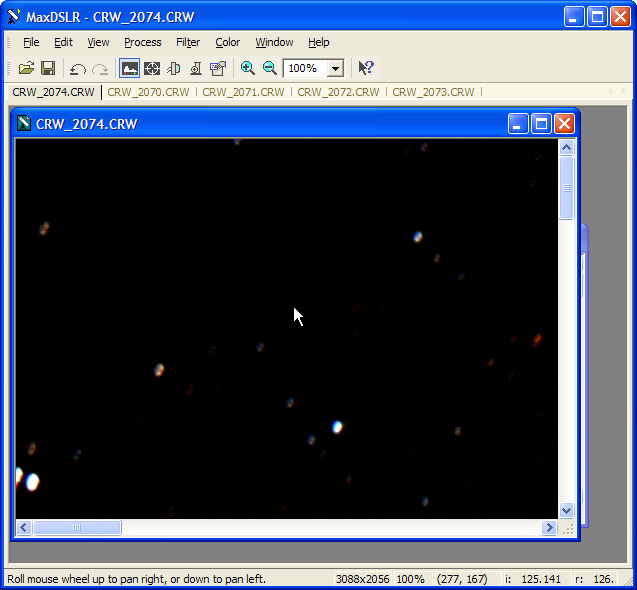
Stacking images
Now it's time to stack (combine) your color images. MaxDSLR can usually do this automatically. But you have some decisions to make:
- Whether to stack or rotate and stack. Actually, you usually don't have to make this decision — MaxDSLR automatically rotates and stacks.
- How to line up the images. Auto – Star Matching is usually best for deep-sky images. If you want to, you can pick the alignment stars manually (see the help screens). If you pick them manually, you should choose two stars near opposite corners.
- How to combine the images. I prefer average if there are just two or three, median if there are at least four, and sometimes the more advanced techniques offered in MaxIm DL. The idea is to reject bad pixels no matter what the source, but average good ones.
The advantage of median combining is that pixels are ignored if they differ wildly from the other images. Median combining can actually remove an airplane trail or the like if it is present in only one image in the set.
Go to Process, Combine, and on the image selection menu, choose Add All (i.e., everything that's open).
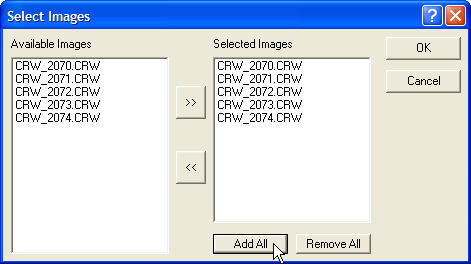
Then click OK. That brings up the next menu:
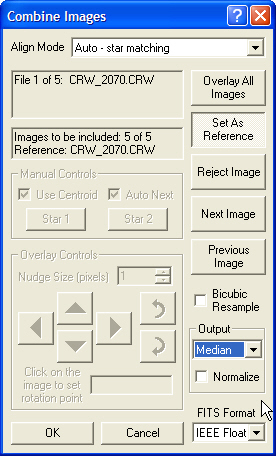
What's important here is that the align mode is Auto – Star Matching, the output is Median (because we have 5 images), and the FITS format is IEEE Float (we want to work with high-precision floating-point numbers); and everything special is unchecked.
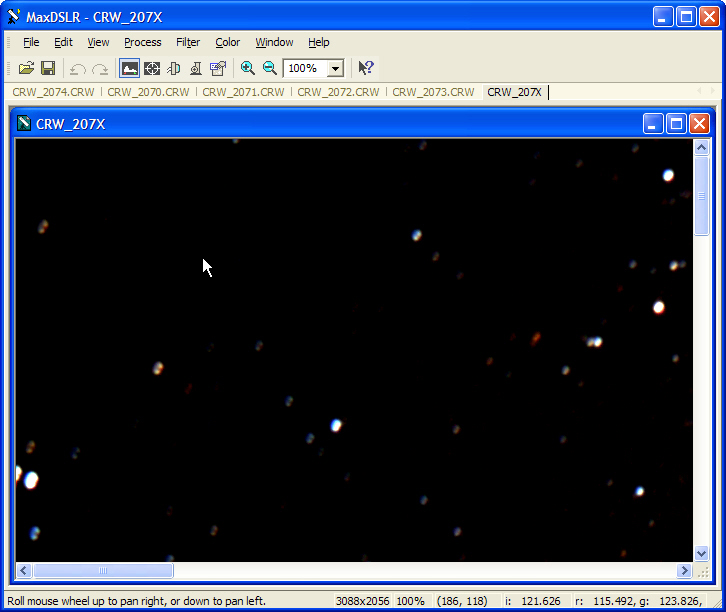
If your images were poorly matched, it might be necessary to tell MaxDSLR manually which stars correspond. But I'm lucky; clicking "OK" is enough, and then MaxDSLR thinks for about half a minute, and I get a new, combined image with a name ending in X:
Alternative: Combining from files
If you're combining more than 3 or 4 DSLR images, I strongly recommend combining from files rather than combining files that are open on the screen. That will keep you from running out of memory. Here's how it's done:
- (1) With all your color images open, choose File, Save All. They will save as FITS, not CR2 or NEF format.
- (2) Go to File, Close All. You don't have to keep the images open any more.
- (3) Go to File, Combine Files and choose the files to be combined.
- (4) Fill out the Combine Files menu, just as with the previous method.
The files will be combined and the result will appear on your screen. You can also use this method to combine JPEG or TIFF files. Don't use it on camera raw files, even though it's willing to do the combination.
Results so far
Let's end the suspense. So far I've only been showing you the upper left corner. Zoom out, and here's what you see:
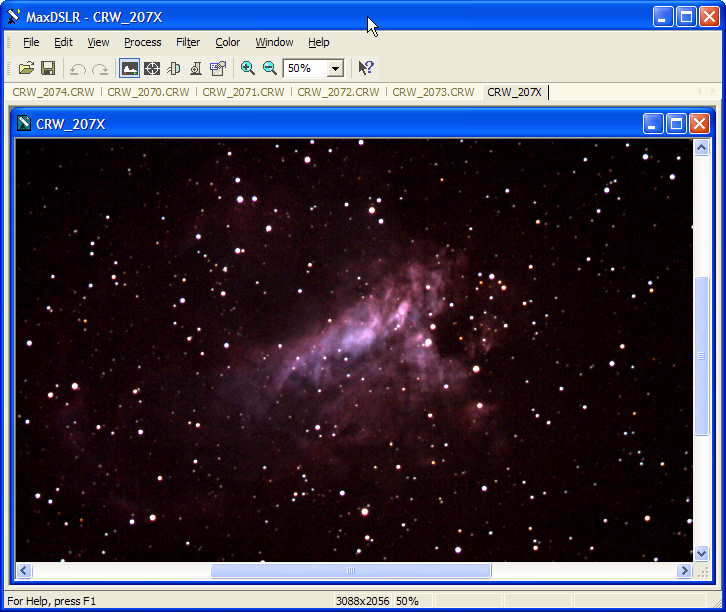
It's M17. But an image of a fainter nebula might be very dark or even invisible at this stage. Don't give up if your image doesn't look like much.
You can save the image to a file at this point. I recommend saving to a FITS file, which preserves the data that MaxDSLR is working with, unaltered.
Stretching and gamma correction (lightening the midtones)
Our goal is an image that will be easy to process with Photoshop or similar programs. At this point we still have two problems:
- The midtones are too dark relative to the rest of the image; that is, the image needs gamma correction. For more about why this is so, click here.
- The pixel values extend from 0 to maybe 8000 (initially 4096, but they may have been boosted in RGB conversion). We want them to go all the way up to 65,536 so we can use the full range of a 16-bit TIFF file.
Performing a gamma stretch
The gamma stretch operation in MaxDSLR takes care of both of these problems at once. The gamma numbers used by MaxDSLR are the reciprocal of the ones usually used in the graphics industry, so instead of 1.8 we are aiming for 0.6. Choose Process, Stretch, and make all the choices shown here:
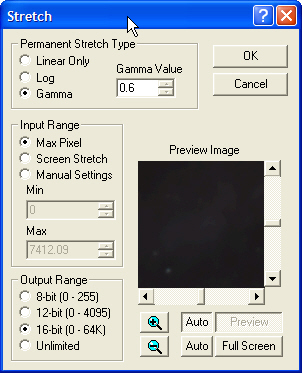
Click OK, and then, if you don't see much, go to the Screen Stretch window and set the stretch to "Low" rather than "Manual." It may not look like you've done much, but here's distinctly more of M17:
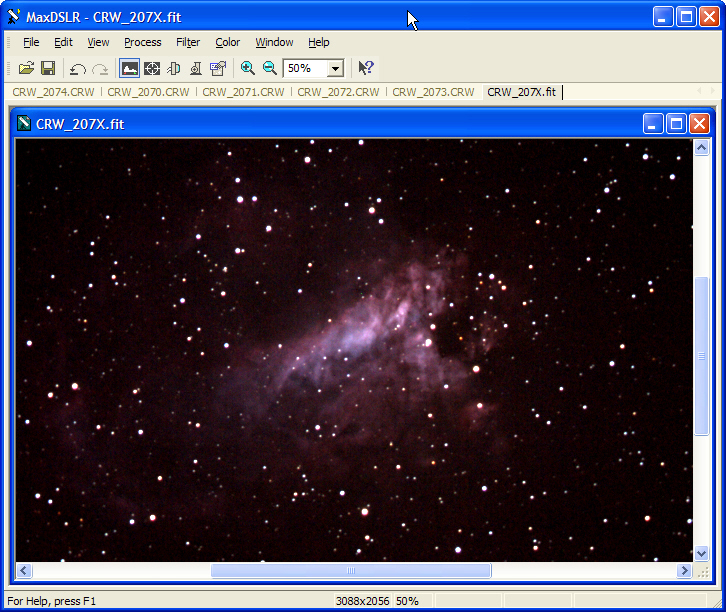
For this particular picture, that didn't seem make a big difference, mostly because automatic screen stretch compensated for it.
Stretching further
An image of a faint deep-sky object may need considerably more stretching. You have several options. One of the simplest is to adjust the screen stretch until the image looks right, and then go to Process, Stretch and, for Input Range, check Screen Stretch instead of Max Pixel, like this:
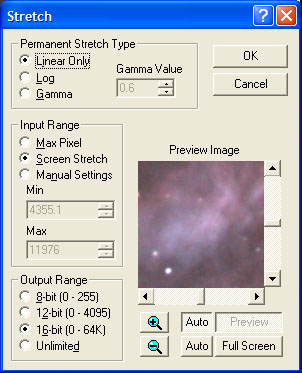
Depending on the desired effect, the shape of the stretch, selected at the top, might be either Gamma or Linear. Now a lot more of the nebula comes into view:
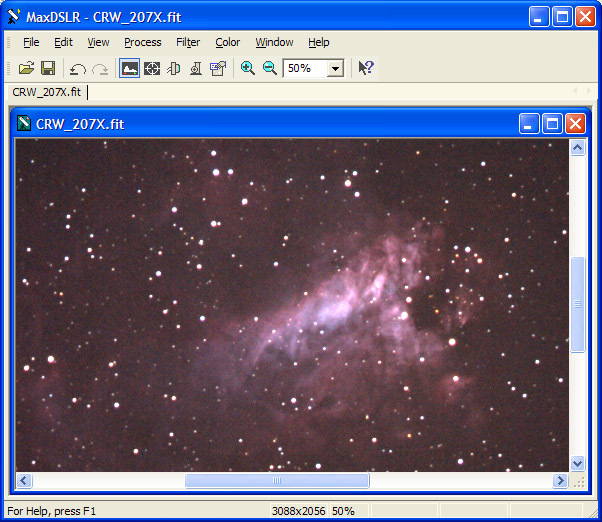
This is close to a finished image.
Alternative: Curves
Another way to stretch in a controlled way is to use Process, Curves and raise the portions of the curve that need to be brighter. Here is a shape that often works well with nebulae:
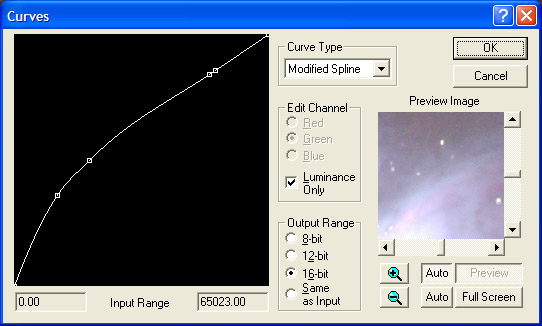
By unchecking "Luminance only," you can edit the red, green, and blue curves separately. For instance, if you have blue sky fog, you can make the blue curve sag while raising red and green.
Alternative: Levels
Beginning with versions 4.07/4.57, MaxDSLR and MaxIm DL introduce a "Levels" slider very much like the one in Photoshop. To get it, go to Process, Levels:
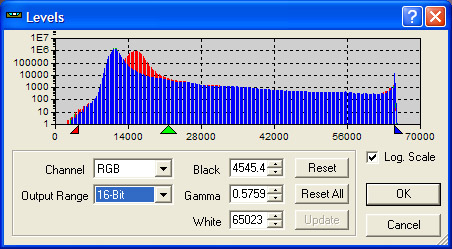
Often, you will want to move the middle slider appreciably to the left and the leftmost slider slightly to the right. I suggest doing this in several steps, each time making less of a change than you actually think necessary; that gives you more control of the resulting curve shape.
For consistency with what we've been doing, remember to set the output to 16-bit rather than 12-bit.
Digital development
An alternative to gamma correction followed by further stretching is digital development (under the Filter menu). This is a combination of sharpening (unsharp masking) with a strong gamma correction.
I have not yet mastered digital development; in my hands it tends to bring out grain. Nonetheless, there are those who find it very useful. Here is what digital development does to the image of M17:
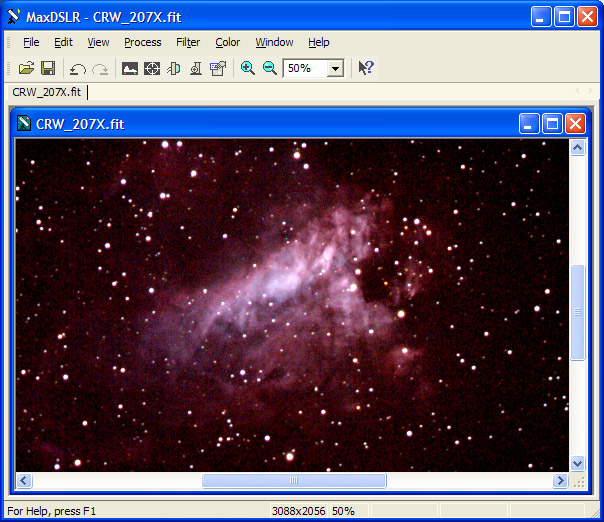
Digital development was invented by Kunihiko Okano, and you can read about it here. It is a rather quick algorithm to do what would otherwise be a multi-step process.
Saving the result
I normally do final processing with Photoshop, and then reduce grain with Neat Image, so my goal at this point is to save the picture onto a file that Photoshop can process.
Accordingly, my last step is to go to File, Save and make these choices:
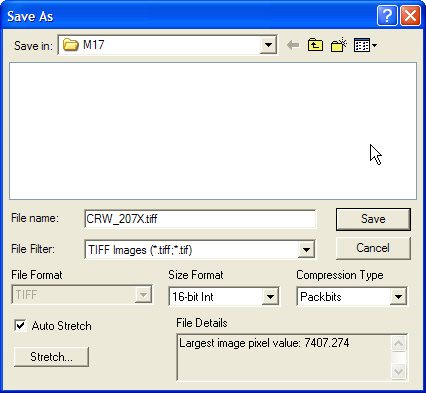
Note carefully: 16-bit integer TIFF, Packbits, and Auto Stretch.
Note also that Auto Stretch will only reduce, not increase the pixel value range. That's why we had to stretch it to 16 bits (0-65535) explicitly earlier.
If you use Photoshop Elements, you'll want to save as an 8-bit TIFF. Auto Stretch will map the pixel values onto the 8-bit range 0 to 255.
When you exit MaxDSLR, tell it not to save any changes to your Canon or Nikon raw files, of course.
When I get the image to Photoshop, I do further level adjustment, unsharp masking, and cropping, and then I convert it to an 8-bit image and save as JPEG, or as a properly compressed TIFF (with LZW compression, which MaxDSLR does not support). Here's the finished product from this one:
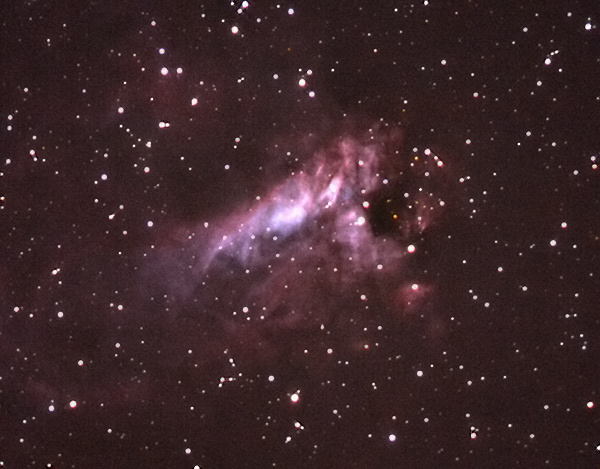
Enjoy! This was taken through an 8-inch Schmidt-Cassegrain with an f/6.3 compressor. The exposures were 3 minutes each on a Digital Rebel (300D) at ISO 400.
Copyright 2006 Michael A. Covington. Caching in search engines is explicitly permitted. Please link to this page rather than reproducing copies of it. This page is not in any way connected with or endorsed by any photographic or software manufacturer. Many of the product names that appear on this page are registered trademarks of their respective owners.