How to Digitize Your Records and Tapes
To Make Audio CDs and MP3 Files (using GoldWave)
This document describes the procedures in use at Covington Innovations
at the time it was written (2005).
Almost all of it will be useful to people elsewhere, which is why we've
placed it on the Web. Please note that some of the directions here pertain
specifically to our own equipment.
This page describes the use of GoldWave software,
which is shareware with a generous free trial.
If you prefer to use Adobe Audition,
please read this page for general concepts and background,
then click
here for
software-specific details.
Important updates:
- The following material describes an older version of GoldWave. In GoldWave 5, the user interface
is slightly different and involves right-clicking to get a context menu on the wave you are
editing.
- GoldWave no longer has an unlimited-length free trial. We strongly recommend registering it
(for $49).
- In Windows Vista, to select the input source, you will need to use Control Panel, Sound, since
the mixer control is not as versatile as in earlier versions.
Another good web site on this subject is the one by
Allen Reny, mostly written in 2001.
He used Cool Edit, which later became Adobe Audition,
and highly recommends the Clickfix plug-in.
Contents:
Background
Audio formats
Legal issues
Cell phones off!
Cabling the equipment together
Sound card connections
Grounding precautions
Wiring the computer to a stereo system as a tape deck
Nikko amplifier controls
Sherwood amplifier controls
Connecting the turntable directly to the computer
Controlling the Sound Card
Volume Control for Playback
Volume Control for Recording
Playing Records
Playing Tapes
Recording and Editing with GoldWave
Meet GoldWave...
Setting GoldWave Options
Capturing Audio
Can't get the levels low enough?
Removing Pops
Removing Noise
Dividing The Recording Into Tracks (Songs)
Burning CDs
Audio CD from WAV Files
Data CDs of MP3 Files
Technical Points
Signal Levels
What is a Spectrum?
Background
This document describes current procedures at Covington Innovations.
Information specific to our setup is in Arial type, like this.
Audio formats
WAV is a lossless file format and is the way we normally capture audio files.
A CD-quality stereo file occupies 1 megabyte per 5.8 seconds of audio.
The largest possible WAV file, 2 gigabytes, will hold slightly more than 3 hours of audio.
MP3 is a lossy compressed format used to store music concisely.
Files should be edited before conversion to MP3, because the exact nature of pops
and background noise is lost by MP3 encoding and they are no longer easy to pick out.
WMA (Windows Media Audio) is similar to MP3 but includes a copy protection and
licensing scheme. Merely possessing the file does not necessarily give you the
ability to play it. WMA files are generated by Microsoft products and not much else.
MIDI is essentially a musical score on the computer, ready to be performed (rendered)
by synthetic instruments. MIDIs are made from sheet music or by capturing the keystrokes
of a piano player (or the like), not from recorded sound.
Audio CDs are lossless, like WAV files, but are in a different format than data CDs.
An audio CD is not divided into files in the normal way and cannot have subdirectories.
Also, when reading it, errors are simply ignored, rather than being reported to the
operating system as disk errors; that's what makes audio CDs so tolerant of scratches.
Modern computers can open an audio CD as data and retrieve the tracks as if
they were files with the extension .CDA.
Some newer CD players will play a data CD (or even a data DVD) of MP3 files.
Legal issues
There is a lot of nonsense being bandied about on the Internet about copyright laws,
particularly by people who apparently want to create a smokescreen of confusion
for their own activities.
Bear in mind that the real issue is mass distribution
and loss of markets, and that the recording industry has always been more
generous with copyrights than the software industry.
It is legal to make copies of your own records and tapes for your own use.
It is not legal to sell them or post them on your web site for millions of
your friends to download.
It is not legal to keep copies of your records and CDs if you sell the originals.
That is piracy, albeit on a small scale.
Copyright owners routinely permit some things that they could forbid if they wanted to.
One is posting short snippets of songs on a web site.
Online music vendors do this routinely.
The samples are so short that they do not compete with the market for the whole songs.
[Note: I have since learned that ASCAP has a licensing scheme for music vendors
who want to post short snippets. They don't get to do this free of charge.
And obviously, using a short snippet of a song as part of a new creative work,
such as a TV commercial or a web page, would incur the need to pay royalties.
So be cautious.]
You are also not likely to be challenged if you make copies of old material
that is no longer in print, so long as you don't sell the copies or distribute
them indiscriminately. The recording industry has a long tradition of tolerating and
even encouraging this kind of activity because it tends to preserve and
even create markets.
Some people justify music piracy on the ground that
the record companies are underpaying the musicians.
However, stealing from the record company doesn't help the situation
(unless you're going to give your ill-gotten gains to the musicians –
and nobody ever does this).
Cell phones off!
Even when not in use, a cell phone transmits an ID signal periodically to the nearest tower.
This can be picked up by audio equipment, where it is an unusual rumbling
sound with a galloping rhythm.
Turn cell phones off when you are making recordings.
Cabling the equipment together
Sound card connections
Sound cards always use 1/8-inch (3.5-mm) stereo phone plugs:
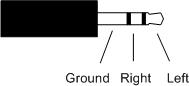
The plugs on other stereo equipment are usually RCA phono plugs, color coded
white or black for left and red for right.
The connections that interest you are Line In and Headphone Out.
On older sound cards, there is a third Microphone jack.
Newer sound cards are likely to use a single jack for Line In and Microphone,
selecting its function in software.
Newer sound cards also have multiple speaker jacks for surround sound.
Tell the sound card in software that it is driving headphones.
The usual color code on sound cards is:
Red or pink - Microphone
Light blue - Line In
Green - Headphones or speakers
Black - More speakers (e.g., surround sound)
Aftermarket sound cards (e.g., Sound Blaster) are often strikingly better than those
built into the motherboard. The biggest difference is the background noise level.
Grounding precautions
If at all possible, the entire system (computer and stereo equipment) should be plugged into
the same power strip or at least the same electrical outlet.
Hum can result if there is a ground loop, i.e., AC current flowing
through the ground wire of the power line.
For more about ground loops, see
Tomi Engdahl's web site.
Wiring the computer to a stereo system as a tape deck
The most versatile way to connect a computer to a stereo is to pretend it's a tape deck:
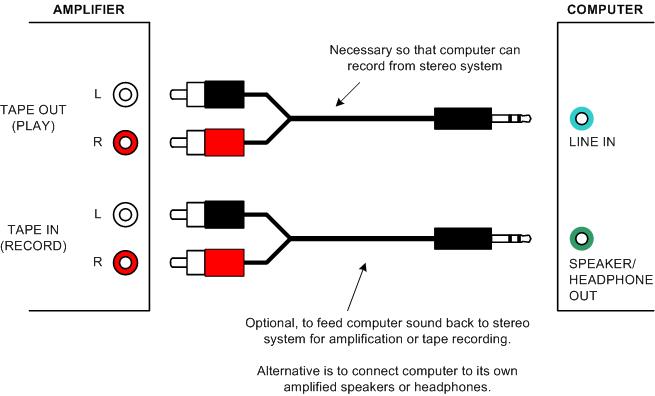
Cables of the kind shown here (3.5-mm stereo plug to 2 RCA plugs) are usually 3 or 6 feet long.
A 12-foot version is made by QVS and
is available locally in Atlanta from Micro Center.
For extremists, a 50-foot version is made by General Electric and also available from Micro Center,
but it is advertised as a cable for the computer's output and I don't know if it's adequately shielded
for use on an input.
Not only can the computer record any audio program from the stereo, but the stereo
works as a very fine set of amplified speakers for the computer.
(Listen to the computer the way you listen to a tape; this may require
pressing a Tape Monitor button.)
If there is also a real tape deck, the stereo can even record the computer's output.
The "tape out" signal level of some amplifiers may be greater than the line level
signal expected by the sound card. Attenuators can be used if this is a problem.
More commonly, though, the situation is the opposite, and you have to turn the input level almost
all the way up.
Nikko amplifier controls
Our Nikko amplifier supports two tape decks and has complicated controls
typical of an early 1970s amplifier.
The cassette deck is Tape 1 and the computer is Tape 2.
Tape 2 uses 1/4-inch phone plugs on the front of the amplifier, and there is
an attenuator built into the Tape 2 output cable.
There are 2 main switches:
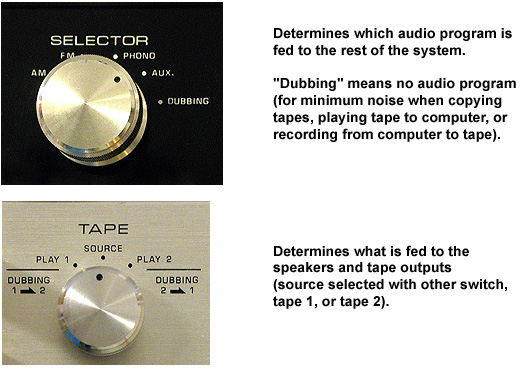
To record from tape to computer, set TAPE to PLAY 1 and SELECTOR to DUBBING.
To record from computer to tape, set TAPE to PLAY 2 and SELECTOR to DUBBING.
Otherwise, set TAPE to SOURCE and SELECTOR to the desired input; the computer
and cassette deck can record the selected program.
Sherwood amplifier controls
Our Sherwood amplifier is typical of modern electronically-switched amplifiers.
The selected program source is also fed to both recording devices (the tape deck
and the computer), except that no source is fed back to itself (e.g., when you're
listening to the tape, the tape audio is not fed back to the tape deck).
The inputs and their usage are:
TAPE - The tape deck
CD - The CD deck
VCR - The computer (wired as a tape deck)
TV/AUX - The turntable (with built-in preamp)
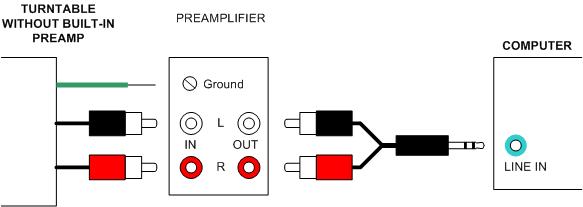
Connecting the turntable directly to the computer
If you don't have a stereo system,
or if your computer is your stereo system,
or if you just want maximum quality, you can connect the turntable
directly to the computer. How this is done depends on whether the turntable has a built-in
preamplifier so that it delivers line-level signals; if it doesn't, you'll need to buy
a separate preamplifier such as
this one.
If there is no screw on the preamp to which to attach the ground wire,
click here.
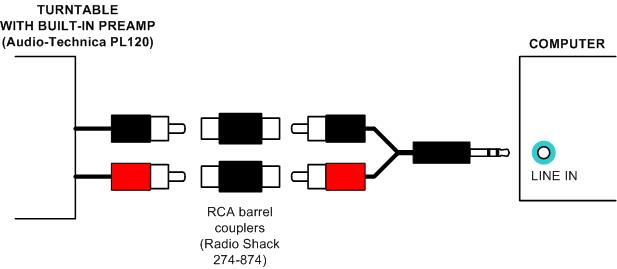
With this setup, if the turntable has a ground wire, it can go to the chassis of the computer.
Controlling the Sound Card
The following instructions tell you how to control the sound card using Windows Volume Control,
which is under Programs, Accessories, Entertainment.
Sound cards usually come with a "Mixer" program that does exactly the same thing.
At Covington Innovations, we usually use Creative Mixer. It works very
much like Windows Volume Control except that, in playback mode, it also shows the one
selected recording device. An icon for it is always at the lower right-hand corner of the screen.
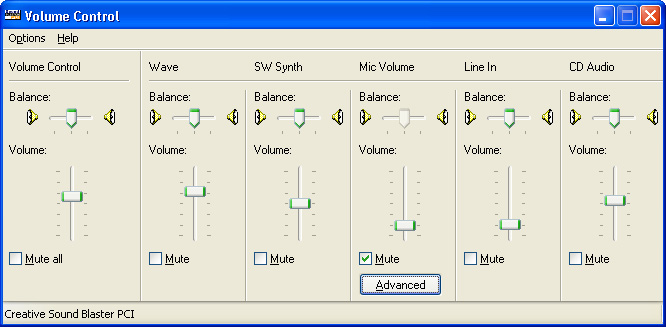
Volume Control for Playback
Windows Volume Control does two things. Normally, it is the playback volume control
and determines:
(1) the overall volume in the computer's speakers or headphones;
(2) the relative volume of each signal source in the computer's speakers or headphones;
(3) which signal sources are not sent to the speakers or headphones at all ("muted").
It looks like this:
Hint: If your turntable is connected to Line In on the sound card,
and you're sending the audio from Line In to the speaker,
then your computer is a record player, whether or not you're running any audio software.
Who needs a stereo?
Normally, you should mute the microphone when you're not actually using it.
Apart from that, most people leave all the other sources un-muted.
However, some have found that they get better recordings if they
mute everything,
or everything except the source from which they are recording,
while a recording is being made.
Volume Control for Recording
If you choose Options, Properties you'll get this very useful window:
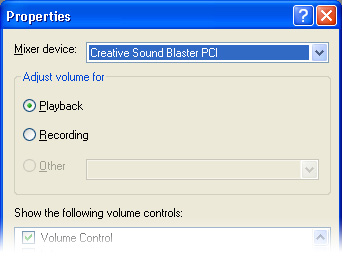
You can choose which sound card you're controlling (important if you have more than one!)
and whether you're viewing the playback or recording volume control.
The recording volume control looks like this:
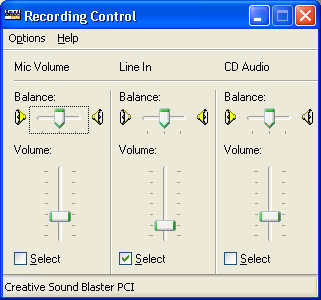
Note that you only get to select one source for recording.
Hint: To go directly to the recording volume control, create a shortcut
whose destination is: sndvol32 /r
Playing Records
Old records are often dirty even if they were stored clean. Apparently, the vinyl plastic
sheds a small amount of matter from the surface over the years.
Records often benefit from being washed with dishwashing detergent and then rinsed with
plain water and air-dried.
Before playing, if a record has visible dust on it, use the
carbon fiber brush.
Then, use of the
Discwasher
or
Audio-Technica cleaning kit
is highly recommended.
It reduces static pops and crackles.
Also make sure the stylus is clean. If in doubt, remove the headshell and look at the stylus
with a magnifier or even the microscope (40x). Clean it with a brush or stylus cleaner
(velvet pad on a stick). Sometimes it will need cleaning with the corner of a piece of
tissue paper dipped in isopropyl alcohol.
Our Audio-Technica turntable tracks at 3.5 grams and will not normally need additional weight to track
worn records. Other turntables may require additional weight with some records.
Placing a penny on top of the headshell adds 2.5 grams.
Very crackly records sometimes benefit from being lightly misted with water while playing.
This practice ("wet playing") is controversial; it may increase wear on the record,
but sometimes it is the only way to get reasonably clean playback.
78 rpm records require a special stylus. Oddly, they do not require a turntable that plays
at 78 rpm because they can be speeded up digitally (just play at 45 rpm and speed up × 1.733.
The true speed of old, acoustic records is likely to be 80 rpm.
Our 78 rpm stylus fits the gold-colored Pickering cartridge that is on
the second headshell. This cartridge also takes other Pickering styli, so make sure the 78 stylus
is actually in it.
No matter how you play records, there are audiophiles who will tell you you're doing it
the wrong way. Remember that your goal is not to eliminate wear due to the playing process, but
rather to get good sound (especially, noise- and artifact-free sound) for transcription.
Playing Tapes
When playing old cassette tapes, the main trick is to get the right Dolby setting (usually B).
Old, degraded tapes may sound better with Dolby off even if originally recorded with Dolby B.
The tape heads and tape path need cleaning periodically using Q-tips and isopropyl alcohol
(preferably water-free), especially after playing degraded tapes.
Recording and Editing with GoldWave
You can test your equipment using Windows Sound Recorder, but it will not make long recordings,
nor does it offer much ability to edit them.
Accordingly, I'll describe how to do audio work with GoldWave, which you
can download here and use
on an unlimited free-trial basis.
The free-trial version limits you to relatively short editing sessions, quite adequate
for what we're doing since you can simply close GoldWave and open it up again when you
bump into the limit.
For professional-quality work,
you may want to use Adobe Audition,
especially if you can get it at the discount price for
teachers and students. You can download a 30-day free trial version.
The user interface is very similar to GoldWave.
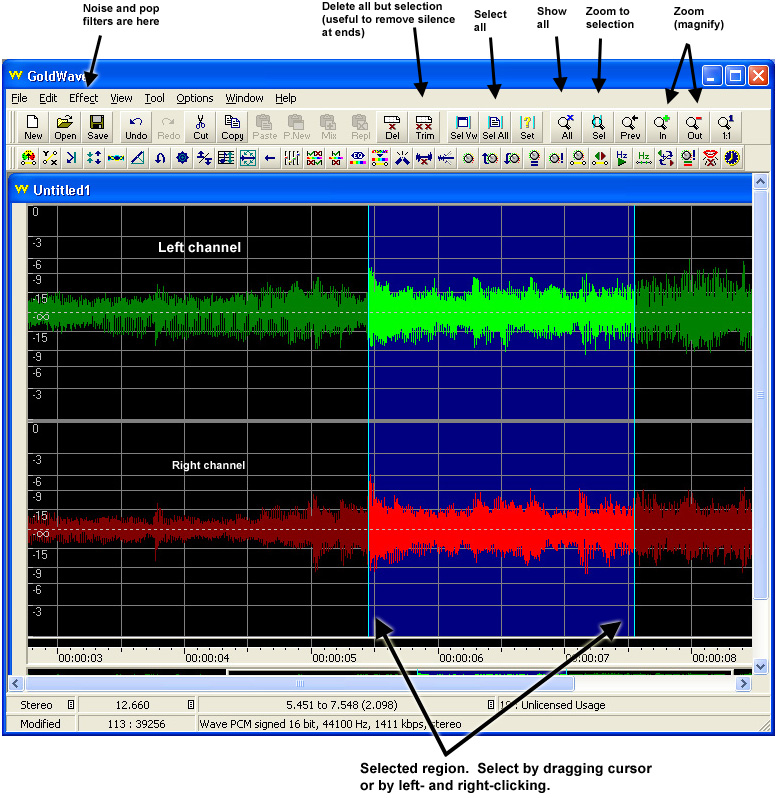
Meet GoldWave...
GoldWave is an editor for audio signals; it works a lot like an editor for drawings or text.
Here's what is looks like in use:
There is also a second window, the Control, which looks like this:
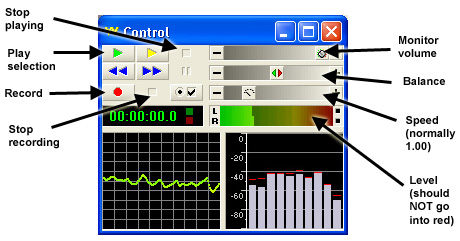
If you can't see the Control window, go to Tools, Control in the main window.
Setting GoldWave Options
To get exactly the results described here, I recommend that when you first run GoldWave,
you go into Options, Control Properties, and make the following settings:
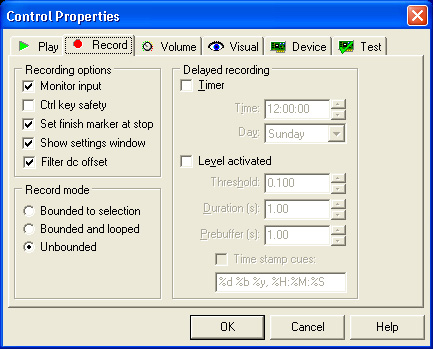
Monitor Input means you'll see the input signal levels even when not recording.
Unbounded means that if you haven't allocated a big enough file, GoldWave will
try to extend it and keep recording anyhow.
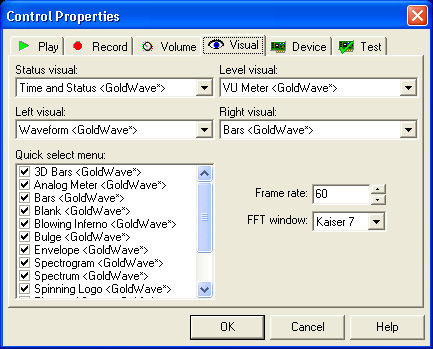
This controls what you display in the Control window.
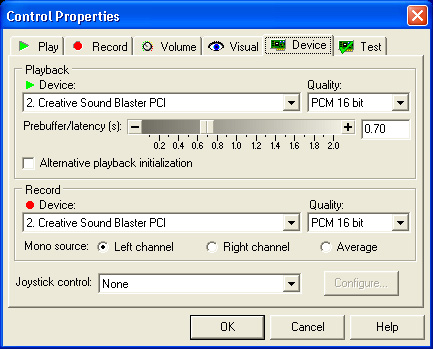
This controls which sound card you're recording from (crucial!).
Capturing Audio
To make your first recording:
(0) Turn off all cell phones within 30 feet.
(1) Allocate memory. (Don't worry, you can trim off
the unused part of the file later.) Go to File, New and specify something like the following
(1 hour of CD-quality stereo sound):
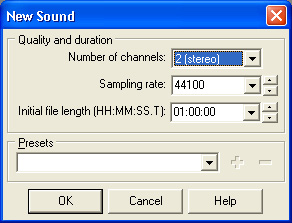
Don't mistake minutes for hours. It's an easy mistake to make.
Allocating memory can take time on a slow computer. Don't panic if this step
takes as much as a minute.
You will be recording into the selected (blue) part of the file, so if it's not already
selected, hit Edit, Select All.
(2) Connect your audio source to Line In on the sound card,
and make sure Line In is selected as the
recording device (in Windows Volume Control, recording mode).
(3) Set the levels. Play the loudest part of the music and make sure the Control
window shows the audio peaking in the yellow or high green, not red.
Adjust the recording level in Windows Volume Control (recording mode).
If you have tape recording experience, note that digital is a different world!
Tape is very forgiving of momentary overloads; in fact, to some extent you can take
the pops out of a worn record by copying it to tape.
Not with digital! Overloads result in severe distortion.
Don't let THIS happen:
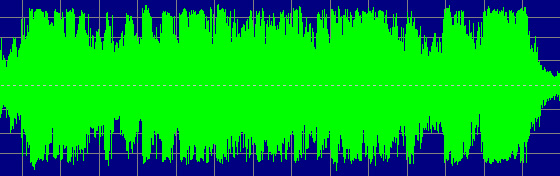
It will sound awful. It's best to work at 1/4 to 1/2 the maximum waveform height;
that's only 3 to 6 dB below maximum volume. Not only does this eliminate clipping,
it also makes pops stand out so the filter can eliminate them.
However, sometimes clipping has already occurred in the recording process.
It's not necessarily your fault!
| Can't get the levels low enough?
It may be because your soundcard driver isn't giving you the full range of the level control.
We have experienced this problem with a Creative Labs Sound Blaster 16 PCI that had a Microsoft
driver (which came in with Windows XP) instead of the manufacturer's driver.
A quick trip to www.creative.com fixed it.
Or it may be that your signal source is producing a rather high "line level."
We have measured 3 volts peak-to-peak (1 volt rms) from a supposedly 500-mV line.
Note that this is only 3 dB higher than specified and is nothing to get alarmed about.
If you need to reduce the signal in the cable, insert an attenuator
such as this one.
Can't get the levels high enough?
It is common to have to turn the input level all the way up with some "line-level" signal
sources and some sound cards.
Most properly functioning sound cards will accommodate professional-level signals of 1.2 V rms.
Consumer gear is more likely to output 0.3 V rms or less, which is 12 dB lower.
That is not a catastropic loss since it costs you only 2 bits of digital resolution,
and in return, you get more protection against clipping.
[Note added 2009:] Newer sound cards use the same input jack for "line" and "mic" and their
"mic" level may actually be comparable to consumer audio line level. You can use it
if you are recording monophonic material. The "mic" input of a soundcard is
usually not stereophonic. But it is also not "microphone level" — it is designed
for computer microphones that have their own internal amplification.
Can't get the levels anywhere near high enough?
On our Sound Blaster Live! 24, I've noticed a strange phenomenon: sometimes
the Line In level is about 50 dB too low. But if you select some other sources,
such as Microphone (which is the same jack and will therefore sound awful),
then go back to Line In, the levels will be normal again.
|
(4) Record. The whole file must be selected (blue) (Edit, Select All).
Click the red Record button. Click the pink button next to it to stop recording.
Caution: Unless you have a very fast CPU, do not run other software
while recording. You may have to disable your screen saver.
The waveform is NOT displayed while recording. It will appear as soon as you stop.
(5) Play some of it back to make sure you recorded successfully.
The green button in Control will normally start playing at the cursor position.
There is also a yellow button for an alternative type of playing;
you can configure both of them in Options, Control Properties.
(6) Save the file. Name it "so-and-so.wav". It will be big.
You can also save as MP3 (much smaller), but remember that it's hard to do any further
noise removal on an MP3.
At Covington Innovations, common practice is to record on Artemis
(thus not tying up a fast computer) but save into \\Minerva\incoming and process on Minerva,
which is much faster.
Removing Pops
You can remove loud pops from the whole recording by choosing Edit, Select All
and then Effects, Filters, Pop/Click.
However, this may distort the sound of instruments whose waveform begins with a sudden rise,
such as cymbals and trombones.
If there are not many pops, it is better to find them, select small regions, and apply
the filter only there.
Removing Noise
You can remove constant background noise (hiss, rumble, etc.) by taking a sample of it
(a "noiseprint") and then subtracting the spectrum of that sample from the whole recording.
This filter makes the music clearer – that is, it's easier to hear every instrument
distinctly – but may cost you some musical timbre; all the instruments become more
bell-like (their spectra are slightly simplified). Loud noises become musical in nature.
Listen to the samples
here
(scroll down to "Blue Steel Blues") and note that in the cleaned-up recording, some of the
noise survives as a tinkling that seems to come from the guitar strings, as if something
were brushing against them.
Here's the procedure:
(1) Take a noise sample. Select a few seconds of the sound between songs, containing the
usual rumble and hiss but no pops or other unusual noises. Choose Edit, Copy to copy it
to the clipboard.
(2) Select the part of the recording you want to clean up (possibly the whole thing).
(3) Apply the filter. Choose Effects, Filters, Noise Reduction and make sure
Use Clipboard is checked:
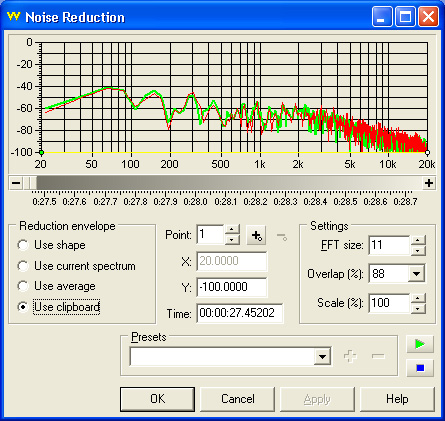
You may want to set Scale to less than 100% to remove only part of the noise and reduce the
risk of distortion.
Dividing The Recording Into Tracks (Songs)
After applying filters, you may want to save the whole file again under a different name,
in case it needs further work. These files are bulky, but they can be archived on DVDs.
You should also maximize the volume of the whole file before chopping it up.
Choose Effects, Volume, Maximize.
If some songs are much softer than others, you may want to select them one
at a time and maximize them individually.
Now it's time to divide the file up into songs.
One way to do that is to select each song, play it to make sure it's right,
and then use File, Save Selection As.
A quicker way is to insert cue points into the music and have GoldWave split the file at
the cue points. You can insert cue points:
- By pressing Ctrl-Q during recording or playback. (Do it by ear!)
- By setting the start marker (beginning of selection, left click) and choosing
Tools, Cue Points, Start Marker. This inserts one cue point.
- Automatically, using Tools, Cue Points, Mark Silence. You will probably get too many
cue points, so check carefully and delete some.
Cue points appear at the bottom of the waveform window.
You can move them left or right with the mouse, or right-click on a cue point and choose Delete.
Then use Tools, Cue Points, Split File to chop up the file.
Hint: Make file names that alphabetize in the right order, such as:
A01 Happy Birthday
A02 Greensleeves
A03 Row, Row, Row Your Boat
(where A01 means "side A, track 1 on the original").
Burning CDs
This section will describe the CD-burning capabilities built into Windows XP.
Every CD burner comes with software to create CDs, and its functionality is very similar.
If using such software, be sure to choose Disc-at-once and Finalize (not Multisession)
when making an audio CD.
Audio CD from WAV and MP3 Files
Open Windows Media Player (under Programs, Accessories, Entertainment).
Choose File, CDs and Devices, Burn Audio CD.
Instructions appear on the screen and are further explained in Media Player's help system.
Basically, you will create a playlist of WAV and/or MP3 files, then put it on a CD.
You can also include tracks copied from audio CDs (CDA files). In this manner you can use
Media Player to extract and rearrange music that you already have on CDs.
The maximum length of a CD is about 70 minutes of music.
Retrieving ("ripping") audio files from audio CDs:
You can also use Windows Media Player to "rip" audio CDs, i.e., extract the music as WMA (lossless) or MP3 files.
Some CDs have digital rights management that restricts your ability to do this.
GoldWave also comes with a CD-reading tool.
Data CDs of MP3 Files
Many newer CD players will play a data CD containing nothing but MP3 files.
Technical Points
Signal Levels
Sound is vibration of the air.
Audio signals are alternating-current voltages in which the voltage mimics the vibration of the air.
The amplitude (size, voltage) of any audio signal is very variable. The dynamic range of a good
audio recording is at least 100 to 1. Thus, if a signal is specified as 300 millivolts and you measure
500 mV or 100 mV, don't panic. That's barely enough difference to notice.
Audio signals differ not only in voltage, but also in the impedance (resistance) that they
are able to drive. This is rather like the difference between a tiny 1.5-volt camera battery and
a big 1.5-volt D cell. Both are 1.5 volts, but only the second one will drive the low-impedance
bulb of a big flashlight. Impedance is measured in ohms.
Line-level audio is typically 300 mV, able to drive an impedance of 10,000 ohms (10 kΩ) or more.
The semi-official definition of line level is:
Full scale (0 dB on the VU meter) =
+1.8 dBV = +4 dBu = 1.23 V rms = 1.74 V peak = 3.5 V peak-to-peak
for professional equipment;
-10 dBV = -7.8 dBu = 0.32 V rms = 0.45 V peak = 0.9 V peak-to-peak
for consumer equipment.
The actual rated output of consumer gear is often even lower, typically 0.2 V rms.
The impedance (number of ohms) varies.
It's OK to connect a lower impedance output to a higher impedance input;
in fact, that's how it's normally done.
Normally, Sound Blaster products accommodate 3.5 V rms at their inputs,
and if a Sound Blaster will be
connected to a consumer-level output, the input level
will need to be turned all the way up, more than 10 dB above mid-scale.
|
Headphone-level audio is about the same level as line-level, or somewhat less,
but able to drive 32-ohm headphones.
You can connect a headphone-level output to a line-level input.
To be specific, the highest level that can be fed to Sony MDR-301 headphones without
damaging them is 100 mW = +20 dBmW into 32 ohms = 1.8 V rms.
A more realistic maximum signal level is 1 mW = 0 dBmW = 0.17 V rms,
very comparable to line-level audio.
Speaker-level audio (for going directly to a real speaker, not an amplified one)
is a voltage anywhere
from approximately line level up to about 20 volts and is able to drive a 4-ohm speaker.
That's what comes
out of a power amplifier. Speaker-level outputs from small devices (compact shortwave radios, etc.) can
be connected to line-level inputs.
(The input to an amplified computer speaker is line-level.)
Microphone-level audio is about 2 mV into an impedance of 50,000 ohms.
This is the tiny signal that comes out of a tape recorder microphone
or PA microphone. Computer microphones are different – they have a tiny amplifier built in,
powered from the computer. Sound card microphone inputs usually will not work with an unamplified microphone.
Phono-level audio is comparable to microphone-level but also needs RIAA equalization,
basically a treble cut and bass boost, to compensate for the characteristics of the recording process.
Decibels (dB) are a logarithmic way of measuring power, fully explained
here.
By "logarithmic" I mean that when you add or subtract decibels,
you multiply or divide power. A 6-dB change is equal to doubling the
voltage or quadrupling the power.
(Recall that power is proportional to the square of voltage.)
Loudness of sound in air is described in dB relative to the threshold of human hearing
(arbitrarily taken to be 1 picowatt of sound energy per square meter).
Signal levels in electronic equipment
are described in dB relative to an arbitrary level (such as the maximum
recording level of a tape deck) or relative to a particular power or voltage.
The main choices are:
dBm (more properly, dBmW) = decibels relative to one milliwatt
dBV = decibels relative to 1 volt RMS (that is, 0 dBV = 1.000 V RMS)
Note that the first of these is a power unit and the second is a voltage unit.
You can't interconvert power and voltage unless you know the load impedance.
But you can pretend. Thus audio engineers came up with:
dBu = decibels "unterminated" = voltage levels expressed as dBmW pretending that
the impedance is 600 ohms, whether or not it really is. 1 dBu = 0.775 V RMS.
RMS is the normal way of measuring AC voltage. The term stands for "root-mean-square."
Clearly, the voltage of AC needs to be some kind of average, since the instantaneous voltage
is constantly varying. RMS is the right kind of average to use if you want to match power
(for example, a light bulb burns with equal brightness on 120 V DC or 120 V RMS).
With a sine wave, RMS voltage is 0.707 of the peak voltage.
|
What is a Spectrum?
Any complex waveform can be constructed by adding together a number of sine waves (sine curves).
The mathematics underlying this is called a Fourier transform.
A graph of the possible frequencies of these component waves, and the amount of each, is called a
spectrum. Spectrum displays are sometimes useful for identifying noise pops or other unusual
phenomena in audio files. Spectrograms are the usual way of displaying speech sounds for
phonetic analysis; some linguists can almost read speech from a spectrogram.
Copyright 2005, 2006 Michael A. Covington. Caching in search engines is explicitly permitted.
Please link to this page rather than reproducing copies of it.
This page is not in any way connected with or endorsed by any
manufacturer or vendor. Many of the product names that appear
on this and related pages are registered trademarks of their respective owners.