


Between the First and Second Editions
to deliver major updates after the first edition of the book (2007) but before the second edition.
For newer information see the second edition and its update page.
The second decade of DSLR astrophotography
My personal approach
A point of strategy
Mirrorless ILCs too
More sources of advanced DSLR information
The most important tips that aren't in my 2007 book
Image acquisition
What are lights, darks, flats, flat darks, and bias frames?
Exposure times and ISO settings
How DSLR spectral response compares with film
This is the decade of the equatorial mount
Guiding and autoguiding tips
Effect of polar alignment on tracking rate
The trick to using a polar alignment scope correctly
How a lens imperfection can look like a guiding problem
Celestron All-Star Polar Alignment: how to do it right
The truth about drift-method polar alignment
EdgeHD focal plane position demystified
Using an old-style focal reducer with an EdgeHD telescope
Vibration-free "silent shooting"
Lunar and planetary video astronomy with Canon DSLRs
Image processing
Superpixel mode — a skeptical note
How I use DeepSkyStacker
Taking a DeepSkyStacker Autosave.tif file into PixInsight
Calibrating and stacking DSLR images with PixInsight
Modified PixInsight BatchPreprocessing script for using flat darks
Noise reduction tips for PixInsight
Manually color-balancing a picture in PixInsight or Photoshop
Using deconvolution to correct minor tracking problems
A note on flat-fielding in MaxIm DL
Should we do dark-frame subtraction in the camera?
The arithmetic of image calibration
EXIFLOG gets updated
Newer Canon DSLRs
Do Canon DSLRs have bias? Yes...
A look at some Canon 40D dark frames
An easy modification most DSLRs need
The second decade of DSLR astrophotography
|
Around 2002 to 2004, there was a mass movement of astrophotographers from film to digital SLR cameras. DSLRs offered ease of use comparable to film and results almost comparable to cooled CCD cameras. The mass movement began with Robert Reeves' pioneering book, the early work of Jerry Lodriguss and Christian Buil, and my own book. Cameras of that era didn't have live focusing, video, or in-camera dark-frame subtraction. We are no longer living in that era. On this page I'm going to put a series of brief notes about newer DSLR technology, especially DeepSkyStacker, the Canon 40D (typical of contemporary unmodified Canons), and the Canon 60Da (made especially for astrophotography). I'm not aiming to duplicate material that is already in my book, but I will certainly offer corrections to it. This page will grow gradually. Some of the material here has already appeared in my blog. Because I'm very busy with other obligations, I don't promise to keep up with every new development, but I hope what I put here will be useful. |
My personal approach
As always, my hobby is not exactly astrophotography — it is making astrophotography easier. DSLRs appeal to me because they provide a "big bang for the buck." They are exceptionally easy to use, and if you need a good DSLR for daytime photography, it can also be a good astrocamera at no extra cost.
If top image quality is your goal and you don't mind a more laborious workflow, you should seriously consider a cooled astrocamera instead of a DSLR. The cost is comparable and the results are better, but you have to bring a computer into the field to control the camera, and you can't use it for daytime photography.
My approach to image processing is also to keep things simple. It will always be possible to do more work and get a better picture, but at some point, diminishing returns set in. On picture quality, in the long run, the Hubble Space Telescope beats us all. But if you want to get satisfying pictures with a modest amount of effort, DSLR astrophotography may be your choice as well as mine.
A point of strategy
Anyone wanting to do DSLR astrophotography needs to ask: Why a DSLR? For me, the main appeal is cost-effectiveness. A $500 camera from Wal-Mart can serve you well for astrophotography and serve you superbly for daytime photography.
In fact, I spent more than that on my current astronomical DSLR; it's a Canon 60Da, with extended red response (not unlike Ektachrome film). But it's still a versatile camera.
Before investing in something even higher-priced, such as the Nikon D810a, or in a camera with special modifications that preclude its use in the daytime, and if I planned to control it by computer via a USB cable, I would ask: What does the DSLR contribute here? Would a dedicated astronomical CCD camera do the same job better, at lower cost?
The DSLR might still win, if you have a system of DSLR lenses and bodies with which it would interoperate. But the question has to be asked. DSLRs are good for many things, but not ideal for everything.
Late news flash: Mirrorless ILCs too!
Mirrorless interchangeable-lens cameras (ILCs) are like DSLRs but don't have a mirror box; the viewfinder is electronic. This makes the camera smaller and lighter and, more importantly, allows the lens to be much closer to the sensor, giving the lens designer more ways to achieve great performance.
Isn't this the right way to do a digital camera in the first place? That's what I thought in 2007, when I wrote that the DSLR (full of vestiges of 35-mm film photography) was an evolutionary transitional form like a fish with legs.
Well... Mirrorless cameras differ widely in their suitability for astrophotography. Many have the pixels too small. That is, like pocket digital cameras, they have small sensors with tiny pixels whose signal-to-noise ratio won't compete with a DSLR.
But a few stand out. The Sony A7s, although expensive, is a superb camera that is gaining a following among astrophotographers. It has a sensor as big as a piece of 35-mm film and only 12.2 megapixels. That means those pixels are big (about twice as big as on current DSLRs) and perform very well in dim light.
That is not a typical mirrorless ILC. Other Sony A7's put twice as many pixels in the same size sensor (which still isn't too many; they ought to perform acceptably for astrophotography). Less expensive lines of ILCs have smaller sensors and smaller pixels and probably suffer a disadvantage relative to DSLRs.
But let's wait and see! If you have a mirrorless ILC, by all means try all the same techniques as with a DSLR, and let me know how well it works!
More sources of advanced DSLR information
Ongoing astrophotography advice from Jerry Lodriguss (beginning and advanced)
Technical insights from Christian v.d. Berge
Articles by Roger Clark on sensor theory and testing
Articles by Craig Stark (author of Nebulosity) on DSLR performance
DSLR sensor performance tests by Sensorgen
DSLR sensor performance tests by Photons To Photos
Camera and lens tests by DPReview (not astronomy-oriented)
Advanced lens tests by Photozone (not astronomy-oriented)
The most important tips that aren't in my 2007 book
- Use live focusing if your camera has it, and confirm focus at maximum magnification. This is far better than even the best SLR viewfinder.
- If you take flat fields, you must also take flat darks, i.e., matching exposures with the lens cap on. These are used to subtract bias from the image data. At one time, some of us were under the impression that DSLRs didn't have bias.
- You have plenty of pixels. Don't be afraid to downsize the image. One megapixel is enough for a pleasing picture. That is equivalent to downsizing a Canon 60Da image by a factor of 4.2 or binning the pixels 4×4.
- Your pixels are so small that they will reveal tiny imperfections in optics and guiding. As a rule of thumb, today's sensors are about 5 times sharper than film. That is the biggest reason for downsampling the picture — to get its resolution down to that of the rest of the system.
- It's not just Canon any more. When I wrote my book, Canon DSLRs were well ahead of the competition. The playing field is much more level now. In particular, the Nikon D5300 offers a lot of performance for its very low price (and no longer "eats stars" as some early Nikons did), and some Sony, Pentax, and Olympus DSLRs are worth looking at. But don't choose a DSLR or mirrorless ILC at random; check the Web and make sure astrophotographers are successfully using the one you want.
Image acquisition
What are lights, darks, flats, flat darks, and bias frames?
Digital astrophotography relies very much on using the camera to measure its own defects and correct for them. The main defects are that (1) some sensor pixels act as if they are seeing some light when they aren't, due to electrical leakage; (2) the optical system doesn't illuminate all the pixels equally; and (3) the readout levels of the pixels start at values other than 0 (bias, often visible as a streaky or tartan-like pattern in a DSLR image).
Lights (images) are your actual exposures of a celestial object.
Darks (dark frames) are just like the lights, but taken with the lens cap on. Same camera, same ISO setting, same exposure time, and, if possible, same or similar sensor temperature as the lights. (Don't take darks inside your warm house to use with lights taken outdoors in winter.)
To correct for defect (1), your software will subtract the darks from the lights.
Flats (flat fields) are images of a featureless white or gray surface (it need not be perfectly white). I often use the daytime sky with a white handkerchief in front of the lens or telescope. They must be taken with the same optics as the lights (even down to the focusing, the f-stop, and the presence of dust specks, if any).
However, at least with Deep Sky Stacker, the ISO setting need not match. I often use ISO 200 (because the daytime sky is rather bright).
Obviously, the exposure time will not match the lights; you're not photographing the same thing. The exposure is determined with the exposure meter — just like a normal daytime photo, or one or two stops brighter. Deep Sky Stacker requires all the flats to have the same exposure time, so I do not use automatic exposure.
Caution: Use a shutter speed of 1/100 second or longer. Shutters are uneven at their very fastest settings.
A dozen flats are enough. Your software will combine them to reduce noise, but there isn't much noise in the first place.
Flat darks (dark flats) match the flats but are taken with the lens cap on. The ISO setting and exposure time must be the same as the flats. Deep Sky Stacker uses them to correct for bias. Because the brightness values do not start at 0, the software cannot do flat-field correction unless it knows the starting values. This is how we correct for defect (3).
Again, about a dozen are enough. The ISO setting and shutter speed must match the flats.
Bias frames are zero-length or minimum-length exposures; like flat darks, they establish the bias level. You do not need them if you are using lights, darks, flats, and flat darks. They are needed if the software is going to scale the darks to a different exposure time, or if flat darks are not included. See below.
Exposure times and ISO settings
Should you use the highest ISO setting on your camera in order to pick up the most light? No; that's not how it works.
The real purpose of the ISO setting is to make your camera imitate a film camera when you are producing JPEG files. If you're making raw files and processing them with software later, the ideal ISO setting may be lower than you think. Even if your camera offers a high maximum ISO, such as 25,600 or even more, that's not what you should use to photograph the stars.
The ISO setting on your camera controls the gain of an amplifier that comes after the sensor, but before the ADC (analog-to-digital converter). It does not change the camera's sensitivity to light; it changes the way the signal is digitized.
The ideal ISO setting is a compromise between several things. It must be high enough to register all the photoelectrons; on almost all cameras, that means 200 to 400. It must also be high enough to overcome "downstream noise," noise introduced after the variable-gain amplifier. And it must be high enough to overcome the camera's internal limits on dynamic range.
Apart from that, though, a higher ISO setting gains you nothing, and loses you dynamic range (ability to cover a wide range of brightnesses).
The best ISO for deep-sky work with most Canon DSLRs, and indeed most DSLRs of all brands except the very newest, is around 1600. But the Nikon D5300, with unusually low downstream noise, actually works best at 200 to 400. Conversely, with the Sony A7S, measurements show that the sky is the limit — you'll probably not go higher than 6400, but that's because of dynamic range.
How do I find these things out? By looking at Sensorgen's plots of dynamic range and read noise versus ISO setting. Notice (from their plots) that as ISO goes up, read noise and dynamic range both go down. Find the speed at which dynamic range starts falling appreciably. Right about there, you'll see that the read noise at least partly levels off and stops falling so much. That's your ideal ISO.
With most Canon DSLRs (such as the 60D) that is around ISO 1600. Shooting at more than ISO 1600 does not record any more light; it just loses dynamic range.
Other cameras are different. The Nikon D5300 looks best at 400, or even 200. (I think Sensorgen's measurement for 1600 is slightly inaccurate; it doesn't follow the same curve as the rest. And I can tell you people are getting good deep-sky images with this camera at ISO 200.)
Conversely, the Sony A7S might work well as high as ISO 25,600 (I haven't tried it).
Recall that we're not talking about the cameras' sensitivity to light. All three are within about one stop of being the same. We're talking about how the image is digitized. You can change its apparent brightness later, using your processing software.
All this has been analyzed further by Roger Clark and by Christian v.d. Berge.
But don't just take my advice, or theirs. Experiment!
Now how generously should we expose deep-sky images? Often, we have no choice but to underexpose. But when possible, deep-sky images should be rather generously exposed. The image plus sky background should look bright and washed out. The histogram should be centered or even a bit to the right of center. This will give you maximum rendering of faint nebulosity and the like, and you can restore the contrast when you process the image. Just don't let anything important go all the way to maximum white.
Dark frames have to match the exposure time and ISO setting of the original astroimages. The sensor temperature should be the same too, although my tests suggest this is not as critical as people have thought. You may want to standardize on an exposure time and ISO setting so you can accumulate dark frames from night to night; the more of them you stack, the less random noise they'll introduce.
Flat fields, too, should be exposed generously. I recommend checking what the exposure meter recommends and then exposing 2.5 stops more. Again, check that nothing goes all the way to maximum white; the histogram should be a narrow hump somewhat to the right of center. Note that in order to recognize your flats as a set, DeepSkyStacker expects them all to have the same exposure time.
Bear in mind that flat fields need to be accompanied by matching dark frames ("dark flats") for bias correction (explained elsewhere on this page), even though the exposures are short. And since the exposures are short, take plenty of flats and dark flats, so that random noise will cancel out.
Speaking of stacking — A hundred 1-second exposures do not equal one 100-second exposure. The reason is that part of the noise in the image is not proportional to exposure time. Thus, if you expose 1/100 as long, you get 1/100 of the light but somewhat more than 1/100 of the noise. For the details, see this working paper by John C. Smith. The bottom line? Expose generously enough that the deep-sky image is well above the background noise level.
How DSLR spectral response compares with film
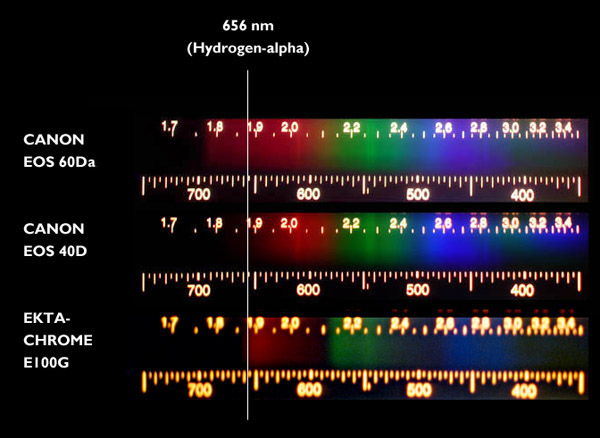
How does the late lamented Kodak Ektachrome film — known to be very good for photographing nebulae — compare to ordinary and astronomy-modified DSLRs? To find out, I did an experiment with my very last roll of Ektachrome E100G.
These pictures were taken by aiming a Project STAR spectrometer at a white piece of paper illuminated by a tungsten-halogen bulb. The Ektachrome image isn't as sharp as I'd like, but, alas, there is no way to re-do it; Ektachrome is no longer made.
The DSLRs are a Canon 60Da (supplied by Canon with extended red response) and an unmodified Canon 40D (typical of unmodified DSLRs).
Observations:
- At hydrogen-alpha (656 nm), Ektachrome is in between the modified and unmodified DSLRs. Data sheets indicate, actually, that Ektachrome is strong at precisely that wavelength but does not extend appreciably past it. The modified DSLR extends to 700 nm or so.
- You can get modified DSLRs with red response more extended than this Canon.
- Ektachrome (like all color film) has gaps in its spectral response. There is a gap around 590 nm, and another around 500 nm. The latter corresponds to the blue-green color of comets that shows up only with digital cameras.
- Greens and purples to the right of about 420 nm in the picture are reflections in the instrument.
Fuji slide film, as I understand it, does not have response extending to 656 nm; nor do most black-and-white films.
This is the decade of the equatorial mount
This (2010-2020, or maybe 2015-2025) is the decade of the equatorial mount.
In the 1970s and 1980s, we astrophotographers were connoisseurs of types of 35-mm film. In the 1990s and 2000s, we became connoisseurs of optics, as really good solutions to our optical problems finally became readily available.
Now it's time to become connoisseurs of equatorial mounts and drive motors. Rapid technical progress is occurring, and perhaps more importantly, the amateur community is coming to understand the equipment better, as instruments such as PC-based autoguiders make it easy to test our mounts and drives, and the tiny pixel size of modern digital sensors exposes even small flaws.
We are still at the stage where $5000 buys a much better mount than $1000, but the gap is narrowing and standards are rising.
My general philosophy with mounts and drives, as with other equipment, is that no matter what you have, you can push it beyond its limits and be frustrated, or you can find those limits, stay within them, and take plenty of good pictures.
Guiding and autoguiding tips
Many of today's telescope mounts will enable you to take 30- or 60-second exposures through a long telephoto lens, or even through the telescope, without guiding corrections. There is still periodic gear error, but the period is typically 8 to 10 minutes, and there will be considerable stretches of 30 to 60 seconds during each cycle during which there are no noticeable irregularities.
For this to work, you must polar-align very carefully (to within 4 to 6 arc-minutes if possible). See the next section for more about this. Even if you're using an autoguider, you probably want to give it an easy job, so you need good polar alignment.
If you use an autoguider, here are some further hints:
- Tune the autoguider. Very low aggressiveness (as low as 0.3) may be correct when the air is unsteady, to keep it from chasing air turbulence. Persistent errors in the same direction mean you need more aggressiveness; rapid alternation between opposite errors means you need less. Large, sudden spikes in both directions are the sign of an overloaded mount.
- Use 2-second to 5-second exposures. Again, too short an exposure will lead the autoguider to "chase seeing." You want to undercorrect, not overcorrect.
- Use a bright enough guide star. Autoguiders achieve sub-pixel accuracy by assuming that the star image is bright enough to overcome random noise around the edges.
- Train the PEC (preferably by averaging several runs) and then autoguide with PEC playback turned on. This gives the autoguider a bit less work to do, and it can do its job more accurately.
- Use a 30-second calibration time when calibrating the autoguider. Automatic calibration with 10-second moves might not overcome backlash.
Finally, beware of terra non firma. A really pesky guiding problem that I experienced turned out to be caused by broken concrete pavement in my driveway. The tripod had one leg on a different piece than the other two, and when I walked around, the pieces of concrete moved relative to each other. Even a tenth of a millimeter of movement, a meter or two from the telescope, can cause serious problems if it's sudden.
And don't expect impossibly tiny star images. The star images in the Palomar Sky Survey are about 3 arc-seconds in diameter. You may do that well in very steady air, but not all the time. Do the calculations; you may find that 3 arc-seconds correspond to several pixels with your telescope or lens.
In fact, let me announce:
|
COVINGTON'S LAW OF ASTROPHOTOGRAPHIC GUIDING Sharp star images are not round. Round star images are not sharp. |
The reason is that your tracking in right ascension and in declination are unlikely to be equally good. (Think about it; you have motors running and periodic error in right ascension, but not in declination. The autoguider has two rather different jobs.) So if your star images are sharp enough to show the limits of your guiding, they will not be perfectly round. And if they are round, they are not showing the limits of your guiding.
One way to make them round is to downsample the image to a lower resolution, then enlarge it again. A better way is to use motion-blur deconvolution.
Effect of polar alignment on tracking rate
Back when I wrote Astrophotography for the Amateur, I assumed that guiding corrections would always be made, so the only harm done by bad polar alignment would be field rotation. By that criterion, aligning to within half a degree was generally sufficient.
As noted above, many of us now make 30- or 60-second exposures without guiding corrections, and even when using an autoguider, we want to give it an easy job. How accurately do we need to align nowadays?
Besides field rotation, we have to worry about drift (gradual shift of the image) caused by poor polar alignment. Even a small alignment error will produce quite noticeable drift in right ascension and declination. Here are some calculated examples.
Example: Photographing an object on the meridian with a 1° error in polar axis altitude
The problem here is that we are effectively tracking at the wrong rate. Think of the equatorial mount as drawing a circle around the pole. In this case the mount's pole is too close to the object being photographed, so it's drawing a circle of the wrong diameter and traverses the wrong amount of the circle per unit time.
The drift in declination is negligible; at least for the moment, the telescope is moving in the right direction, just at the wrong speed.
The drift in right ascension during a one-minute exposure is 16 arc-seconds × sin δ where δ is the declination. The actual distance covered (as angular distance on the sky, not as change of right ascension) is 16 arc-seconds × sin δ × cos δ. Some examples:
| Drift caused by 1° error in polar axis altitude, tracking an object on the meridian | ||
| Declination | R.A. drift | Dec. drift |
| 0° | 0.3"/minute | Nil |
| ±15° | 4"/minute | Nil |
| ±30° | 7"/minute | Nil |
| ±45° | 8"/minute | Nil |
| ±60° | 7"/minute | Nil |
Elsewhere in the sky, this chart corresponds to a polar alignment error of 1° in the direction of a line from the true pole to the object. With half a degree error, you'd see half as much drift, and so on. With a really good alignment (to 6 arc-minutes), you'd see 1/10 as much drift as in the chart.
What we learn is that to avoid right ascension drift, we need to align to about 8 arc-minutes or better in altitude, assuming one arcsecond per minute of time is acceptable.
Example: Photographing an object on the meridian with a 1° error in polar axis azimuth
In this case the telescope is moving in the wrong direction, not quite parallel to the lines of declination, and there is declination drift. There is also a small drift in right ascension, but it is negligible.
The drift in declination during a one-minute exposure is 16 arc-seconds × cos δ where δ is the declination.
| Drift caused by 1° error in polar axis azimuth, tracking an object on the meridian | ||
| Declination | R.A. drift | Dec. drift |
| 0° | Nil | 16"/minute |
| ±15° | Nil | 15"/minute |
| ±30° | Nil | 14"/minute |
| ±45° | Nil | 11"/minute |
| ±60° | Nil | 8"/minute |
Elsewhere in the sky, this chart corresponds to a polar alignment error of 1° perpendicular to a line from the true pole to the object. With half a degree error, you'd see half as much drift, and so on. With a good alignment to 6 arc-minutes, you'd see 1/10 as much drift as indicated in the chart.
What we learn is that to avoid declination drift, we need to align to 1/15° (that is, 4') or better in azimuth, assuming one arc-second of drift per minute of time is acceptable.
The trick to using a polar alignment scope correctly
Here's a crude photograph of the reticle in a Celestron polar alignment scope such as is used in the AVX and other mounts. Other mount manufacturers offer a similar accessory.
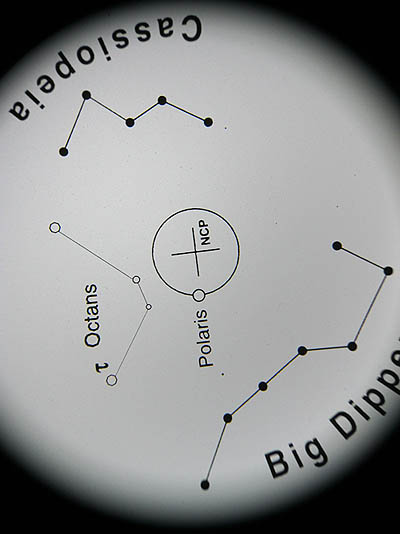
If you compare this to a real star map — or to, for instance, this chart, which I made from a star map in order to use another brand of polar scope — you'll see that Celestron's reticle is not a star map. The constellations are drawn unrealistically close to the pole and to each other.
Not realizing this, I fell into a mistake. I tried to draw an imaginary line from Polaris to Cassiopeia or Ursa Major and figure out, for instance, which star in those constellations was directly above Polaris, then rotate the mount accordingly.
Wrong! Because the map is not to scale, only the middle of each constellation is the correct direction from Polaris. What you're supposed to pay attention to is the apparent tilt of Cassiopeia or Ursa Major in the sky.
To their credit, Celestron's instructions get this right, though you have to pay attention. Less formal instructions given elsewhere may mislead you.
A much better way is to use the Polar Scope Align app for iOS on your iPhone. It shows a picture of the whole reticle, complete with Celestron's not-to-scale constellations, depicted so that the top of your screen corresponds to straight up in the sky. Rotate your telescope around the RA axis until it matches what you see on the screen, then put Polaris in the circle.
Incidentally, it is a good idea to adjust the polar scope reticle as described in the instructions. The easiest way is to set up the mount so that the RA axis points toward a distant outdoor object in the daytime. Notice the point on that object that is right in the central crosshairs. Now rotate the mount 180° in right ascension and notice where the crosshairs have moved to. Adjust the reticle to take away exactly half the error. The crosshairs should now stay stationary as the mount rotates.
How a lens imperfection can look like a guiding problem
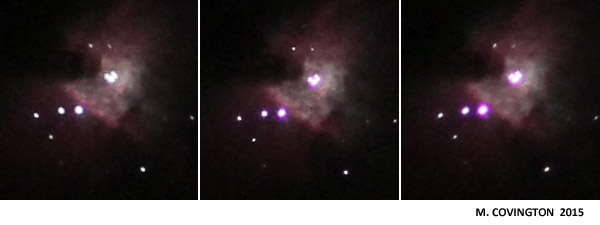
These three pictures of the center of M42 seem to illustrate guiding problems. The middle one has nice, sharp, round star images (and also shows more faint stars); the other two images are slightly trailed in different directions.
But, in fact, guiding was not the issue. Each exposure was only 2 seconds and was replicated several times.
The difference between these pictures is focus. The lens (Canon 300/4 at f/5) was focused a bit differently for each of the three.
Unlike telescopes, camera lenses are not ordinarily diffraction-limited wide open. Rather, correct focus is the point at which several aberrations come nearest to balancing each other out. And, because of finite manufacturing tolerances, one of the aberrations is astigmatism, caused by slight errors of centering.
That is what you are seeing here. If astigmatism is present, an out-of-focus star image is slightly elongated one way or the other.
When a star image is perfectly in focus, the astigmatism isn't visible; it's hidden under the effect of the other aberrations and diffraction.
This lens has a detectable imperfection, but that does not make it a defective lens. When focused carefully, it produces round star images less than 0.01 mm in diameter, corresponding to a resolving power around 100 lines per mm, depending on the point spread function, which I did not measure. That is good for any lens, and exceptional for a telephoto; in film photography, it would have meant that the resolving power would always be limited by the film, not the lens. But digital sensors are sharper than film, and astigmatism is one of the aberrations that we see when this lens is slightly out of focus. The other is chromatic aberration.
Notice also that at best focus, there is a bit of purple fringing around the stars from residual chromatic aberration. The different aberrations of this lens don't all balance out at exactly the same point. Accordingly, focusing this lens for minimum chromatic aberration isn't the right strategy. It's sharper if some chromatic aberration is tolerated. If it bothered me, I could add a pale yellow filter to get rid of it, but as it is, a small amount of chromatic aberration helps make the brighter stars stand out.
Subsequent spooky development: After reproducing this problem with the same lens in one subsequent session, I was unable to reproduce it in the next session. The star images were always round! Maybe something got out of alignment and then worked its way back into place. Or maybe there was a problem with the way the lens was attached to the camera body, just once. Who knows?
Celestron All-Star Polar Alignment: doing it right
Many newer Celestron mounts, including the AVX, have the ability to refine the polar alignment by sighting on stars other than Polaris. You can do an approximate alignment (even ten or fifteen degrees off) without being able to see Polaris at all, then correct it by going through this procedure. I do it regularly because one of the places I put my telescope has a tree blocking our view of the pole. And our Southern Hemisphere friends must certainly appreciate not having to find Sigma Octantis every time they set up their telescopes.
The following tips are for people who have already read the mount's instruction manual and have used it in at least a basic way. Here's how to get the best performance.
Let's distinguish two steps: (1) go-to alignment, telling the mount's computer where the stars are, and (2) computer-aided polar alignment, aligning the polar axis more accurately parallel to the earth's axis. When you do step (1), the computer finds out the true position of the sky and can compute how far the mount's axis differs from the earth's axis, and in what direction. It uses this information to "go to" objects correctly despite polar axis error. When you do step (2), the computer can use the information from step (1) to tell you how to move the mount.
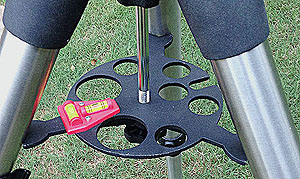
The time and location are assumed to be set accurately and the mount is assumed be level. Great precision is not needed; location within 30 miles, time within a few minutes, and leveling with a cheap bubble level (or even by eye) will do.
I say the time and location "are assumed to be set" and the mount "is assumed to be level" rather than "must be level" because these things do not affect go-to accuracy or tracking at all. Time and location tell the telescope what objects are above the horizon at your site. Together with leveling, they affect finding the first star when you begin step (1).
Leveling, time, and location also have a small effect on the accuracy of step (2). The reason is that two points define the position of a sphere, but ASPA only asks you to sight on one star, so the mount has to assume another fixed point, the zenith. If this assumption were not made, your movement to the ASPA star might involve an unknown amount of twisting around the star in addition to moving laterally to it. Nonetheless, if you choose the ASPA star according to instructions — low in the south — the effect of leveling error will be very small.
Also — and more basically — ASPA has to know your location and the date and time so that it can convert a right ascension and declination error (measured from the stars) into an altitude and azimuth error (measured relative to the earth's rotating surface).
The geometry is explained in some excellent diagrams by "freestar8n" here, although subsequent replies to them are confused. Recall that if you were doing a traditional polar alignment by sighting Polaris through the polar scope, you would also be using more than one known point implicitly, because you'd use the constellation map wheel to orient Polaris relative to the true pole.
To get started, level the tripod and set up the mount with at least a rough polar alignment (by sighting Polaris through the polar scope, or through the hole where the polar scope would go, or simply by aiming the polar axis north and setting it for your latitude). Then:
(1) (Go-to alignment) Do a 2-star alignment and add at least 2 and preferably 4 additional calibration stars on the other side of the meridian.
- Throughout this step, the mount head does not move. It should be locked down in altitude and azimuth. Once you have turned power on, the R.A and declination clutches should remain locked so that the telescope moves only under motor power; if it moves any other way, the computer won't know about it and will get lost.
- Choose stars that are well away from the pole and from each other.
- Use a crosshair eyepiece if possible.
- Do not turn the diagonal around during the process. Any slight centering error would no longer be consistent.
- To switch sides of the meridian (e.g., to get the telescope to offer you eastern stars instead of western stars), press MENU.
- Using the SCROLL buttons, you can choose any named stars, not just the bright ones that are offered as alternatives when you press BACK. I often use Gienah (Gamma Corvi).
- During any "Align" step, you can press MOTOR SPEED, 2, in order to slow down the motor for the final approach. Always make the final approach with the "up" and "right" buttons.
- If you are going to do step (2), you can save a step by choosing your last calibration star to be one that is in the south, not too high in the sky.
(2) (Polar alignment) Adjust the mount using ASPA.
- During this step, you will move the mount in altitude and azimuth as directed. The R.A. and declination clutches must remaing locked so that the telescope moves only under motor control.
- Choose a star in the south, well away from the zenith. A star that is relatively low in the south is ideal, well south of the equator. It should be close to the meridian, but not so close that the telescope might do a meridian flip while slewing between its two computed positions a few degrees apart.
- Do not choose a star that is east or west of the telescope. If you do, the two polar axis adjustments will not be perpendicular. In fact, if the star is due east or due west, both adjustments move the star in the same direction and ASPA is useless!
- Select that star and go to it. If, however, it was your last calibration star, then you don't have to go to it at this step; the telescope will remember it.
- Press ALIGN and choose Polar Align, Align Mount. The mount will go to the star that you most recently sent it to. Follow the directions, which involve centering the star, adjusting the mount, and centering it again.
After doing ASPA, you may notice two strange things:
- Your go-to accuracy is a little worse than before you did the ASPA (although tracking of objects, once found, will be much better). The reason? The ASPA wasn't perfect, but the telescope has not taken any measurements of stars since then, so it has no way to correct for any remaining error.
- Your mount can't tell you how well it's polar aligned. If you ask it (by pressing ALIGN, Polar Align, Display Align), it will say the error is zero or nearly so. Again, this is because it hasn't actually measured any star positions since doing ASPA. (I have suggested to Celestron that Display Align should be disabled in this situation.)
If you want to overcome both of these quirks, put the telescope in the home position (MENU, Utilities, Home Position, Go To), turn the mount off, and turn it back on and do step (1) afresh. Then Display Align and see what you got. You can repeat the process for greater accuracy.
In my experience, you can get an overall accuracy of about 00°05'00'' or better by doing ASPA twice. The reported error is never perfectly accurate because of limits to how accurately the telescope measures its position and how accurately you center the stars. Extremely critical astrophotography, involving long exposures at long focal length without an autoguider, might require a more accurate polar alignment achieved by the drift method. On the other hand, for visual work and for autoguided photography, a quarter degree (00°15'00'') is plenty good enough. Be sure not to mistake big numbers in one field for big numbers in another; 00°45'00'' is poor but 00°00'45'' is excellent!
The truth about drift-method polar alignment
The gold standard for polar-aligning a telescope is the drift method. What you do is adjust the polar axis so that stars do not drift north or south as the telescope tracks them. Using a crosshairs eyepiece, you can do this very precisely. First, track a star near the equator and meridian, and adjust the azimuth of the polar axis. Then, track a star that is low in the east or west, and adjust the altitude of the polar axis.
This handy chart tells you how. Of course, if you're doing unguided astrophotography, you'll want much better than the half-degree accuracy that it says is sufficient. Very high accuracy is not hard to achieve.
The drift method is guaranteed to work with any equatorial mount, whether or not it is computerized, and whether or not it has a drive motor! You are only checking for north-south drift, so you can push the telescope westward manually, moving only around the R.A. axis, if you have to. And you don't have to do it continually; center the star, go away for five minutes, and center it again by moving only in right ascension.
But here's a deep, dark secret. Drift method isn't giving you perfect polar alignment. It is giving you a drift that counteracts whatever drift you have from flexure.
And that's a good thing!
Portable mounts commonly have flexure on the order of 1 arc-second per minute, constantly shifting the image at that rate because the load on the mount is moving and making it bend differently. The direction and amount of flexure depend on what part of the sky the telescope is aimed at. A very fastidious drift-method alignment can counteract some of the flexure by setting up an equal and opposite drift.
So don't be surprised when your drift-method alignment needs to be redone when you've aimed at a different part of the sky. The flexure is different. And you never had absolutely perfect polar alignment — nor did you need it.
EdgeHD focal plane position demystified
The biggest difference between Celestron EdgeHD telescopes and Schmidt-Cassegrains is that the EdgeHD has a much flatter field. It produces star images that are sharp across a camera sensor from edge to edge. A conventional Schmidt-Cassegrain would only do that if the sensor were curved like the surface of a basketball.
The second biggest difference is that the EdgeHD is designed to form flat images only at a specific focal plane position — 133.3 mm from the rear flange with the 8-inch, 146.0 mm for the larger models.
The EdgeHD visual back and camera adapter are different from those used with conventional Schmidt-Cassegrains. The conventional ones will fit, and will form an image, and if you're accustomed to a Schmidt-Cassegrain, you may not realize you're not getting top quality. To get a truly flat field and to get optimal image quality at center of field, you need to put the image plane where it was designed to be.
So... How do you get the best images with an EdgeHD?
Like most new EdgeHD owners, I started out by measuring all my imaging setups and trying to determine how close they were to the specified 133.3 mm. Some things were hard or impossible to measure, such as the optical length of a prism diagonal. And I started wondering where to get 16.2-mm T-thread extension tubes, and things like that.
But there's an easier way.
Step 1 is to figure out how close you have to get to the specified position. (The 0.5-mm tolerance that you sometimes hear about is Celestron's manufacturing tolerance, not your focusing tolerance.) My own experience is that if you are using the maximum size camera sensor, the tolerance is about 2 mm in either direction. That is, you should use Celestron's camera adapter (with a DSLR) or something you've verified to be the same length.
With most eyepieces and with smaller sensors in planetary cameras, you don't need such a large flat field, so you can err as much as 10 mm, but not more. I can definitely see field curvature in a 20-mm eyepiece that is 20 mm from the specified plane.
Step 2 is to find a way to focus to the specified position. An SLR camera body (film or digital) with a conventional (not "ultrathin") T-ring and Celestron's EdgeHD (not conventional) T-adapter will come to focus exactly at the recommended position. My experience has shown me that the EdgeHD visual back, with a Tele Vue mirror diagonal and Tele Vue Radian or DeLite eyepiece, is also a perfect fit.
Step 3 is to make all your other setups focus at about the same position. It's that simple! Extend or shorten every setup until it comes to focus within half a turn of the focuser knob, or less, relative to the position that works with the SLR camera or the known-good eyepiece and diagonal.
Important EdgeHD note: You're not supposed to turn the focuser knob very much unless you're using a focal reducer or using the Fastar setup. On the 8-inch, one full turn of the focuser moves the focal plane 20 mm, which is farther than you normally want to move it. Of course, you'll want to give it several turns back and forth every so often, to redistribute lubricants, but the "twist, twist, twist" routine familiar to the Schmidt-Cassegrain owner does not pertain to the EdgeHD.
You will probably need a 2-inch-long 1.25-inch-diameter extension tube, such as those sold by Orion and others. This takes up about the same amount of space behind the visual back that a diagonal would. You can use it in straight-through setups in place of the diagonal.
If you are using a webcam or small planetary camera, it goes in place of an eyepiece, so the overall system length should be the same as when you're using the telescope visually. There's no shame in doing planet imaging through a diagonal (if you remember to flip the images); alternatively, use the 2-inch-long extension tube.
If your setup involves eyepiece projection, or a Barlow lens, or (preferably) a telecentric extender to give a larger planet image, the eyepiece, Barlow, or extender should go about where it would go for visual use. Again, use the 2-inch-long extension tube ahead of it if you're not using a diagonal.
One of Celestron's instruction books shows eyepiece projection being done with the eyepiece positioned right at the back of the telescope. That's a carryover from Schmidt-Cassegrain days and, in my opinion, an optical mistake with the EdgeHD. But eyepieces themselves have so much field curvature that it's hard to say. I much prefer telecentric extenders.
Using an old-style focal reducer with an EdgeHD telescope
Have you ever wondered what happens if you use an old-style Celestron #94175 f/6.3 focal reducer on an 8-inch Celestron EdgeHD telescope?
It's not recommended, of course. There is a new f/7 focal reducer for the 8-inch EdgeHD.
But curiosity got the better of me — I had the old focal reducer, which I had used with an earlier telescope — so I decided to try it.
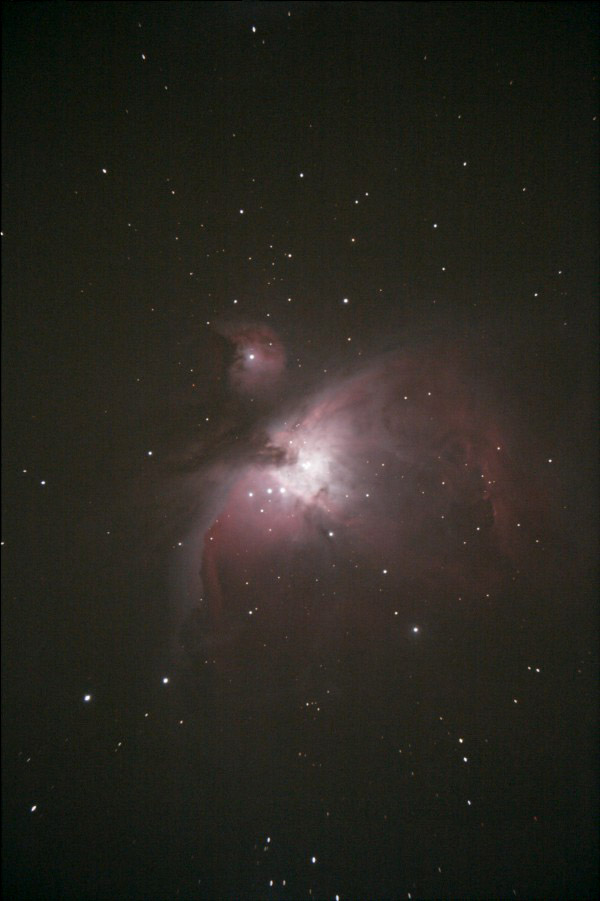
Not bad, is it?
This is a stack of two 15-second and two 30-second exposures with a Canon 60Da. The outer parts of the picture are obviously bad, with smeared star images, but a significant region near the middle is quite presentable.
A quick measurement showed me that I got f/5.9 with this setup, which should produce somewhat brighter images than the f/7 flat-field corrector. So although it's not perfect, I think I'll keep the old focal reducer for a while.
Update: The new f/7 reducer is essentially perfect edge to edge. I won't be using the old one any longer.
Vibration-free "silent shooting"
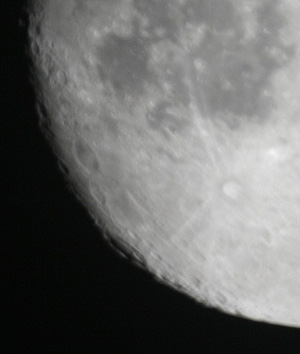
One of the least-known features of the Canon EOS 40D and many of its relatives is the electronic first shutter curtain. Normally, a DSLR uses a focal-plane shutter just like a film SLR. One curtain moves aside to uncover the sensor, and the second curtain follows it to end the exposure. If the exposure is short (like 1/1000 second), the second curtain follows the first one so closely that the entire sensor is never exposed at once — instead, the shutter forms a fast-moving slot.
Canon DSLRs have the ability to begin the exposure electronically with zero vibration. Above, you see how much difference it makes. Both pictures are 1/100-second exposures taken through a Celestron 5 on a solid pier. The blurry one used mirror lockup in the standard way; the sharp one used the electronic first shutter curtain.
In fact, as I understand it, the "electronic first shutter curtain" is a virtual moving edge just like the real shutter curtain, so you can use it even with short exposures. Columns of the sensor are turned on one by one just as if the real curtain were exposing them.
Because a CMOS sensor can't turn off as quickly as it turns on, the real shutter curtain is used to end the exposure. But it introduces little vibration because, of course, the exposure is ending, and it only takes something like 1/10,000 second to make its journey from one side to the other.
Why haven't you heard of this? Because Canon calls it Silent Shooting and advertises it only for quietness.
Here's what to do. Enable Live View Shooting and choose Silent Shoot Mode 2 (on the 40D; others are probably similar). (See your instruction manual for particulars.) Now here's how to use it:
- Press Set to initiate Live View. The shutter opens and you get a continuous image from the sensor. Focus, using the magnifier as you wish.
- Press the button to take the picture. In my situation, I had the 10-second delay set so that vibration from my touching the camera would die away; I recommend this. After the delay, if any, the exposure begins electronically. When it ends, the shutter closes.
- All this time, you can hold down the button if you wish, although normally you will have only pressed it momentarily. If you're still holding the button down, the shutter won't reopen until you release it. This is for maximum quietness, when photographing wildlife.
- Press Set again to save battery power when you're finished using this mode.
Note: Various Canon instruction manuals say not to use Silent Shooting when the camera is on a telescope, extension tube, or other non-electronic lens system. They warn of "irregular or incomplete exposures." I have never had any problem. Canon tells me the warning only pertains to autoexposure modes.
Lunar and planetary video astronomy with Canon DSLRs
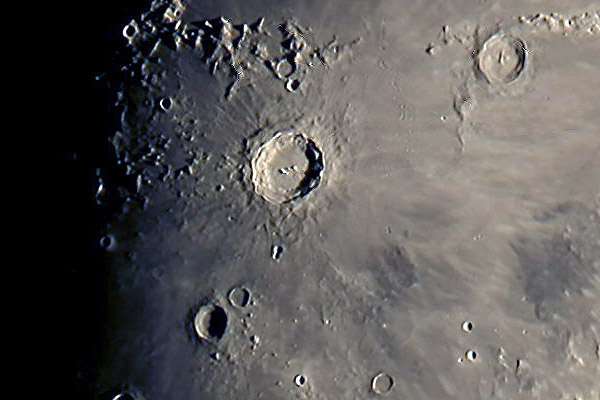
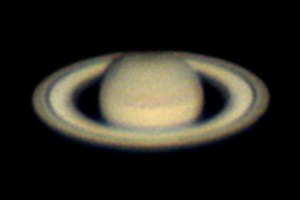
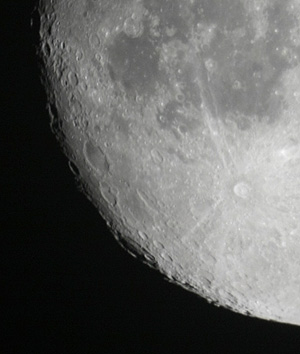
If your Canon DSLR has Live View, whether or not it has a movie mode, you can use it as an astronomical video camera.
Astronomers regularly use video cameras and modified webcams to record video of the moon and planets. They then feed the video into software such as RegiStax (great freeware!), which separates the frames, aligns and stacks them, and then sharpens them with wavelet transforms.
(The mathematics of this is widely misunderstood, by the way. RegiStax isn't just looking for a few "lucky" sharp frames taken during moments of steady air. It is adding a lot of independent random blurs together, making a Gaussian blur. This is important because the Gaussian blur can be undone mathematically; unknown random blurs cannot. That is why, with RegiStax, we get the best results by stacking thousands of frames, not just a few selected ones from each session.)
If your Canon DSLR can record video in "movie crop" mode (i.e., with the full resolution of the sensor, using just the central part of the field), then you can use it by itself as an astronomical video camera. If it doesn't do that, but does have live focusing ("Live View"), you can use software to record the Live View image; both EOS Camera Movie Record (free) and BackyardEOS do the job.
There's a whole book-on-disc about DSLR planetary video by Jerry Lodriguss, but here are a few notes on what works with my 60Da.
Pro and con: An almost compelling advantage of the DLSR, compared to a regular planetary camera or webcam, is that you can use the whole field of the DSLR to find, center, and focus, then zoom in on the central region for the actual recording. (An astronomical video camera has a tiny field all the time, and it's easy to lose the planet.) Another advantage is that if the camera can record video, you don't even have to bring a computer into the field.
The down side is that you can't record uncompressed video. With software that records the Live View image, each frame is JPEG-compressed; if the camera records video by itself, the video is compressed in a different way that takes advantage of similarities between adjacent frames. Both methods sacrifice some low-contrast detail, which can probably be made up by stacking a larger number of frames. I would advise you to take an ample number of frames — at least 5,000, if possible — when imaging with compressed video.
(Some Canon DSLRs can record uncompressed video if you install a third-party firmware extension called Magic Lantern. However, it voids the camera's warranty and I haven't wanted to take the risk myself.)
Another disadvantage is that you don't have as much control over the exposure. My Canon 60Da, recording video, has to produce 60 frames per second, which means the exposure is no longer than 1/60 second, and the only way to image a dim object is to turn up the ISO speed, i.e., the analog gain. At f/30, Saturn at ISO 4000 is still badly underexposed, and image quality suffers.
A third caution is that Barlow lenses may magnify much more than they are rated to, because of the depth of the camera body. My Celestron Ultima 2× Barlow magnifies 4× when placed in front of a DSLR. That gives me f/40, which is too big and too dim to be optimal. This depends on the focal length and other design parameters of the Barlow lens; small, compact ones are most affected. According to Tele Vue's web site, Tele Vue's conventional Barlows are less affected and Powermates are almost unaffected by changes in focal position; they are designed to work well with cameras as well as eyepieces. The Powermate is no ordinary Barlow; after magnifying the image, it corrects the angle at which light rays leave it, so as to more faithfully mimic a real telescope of longer focal length (telecentricity). My Meade 3x TeleXtender is apparently quite similar to a Powermate; distinguishing features include a small lens for light to enter, a much larger lens for light to exit, and the fact that you can pick it up by itself, look through it backward, and use it as a Galilean telescope. Explore Scientific focal extenders are also reported to be telecentric designs.
Using the camera with a computer: With either EOS Camera Movie Record or BackyardEOS, put the camera into Live View mode and make sure Exposure Preview is selected in the camera's settings, so that exposure settings will affect the Live View image. Get the planet into the field and choose a suitable ISO speed and exposure time. Then connect the USB cable from the camera to your laptop, and start up the software. Use "5× zoom" mode to zoom in so that you are recording individual pixels. The software records an AVI file suitable for RegiStax.
Using the camera by itself: Put the camera in movie crop mode, manual exposure (see the manual); focusing and exposure adjustment are done in Live View, which is automatically turned on when you put the camera in movie mode. The cable release doesn't work; to start and stop recording without vibration, use the infrared remote control (Canon RC-6 with its switch set to "2").
Movie crop mode uses only a small, 640×480-pixel region at the center of the sensor. But before you put the camera into movie crop mode, you can use it as a regular DSLR in Live View mode to find, center, and focus on the planet, using the whole field of view of the sensor. That's something you can't do with a planetary webcam, whose sensor is always tiny.
Converting .MOV to .AVI: Now for the tricky part. Canon records .MOV files and RegiStax wants .AVI files. There are many ways to convert .MOV to .AVI, and most of them are wrong! The problem is that they recompress the image and lose fine detail. Eventually, this shows up as strange things in your image — mottled areas and even rectangles and polygonal shapes from nowhere!
The .AVI file format is a "container," which means it holds AVI files in many different formats, and the ability to play them depends on the codecs (coder-decoders) that happen to be installed on your computer. That's the cause of the maddening but familiar phenomenon that some video files will play on some computers and not others. .MOV is also a container, although the movies are almost invariably in QuickTime format.
The easiest way to do the conversion right is to use PIPP (Planetary Imaging PreProcessor), a free software package that can do many other things (such as crop a large image down to a small region of interest), but by default it opens any type of video (including .MOV) and saves it as an uncompressed .AVI file. Be sure to choose the folder for the output, and click "Do processing," and you're done.
You can also do the conversion with the excellent, free VirtualDub video editor. Download, unzip, and install the appropriate version of VirtualDub (32- or 64-bit). To do this, manually make a folder on your desktop and copy the files into it. (There is no installer.)
You'll see that VirtualDub doesn't open .MOV files. To fix that, get the FF Input Driver for VirtualDub. It unzips to make a folder named plugins or plugins64. Copy that folder into your VirtualDub folder (that is, make it a subfolder of the folder that VirtualDub is in), and now VirtualDub can open and edit .MOV files. When you save the file as AVI, it is uncompressed and suitable for RegiStax.
Of course, the best thing is that VirtualDub can edit video files, not just convert them. You can trim off any part of the video where the telescope was shaking or the image is otherwise useless.
Image processing
Superpixel mode — a skeptical note
In earlier editions of this page, I suggested that since modern DSLRs have more than a dozen megapixels, it is expedient to de-Bayerize the images in superpixel mode, making one pixel out of every four to reduce noise.
It does reduce noise, but I've found a good reason not to use it. Let me first explain it and then explain what goes wrong.
Superpixel mode is a way to avoid interpolation (guesswork) when decoding a color image. Superpixel mode takes every quartet of pixels — arranged as
R G
G B
on the sensor — and makes it into one pixel, whose red value is R, whose blue value is B, and whose green value is the mean of the two G's.
This gives you only 1/4 as many pixels as before, but with an 18-megapixel camera, that's quite fine with me — the resulting 4.5 megapixels are plenty for a full-page print. (We easily lose track of this fact: You may never have seen a picture with more than 3 megapixels visible in it. Even one megapixel will equal a typical 8-by-10-inch photographic print.)
On an image of a large, uniformly colored object, superpixel mode would be perfect. Each superpixel would have its true color, based on true readings of red, green, and blue intensity within it. Nothing is brought in from outside the superpixel.
Indeed, superpixel mode reduces chrominance noise (colored speckle) dramatically. But I found that it also introduces colored fringes on sharp star images such as these:
![]()
For a long time, I attributed the fringing to atmospheric dispersion. It seemed to have the right amplitude (2 to 4 arc-seconds).
No... it wasn't in the right direction to be atmospheric dispersion. It always had the same orientation relative to the camera, not the horizon. That meant it was a de-Bayering problem. A quick experiment showed me that it came from superpixel mode.
Here's a brief explanation. The diagram on the left shows light falling on the pixels (gray representing black) and the diagram on the right is the result of superpixel-mode de-Bayering of the four groups of four pixels.
![]()
Look at the superpixel on the upper right. Only a corner of it — the red pixel marked R — intercepts the big, round, sharp-edged star image. So that superpixel comes out strongly red.
Two more superpixels come out yellowish because they don't get their full share of blue. This, in spite of the fact that the exposure was to white light!
Now consider conventional de-Bayering, in which every pixel remains a pixel. The pixel marked R gets its brightness from itself, and its color from examination of itself and the four B's and four G's that surround it. These don't quite result in perfect color balance — B is still a bit short — but the color error will be much smaller, and it will only be confined to one pixel.
Recommended practice, based on my latest results: De-Bayer your images at full resolution, and then resample them to 1/2 or 1/3 of original size to combine pixels by averaging and thereby reduce noise.
If, after all this, you still want to try superpixel mode, here are some ways to try it:
- Choose it in DeepSkyStacker (see below).
- Choose it in PixInsight or whatever software you use to decode camera raw files. (In PixInsight, choose Format Explorer, DSLR_RAW, Edit Preferences, Create super-pixels; this sets what happens when you open a raw file. Or choose superpixel mode when you use the Debayer process to interpret the color in an image that was opened raw.)
- Convert your raw files losslessly to TIFF or other formats using Dave Coffin's dcraw utility and the -h ("half size") option.
- Convert your raw files losslessly to TIFF or other formats using Frank Siegert's RAWDrop utility with "half size" checked.
RAWdrop has other uses, too. A hint for RAWDrop users: If you're making a 16-bit TIFF from a 14-bit raw file (Canon 60D, etc.), set Brightness to 4.0 to get a normal-looking picture. I recommend choosing Highlights Unclip and Auto White Balance.
Note that the output of RAWDrop is gamma-corrected (nonlinear), and hence unsuitable for correcting with darks and flats.
How I use DeepSkyStacker
[Updated 2019].
Although I still recommend MaxIm DL, Nebulosity, PixInsight, and other software tools, I've switched to DeepSkyStacker for the initial processing nearly all my deep-sky work. It is free, easy-to-use-and reliable. Whereas MaxIm DL enables you to do anything with a digital image, DeepSkyStacker guies you through the normal way of processing an image, with plenty of safeguards to keep sleepy astronomers from making mistakes.
You can get the release version of DeepSkyStacker here.
Update, 2019: Development has resumed and is roaring ahead; version 4.2.0 is current. It supports 64-bit Windows and uses libraw, rather than dcraw, for better support of newer cameras.
[Updated:] DeepSkyStacker has its own discussion group and Wiki on https://groups.io/g/DeepSkyStacker. That is where to find out about the latest developments.
What follows is a quick run-through of how I use it. I'm always working with raw (.CRW, .CR2) images from Canon DSLRs, and I always have dark frames and usually have flats and flat darks.
You do not need bias frames in DSLR work provided you make the settings described here. In fact, even though darks and flat darks are theoretically necessary when you are using flats, you will find that DeepSkyStacker can do without them — it uses the bias level reported in the EXIF data in the DSLR's raw file.
The first time you run DeepSkyStacker, you should make three important settings, which will stick once you've used them for a processing run (but not if you just set them and exit):
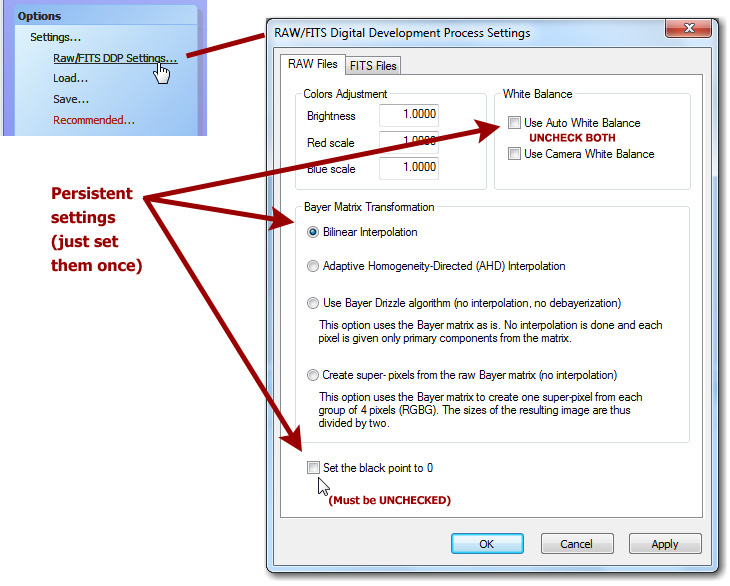
It's a good idea to make sure these settings really did stick; I've had one or two unexplained instances of one of them resetting to default, probably through a mistake of my own rather than a program bug. (This note dates from version 3.3 and the problem may no longer exist.)
Then, in any single processing run, all you do is this:
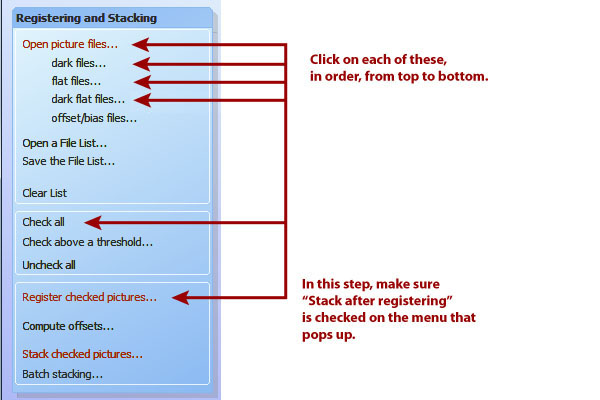
You will want to check the stacking parameters, too. The defaults will work but may not be optimal. I like to use kappa-sigma image combining for the images and for all types of calibration frames (which means you probably need to select it in four places).
As soon as stacking finishes, your picture is stored as Autosave.tif in the same folder as the image files. It's a 32-bit floating-point (rational) TIFF, and you may prefer to open it with PixInsight or 64-bit Photoshop and take it from there. Note: It will not open in 32-bit Photoshop; you'll get a misleading out-of-memory error. If you have a 32-bit operating system, proceed with the following steps and save as a 16-bit TIFF.
The stacked picture is also displayed on your screen. Don't worry that it looks dark and colorless; it is a linear image (with pixel values proportional to photon count, not subjective brightness) and still needs gamma correction and maybe a color saturation boost in order to look normal.
You can take it into other software as-is (see next section), or you can start to adjust the gamma correction (S-curve) and color saturation in DeepSkyStacker:
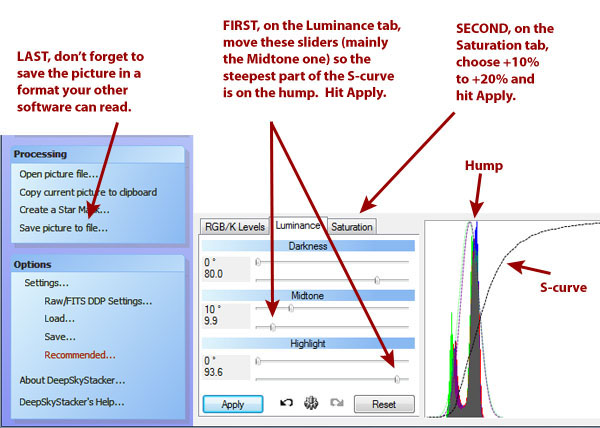
In principle, all the contrast and brightness adjustment can be done in DeepSkyStacker, outputting the finished product, but I choose not to do so. You can't resize or crop a picture in DeepSkyStacker.
The "Save picture to file" button gives you the ability to save in formats other than 32-bit TIFF. If you don't have PixInsight or 64-bit Photoshop, you'll probably want to have DeepSkyStacker save in a more widely used format, such as 16-bit TIFF, which other software will understand. But I'm using Photoshop CS3 or later under 64-bit Windows, so I go with 32-bit and open the file in Photoshop, then do the following:
(1) Adjust levels. The Auto Levels and Auto Color commands often do the trick, or nearly so. Then I hit Ctrl-L and move the three sliders as needed. The middle slider may have to go to the left or the right; try both, and don't get stuck thinking it always goes the same way.
(2) Image, Mode, 16 bits, so that more Photoshop functionality will be available.
(3) Reduce noise. The noise reducer is under Filters, Noise. Reducing color noise is especially important. If your version of Photoshop doesn't have this filter, there's a third-party product called Neat Image that does much the same job.
(4) Crop and resize the image as needed.
(5) Image, Mode, 8 bits, and save as JPG. But I also keep a 16-bit TIFF in case further editing is needed.
Taking a DeepSkyStacker Autosave.tif file into PixInsight
I thank Sander Pool for useful suggestions here. Revised 2015 Feb. 10. I am not entirely sure why the settings that work well now are so different from my earlier results, but an update to PixInsight may be the reason.
The Autosave.tif file that is output by DeepSkyStacker looks very dark and rather colorless when you view it in PixInsight or any other software. It looks dark and colorless because it is linear (not gamma corrected), which means the pixel values correspond to photon counts rather than screen brightnesses. A second reason for the weak color is that the filters in a DSLR's Bayer matrix are not narrow-band; for the sake of light sensitivity, each of them passes a considerable amount of light outside its designated part of the spectrum, relying on software later on to compensate for this.
In what follows I'll take you through the following:
- Previewing the image with screen stretch so that you can see it;
- Gamma-correcting it so that it's really as bright as it needs to be;
- Finally, raising the color saturation if needed.
I'm going to assume you used DeepSkyStacker to apply darks, flats, and flat darks, and that you're working with its output. If you were applying darks, flats, and flat darks in PixInsight, of course you would do it before gamma correction.
Step 1: Previewing the image with screen stretch
Screen stretch means that you view the image brighter, and with different contrast, than what it really contains. What you see is not what you get. Screen stretch is vital if you want to do any processing on an image before gamma-correcting it. You have to be able to see what you're doing! Photoshop doesn't have screen stretch, but many astronomy image processing packages do.
In PixInsight, turn on screen stretch by pressing Ctrl-A or by clicking on the toolbar:
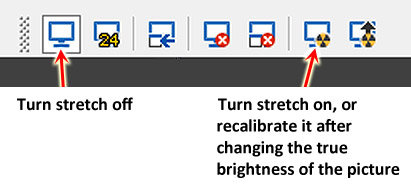
Your image will look very much brightened, with high contrast and lots of noise visible. Don't worry about that. The important thing is, you can see what's there.
Remember also that screen stretch doesn't affect the saved image, only the display. In reality, the image is just as dark as ever.
At this point, you may want to do background flattening (with division to overcome vignetting, or subtraction to overcome uneven skyglow), noise reduction, cropping, and various kinds of image analysis that work best on a linear (non-gamma-corrected) image, although in my experience, background flattening and noise reduction can also be done after gamma correction.
Step 2: Gamma correction (contrast and brightness)
Now turn screen stretch off so that you can see the image as it really is. Obviously, it's still dark!
Use Process, Intensity Transformations, Histogram Transformation. This is exactly what you'll use subsequently to refine the brightness and contrast of your picture, so you can just keep going. Here's what it looks like:
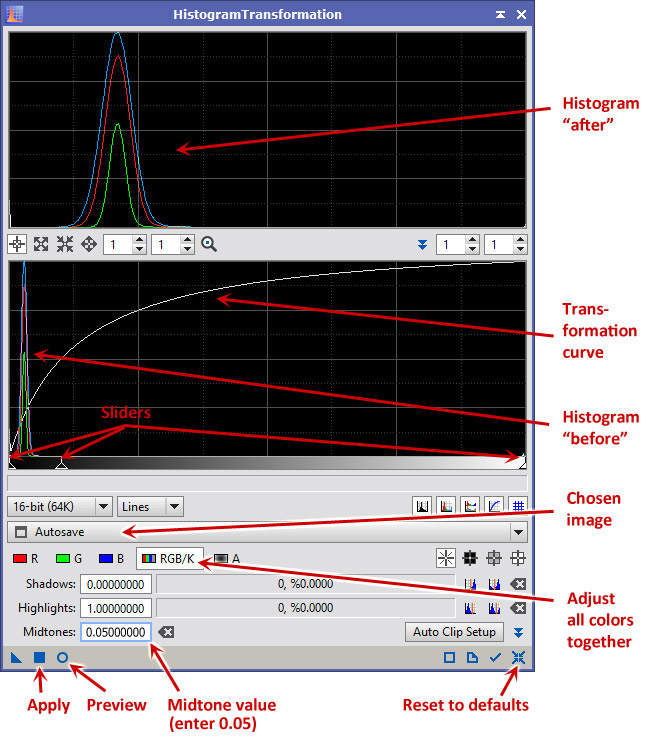
The workflow is as follows:
- Open your file.
- Open Process, Intensity Transformations, HistogramTransformation.
- Make sure the right image is chosen (in this case Autosave.tif).
- Click the Preview circle to open a live preview window.
- Type 0.05 in the Midtones box and hit Return.
- Immediately the preview window should look a lot brighter. Click on the Apply square to actually apply the change to the image.
- Now the preview window will look too light because you're seeing the same transformation applied again.
- Click on Reset (at the lower right) to get ready for your next correction.
- Drag the three sliders to adjust your image, and click Apply, then Reset to get ready for the next correction.
- You can go through as many cycles of this as you like.
Then save your finished file, or proceed to editing it in other ways, such as further refinement of the brightness and contrast, resizing, and (further) cropping.
Step 2 shortcut: Copying the screen stretch into the histogram transformation
But wait a minute. Screen stretch already displayed your picture gamma-corrected, and it probably did a rather good job of it. Can't you just copy the screen stretch settings into the histogram transformation?
Yes, but be careful about the order of steps, because if your picture has a screen stretch and a real stretch at the same time, it will look too light, maybe all white, and you'll wonder what you did.
Open both Process, Intensity Transformations, ScreenTransferFunction, and Process, Intensity Transformations, HistogramTransformation.
Set HistogramTransformation to operate on the file you opened (in my case Autosave.tif) as you did above.
(1) In the ScreenTransferFunction, turn on automatic screen stretch (same icon as you would use on the toolbar).
(2) Note the triangle at the lower left corner of ScreenTransferFunction. It represents the settings, as an abstract object. Drag it to the bottom bar of HistogramTransformation. This copies the screen stretch information into the histogram transformation.
(3) Turn off automatic screen stretch. (You no longer want the image automatically brightened because you're about to brighten it for real.)
(4) Preview and/or apply the histogram transformation. You can move the sliders around, taking their present position as a starting point.
Click here for a picture of what all this looks like.
Step 3: Adjusting color saturation if needed
The Autosave.tif file from DeepSkyStacker often seems to have weak color. In fact, however, proper gamma correction brings most of the color back. If you still need more color saturation, here's how to adjust it.
Note: Theoretically, color saturation should be adjusted before gamma correction. However, I have gotten poor results doing so, especially when using Auto Histogram. In the graphic arts, color saturation is always adjusted on gamma-corrected images, and the results are satisfactory. If you never use Auto Histogram, you may prefer to move Step 3 before Step 2 in this workflow.
Here are the steps:
- Open Process, Intensity Transformations, Color Saturation.
- Make sure the right image is chosen.
- Click the Preview circle to open a live preview window.
- Grip the horizontal line by the very left edge and drag it up to about level 0.5 or 0.6, leaving it perfectly horizontal.
- Click Apply to make the change.
- Now the preview window will look too gaudy because you're seeing the same transformation applied again. Ignore it and close the Color Saturation window; you're done.
I recommend a level of 0.5 because it works well with my Canon cameras, but you may want a higher or lower value. If you can't get enough, set Range to a higher value (I have used ranges as high as 7 so that I can easily pull the horizontal line up to 5.0). Of course you can reduce color saturation by putting the horizontal line below 0.
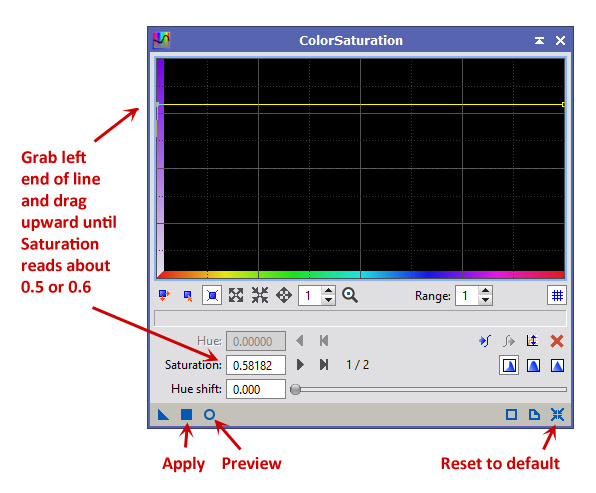
You'll find that if you type a number in the Saturation box, you'll only affect one end of the line. But you can use the "forward" and "backward" buttons near it to skip to the other end of the line, and then type a number for that too. The line should be horizontal unless you want to enhance some colors (hues) more than others.
Calibrating and stacking DSLR images with PixInsight
[Updated after further experimentation, 2018 Jan. 1.]
If you can't use DeepSkyStacker or simply want to see another way to do things, the following will get you started calibrating and stacking DSLR images with PixInsight. PixInsight is much more versatile than DeepSkyStacker, but also slower, and it doesn't keep everything in memory; instead, it puts plenty of working files on your disk drive, which you can delete after you're finished.
Step 1: Group your raw files
Make a folder with four subfolders, for light frames, darks, flats, and flat darks or bias frames respectively. To avoid confusion, make sure nothing is in these folders except your DSLR raw files. If you want to process pictures of more than one object, you can have several folders of light frames.
PixInsight expects you to use bias frames rather than flat darks, and to take all four types of frames at the same ISO setting. However, it has no trouble processing files taken the way I normally do for DeepSkyStacker. I simply tell it the flat darks are bias frames. It recognizes that they do not match the dark frames and is smart enough not to apply darks to them.
Step 2: Calibrate and align
Use Script, Batch Processing, BatchPreprocessing.
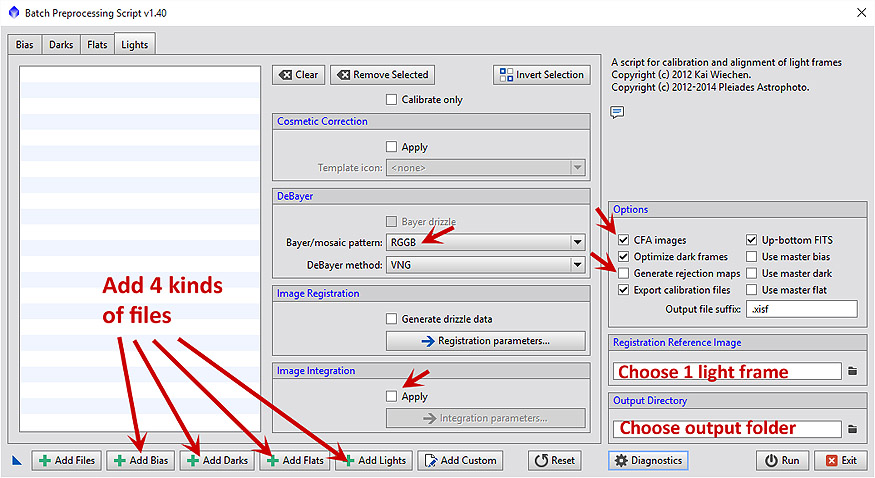
Add each group of files separately (Add Bias, Add Darks, etc.).
- Put in your flat darks as bias frames, and make sure "Optimize dark frames" is checked.
- An alternative to experiment with is making 2 copies of your set of dark flats, putting one set in as bias frames, and putting the other set in as darks, form a separate group from the regular darks because of their shorter exposure times.
- Or to make things simpler, use the modified script below.
PixInsight requires bias frames. If you take the first option, it will dark-subtract the flat fields, not using the flat darks, but using the regular darks scaled down to match the noise level of the flats. That is what they recommend, but the second and third options (which are equivalent) can give better results, in my experience, and they do not require "Optimize dark frames."
On the right of the window are several things that need your attention. Some of them are on the "Lights" tab.
Choose the appropriate de-Bayer mode for your DSLR; for Canon it is RGGB.
Under Image Integration, if you check "Apply" you can skip Step 3 (below) since stacking will be done for you. You will get a stern warning that it is only a rough stacking and that you can do better by adjusting it yourself - but in fact it is usually quite acceptable.
Check "CFA Image". This is vitally important!
I usually uncheck "Generate rejection maps" so I'll only have the actual output to look at.
The options to use master darks, master flats, etc., will check themselves as soon as the master files are created and can be used on subsequent runs.
You must specify one of the lights as the registration reference image. If there are large differences of quality between your images, choose a good one.
And you must specify the output directory for the large set of files PixInsight creates. If you're doing more than one picture with the same darks and flats, I leave it to you to figure out where to put things.
Then press Run and watch it go! Copious log messages are written to the screen and to a log file while the script runs.
Error messages you can ignore: You'll see some error messages go by rather quickly in the log. "Incremental image integration disabled" is normal for DSLR images. "No correlation between the master dark and the target frames" is OK when PixInsight is deciding whether to try to apply the darks to the flats and deciding not to do so.
Step 3: Stack
If you checked "Apply" earlier, this will already have been done for you, but you may be able to do it again better with more manual control.
Find the files. One of the many folders that the PixInsight just created is named registered. Find it. If files from more than one picture have been dumped into the same folder (from multiple runs of the script), make sure you know which is which.
Optional step 2.5: You can use Scripts, Batch Processing, Subframe Selector to measure the star image size and roundness in all your frames, to help you decide which ones to use, and even to calculate weights. The selected images can be saved as XISF files with the weights in them, so that when you stack them, those weights will apply. That's one more folder to create... but it's handy.Now open Process, ImageIntegration, ImageIntegration and stack the registered frames. Note that the user interface has many sections that you can open and close separately. Add the registered frames and then make some choices:
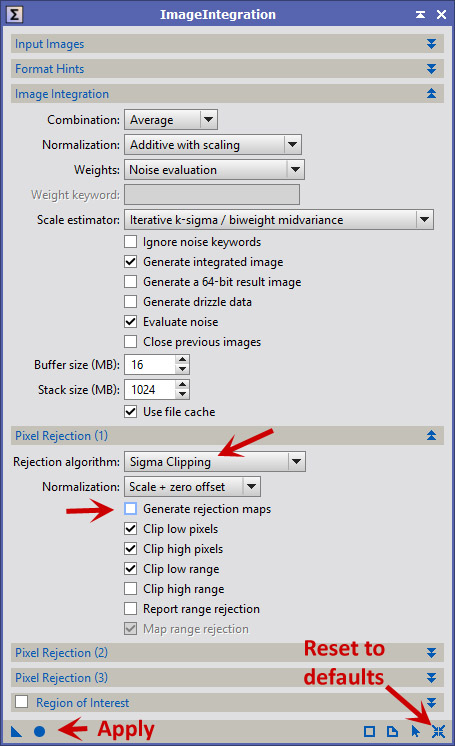
Arrows mark a couple of items that I use that are not defaults. "Reset to defaults" and "Apply" work as in other PixInsight processes.
Click "Apply" and take another break, not quite as long as the first one.
When you come back, a window called "integration" will be open, and you can proceed just as if you had opened the output of DeepSkyStacker. But I recommend saving a copy of it first; unlike BatchPreprocessing, ImageIntegration does not leave files on your computer automatically.
Step 4: Delete unneeded files
When you are finished with them, you will probably want to deleted the calibrated and registered folders, which contain a lot of files that will take up disk space.
For more information about calibration and stacking in PixInsight, see this tutorial.
Modified PixInsight BatchPreprocessing script for using flat darks, easier cosmetic correction
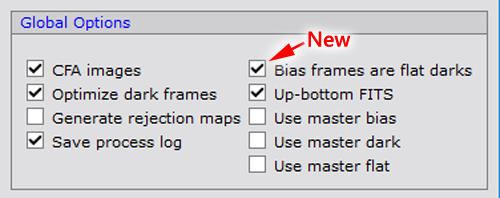
If you'd like for PixInsight to provide for flat darks explicitly, click here to download a modified script that adds the checkbox shown in the picture. (Or click here or here for earlier versions, if needed.)
When that box is checked, what you do is put in your flat darks as bias frames, and they will be used not only as bias frames but also to dark-subtract the flats. This is true whether or not you select "Optimize dark frames" (which I still recommend in order to fit the regular darks better to the lights).
The latest version of the modified script also allows you to perform cosmetic correction (of a simple sort) without having to create an instance in advance:
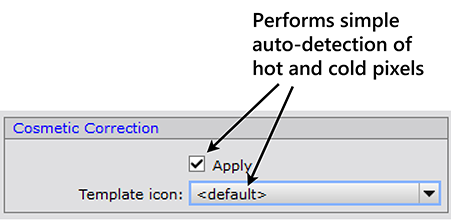
See the previous section for more about this.
Noise reduction tips for PixInsight
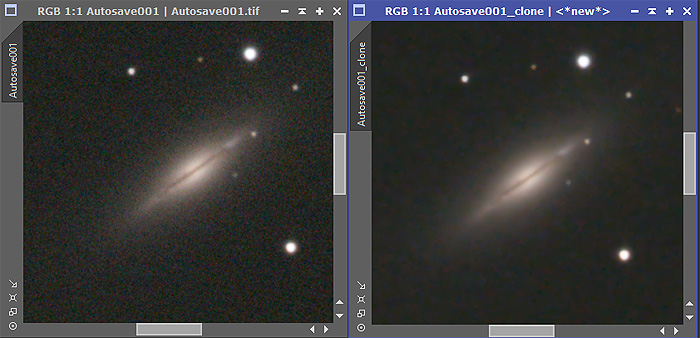
The noise (grain) in a DSLR deep-sky image is mostly in the shadows — the sky background, nearly black and devoid of real information. Accordingly, we would like for noise reduction to take place more in the shadows than in the highlights. Two PixInsight noise reducers offer this option, but it is not the default.
In Process, NoiseReduction, TGVDenoise which seems to be their best noise reducer, what you need to do is check the Local Support checkbox. Apart from that, the default settings are good; the support image should be left set to "<target image>". If you wish to have different amounts of luminance and chrominance denoising, tell it you want to work in L*a*b mode, make appropriate settings, and turn on Local Support for both luminance and chrominance.
TGVDenoise, in my experience, works best if used after all histogram, brightness, contrast, and color adjustments, and after resizing. Get the picture looking the way you want it, and let TGVDenoise do its magic as the last step.
In Process, NoiseReduction, ACDNR, what you want to do is check the Lightness Mask checkboxes for both luminance and chrominance noise reduction. Again, the default settings seem to be best. This is the second-best overall algorithm, and unlike TGVDenoise, it works well on images that have not yet been histogram-adjusted.
One last hint. If you need to reduce the size of a picture by an integer factor (such as 2 for half size), use Process, Geometry, IntegerResample and choose Median. That will produce a slightly less noisy image than the default, which is Average.
Manually color-balancing a picture in PixInsight or Photoshop (etc.)
Here is a picture with a strong color cast. It was taken through a nebula filter and was not flat-field-corrected (which would have tamed the color considerably, since the flat fields would be taken through the same filter). In what follows, I'm going to show you how to adjust the color balance manually.
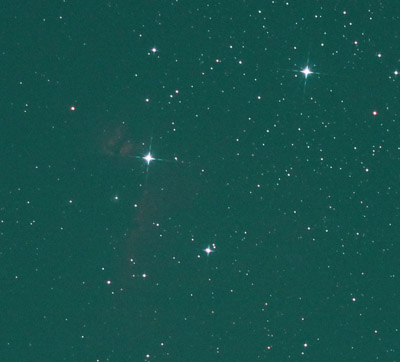
I'm using PixInsight, but very similar operations are available in Photoshop and other software. For example, in Photoshop, press Ctrl-L to get to the histogram menu, and choose RGB, R, G, or B. The principles are the same in all software packages.
Here's Process, Intensity Transformations, Histogram Transformation in PixInsight, with some important features labeled:
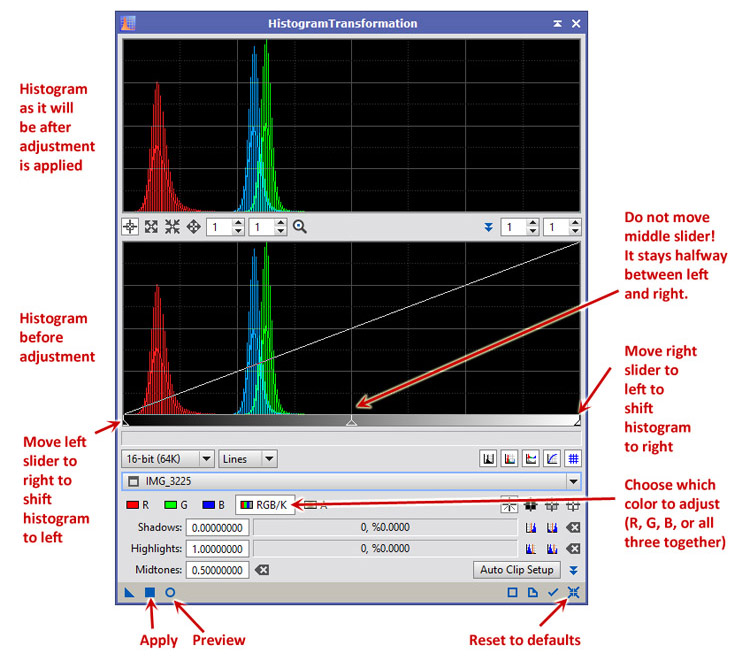
What we're going to do is adjust the red, green and blue humps so that they coincide. Right now, red is too far to the left, and blue and green are a little too far to the right. (Right means brighter, left means dimmer.)
Step 1: Choose G (green) and drag the left slider to the right so that the green hump moves to its intended position:
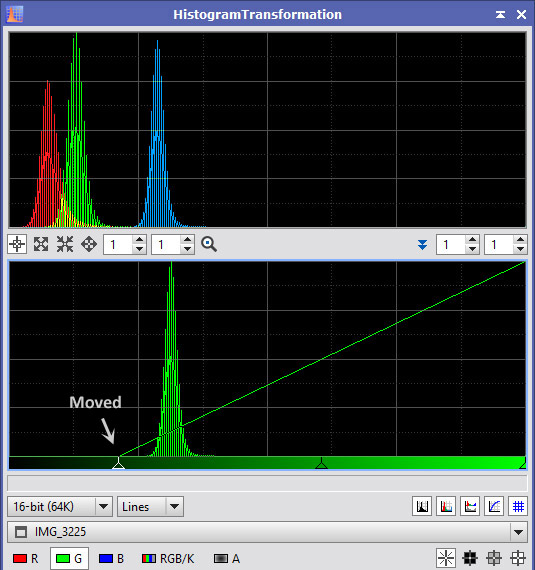
Important hints:
- Do not drag a slider across or into the "hump." If you do, you're discarding image detail. Drag sliders across the flat, featureless base of the histogram at the left and right. It is acceptable to drag across a spike at the extreme left of the histogram, if there is one, since that reflects bias or background glow.
- Do not move the middle slider. If you do, you will introduce "crossover" (a different color cast in the dark areas than in the bright ones). Let the middle slider automatically keep itself halfway between the left and right ones.
Step 2: Choose B and do the same thing. Make the blue and green humps coincide.
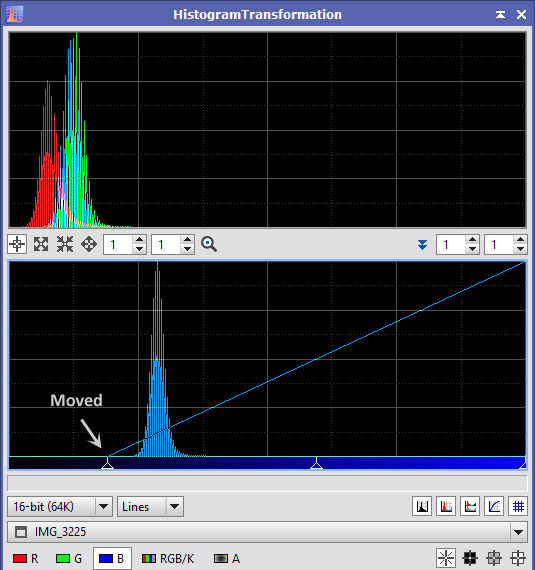
Step 3: Choose R and adjust red. Since the red hump needs to move to the right rather than to the left, we drag the right slider in, rather than the left slider. Looking at Preview, it became obvious that the red hump should not go quite as far to the right as the other two.
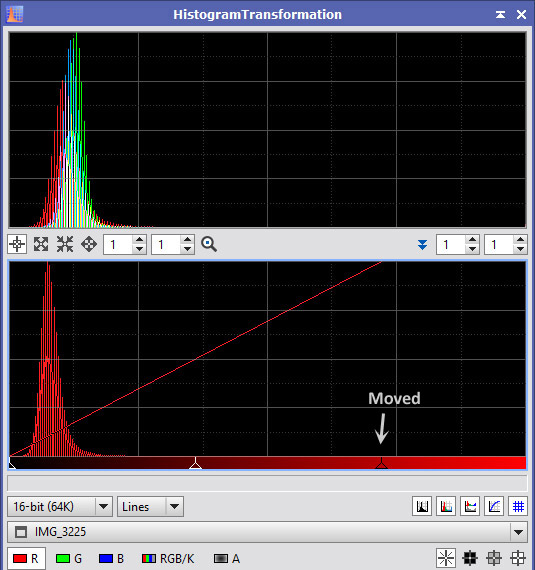
And voilà! The image has a nice neutral black background:
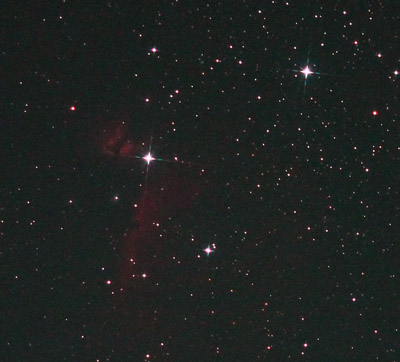
Mission accomplished. The overall contrast and brightness can still be adjusted further, of course.
Using deconvolution to correct minor guiding errors
Any image degradation that can be described mathematically can be undone, provided the image contents were merely rearranged, not discarded. This is called deconvolution. We often use a very simple inverse Gaussian deconvolution to "sharpen" pictures, and a more complicated wavelet-based deconvolution to bring out the detail in stacked planetary images.
What if the image is elongated or smeared? That's what happens when a deep-sky astrophoto doesn't have perfect tracking. For twenty years I've known that such images could be deconvolved, and finally, PixInsight has made it easy to do.
When the blur isn't symmetrical, the deconvolution is an iterative search process, often using the Richardson-Lucy algorithm. There are many parameters to set, but the PixInsight people have chosen wise defaults and automated the process to a remarkable degree. Here's how it's done:
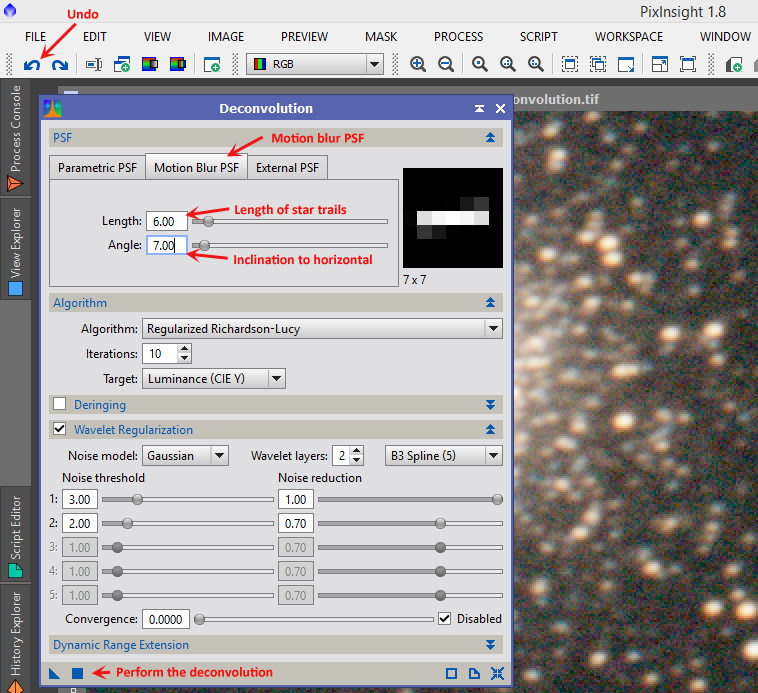
Just choose Motion Blur PSF and adjust the point-spread function by choosing the length (in pixels) and the inclination to horizontal. This is likely to be a trial-and-error process; you'll use the "Undo" button a lot. Fortunately, on modern quad-core PCs, the computation takes less than a minute.
Here are some "before" and "after" pictures of M5, taken with my 8-inch. The double star at the lower left has a separation of about 4.5 arc-seconds. These are enlarged and would normally be presented only half as big.
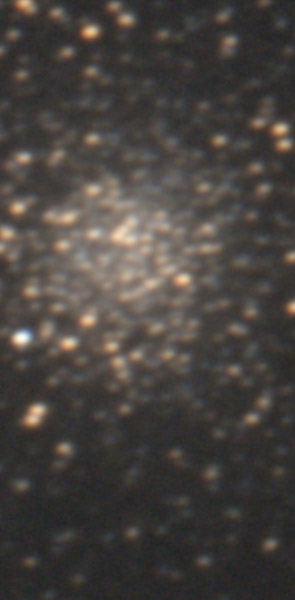
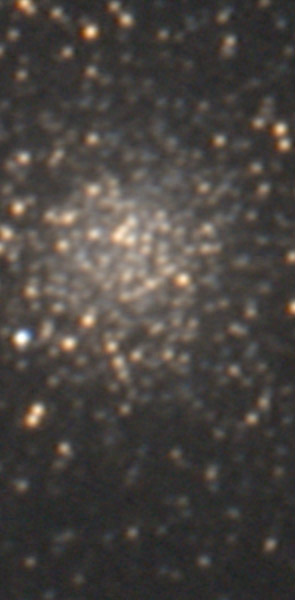
A note on flat-fielding in MaxIm DL
When using MaxIm DL to process DSLR images that are accompanied by flat fields and flat darks (dark flats), do the following:
(1) If there are no bias frames (as there usually aren't), tell MaxIm DL that the flat darks are the bias frames. Flat darks or bias frames are needed for correct flat-fielding, and with the short exposures that I use for flat fields, they are essentially equivalent.
(2) Choose "Bayer planes" rather than "Boxcar filter" as the mode for applying the flat fields.
Should we do dark-frame subtraction in the camera?
The following is about a subtle mathematical point that Sander Pool raised on the DeepSkyStacker mailing list. At first I didn't understand him; as I said, it's subtle. I thank him for taking the time to clarify it.
Whenever a DSLR takes an exposure longer than about 1 second, it's desirable to subtract a matching dark frame from it. That is a matching exposure taken with the lens cap on and/or the shutter closed. The reason is that all of the sensor pixels have a small amount of electrical leakage that makes them give nonzero readings even when there is no light. Some of them have quite a bit of leakage, and that's why a long-exposure picture often seems to be peppered with brightly-colored specks.
Most DSLRs will take and subtract a dark frame for you automatically. They call it long-exposure noise reduction and it's a menu setting. Take your 5-minute exposure, and then the shutter closes and the camera takes another 5-minute exposure, performs the subtraction, and stores the result in the raw and JPEG files.
Astrophotographers often do it a different way. We do batch dark-frame subtraction, where we take a series of exposures (usually many of the same celestial object), then a matching set of dark frames, and we do the subtraction with software. The software first combines all the dark frames into one averaged one, then applies it to all the images.
This has two obvious practical advantages. You can save time by taking the dark frames in a batch, at the end of the session, rather than in between exposures. My camera often finishes up the dark frames, under automatic control, with the lens cap on, while I'm taking down the other equipment or even during the ride home. And the other advantage is that if the software is smart enough, and one of the dark frames happens to have been hit by a cosmic ray (causing a non-reproducible bright spot), it can recognize the bright spot as deviant and throw it away automatically.
But the question was: Apart from those two points, is there any advantage to doing things one way or the other? Which is best?
The obvious appeal of in-camera dark-frame subtraction is that it's automatic, and you can be sure the dark frame is a good match to the image. It is taken immediately afterward, with the sensor at the same temperature and all the settings the same. See also the note at the end of this section.
With that in mind, I asserted that it makes no difference which method you use, as long as the numbers of frames are the same and (in the batch method) the dark frames are combined with simple averaging.
Not exactly. Here's the subtle part.
Usually, we taken multiple exposures of the same celestial object and then align and stack the images. That is, we allow for variations in telescope tracking by having the software align the images before combining them.
Consider now a situation where there are 3 image frames and 3 dark frames, and consider the pixel at location (x,y) in the finished picture.
If alignment has been done, pixel (x,y) in the finished picture corresponds to three different pixel positions in the original images. Call them (x1,y1), (x2,y2), and (x3,y3).
Now then. If the dark-frame subtraction was done in the camera, then each of these image pixels, (x1,y1), (x2,y2), and (x3,y3), was corrected against the corresponding position in one dark frame.
But if the dark-frame subtraction was done as a batch, then each of them was corrected against the average of all the dark frames in that particular pixel position. And that should be a much more accurate estimate of the actual leakage value at that point in the image, because it smooths out random fluctuation.
So the batch method wins — but only if you are aligning images before stacking them. If the images are already perfectly aligned, so that each pixel in the finished picture corresponds to the same pixel position in all of the input frames, then the techniques are equivalent, because averages are averages.
I think the practical difference will be small and will be most evident when the number of dark frames is moderately small (like 3 to 6). Maybe someone will do an experiment and give us some actual results.
[Update:] Actually, theory points one way, but practice points the other way! Jon Rista points out that with in-camera dark frame subtraction, the sensor temperature is almost exactly the same for each image and the corresponding dark frame. This has measurable advantages over a set of dark frames taken half an hour later, especially when temperatures are high. He argues that even if you take a smaller total number of exposures, the improved matching can make up for it.
The arithmetic of image calibration
Here's a summary of what goes on when you correct (calibrate) an astrophotographic image using dark frames and flat fields.
Throughout, all the arithmetic means "do this to corresponding pixels in all the images." For instance, if I write
I mean "add each pixel value in the first image to the one at the same position in the second image, and the result goes in that position in the new image."
We use dark frames and flat fields to overcome:
Dark current, leakage within sensor pixels that makes them act as if they're receiving some light even when they're not. This is the most prominent source of brightly colored noise or grain in long exposures. The cure is to subtract a dark frame, which is an identical exposure taken in total darkness, containing only the effect of dark current and not the effect of light. The improvement from this single step is often dramatic. Dark current is proportional to exposure time and ISO setting and increases with temperature.
Bias, the fact that pixel values don't start at zero. Even with no light and no exposure, each pixel typically has a nonzero value. Bias has to be measured separately if your software wants to convert a dark frame to a different exposure time than it was taken with. Otherwise, you do not need bias frames because dark frames include bias.
Uneven illumination, different amounts of light reaching different parts of the sensor because of obstruction near the edges of the field (vignetting), dust in front of the sensor, or other obstructions. This is counteracted with flat-field images, which are images of a blank daytime sky or a solid white surface taken with the same optics at the same focus and f-stop.
Before we do the corrections, let's look at what needs to be corrected. The following equations describe what comes out of the camera:
Light frame = (Astro image × Flat-field illumination) + Long-exposure dark current + Bias
Dark frame = Long-exposure dark current + Bias
Flat frame = Flat-field illumination + Short-exposure dark current + Bias
Flat dark = Short-exposure dark current + Bias
Bias frame = Bias
Throughout, I am ignoring the fact that each of these is actually a stack of many, averaged together to reduce non-reproducible noise. Typically you might stack 10 to 100 lights, the same or a greater number of darks, 10 flats, and 10 flat darks.
What we want is first to get a correct linear image (what would have come out of a perfect sensor, or as near as we can get) and then gamma-correct it to account for the fact that pixel values on a computer screen have a radically different meaning than pixel values on a sensor.
To perform whichever of the following calculations your software supports, generally all you have to do is tell the software where to find the files, and set it going. But it is useful to know how the calculations are done.
Method 1: Lights, darks, flats, flat darks
Perfect calibration results from these calculations:
Flat field illumination = Flat frame - Flat dark
Astro image = (Light frame - Dark frame) / Flat field illumination
Note that we are dividing by flat field illumination; that's why it has to be truly linear, based at zero. That, in turn, is why the flat darks were necessary. Since flat darks include bias, and dark frames also include bias, you can see that bias has been eliminated even though we did not use bias frames.
Another advantage of this method is that flats and lights do not have to be taken at the same ISO setting. They have to be taken with exactly the same optics, of course. The dark frames have to match the ISO setting of the lights, and the flat darks have to match the ISO setting of the flats. But taking flats at a low ISO setting (such as 200) is convenient and leads to lower noise.
Method 2: Lights, darks, flats, bias
An older way of doing calibration includes bias frames but not flat darks. The advantage of this method is that, with bias known, the dark frames can be (approximately) scaled to different exposure times, if necessary. The bias frames also do roughly the same job as the flat darks. The calculation is:
Long-exposure dark current = Dark frame - Bias frameFlat field illumination ≈ Flat frame - Bias frame
Astro image = (Light frame - Long exp dark current - Bias) / Flat field illumination
Notice the approximately-equal sign. This classic method ignores short-exposure dark current, which is normally a very small quantity.
With this method, all of the frames must be taken at the same ISO setting because the same bias frames are applied to all of them.
Method 3: Lights, darks, flats, flat darks, bias
The most thorough kind of calibration requires all four kinds of calibration frames, all taken at the same ISO setting as the lights. It is as accurate as Method 1 but allows scaling the dark frames to different exposure times if your software supports it.
Here's how it's done:
Long-exposure dark current = Dark frame - Bias frame
Short-exposure dark current = Flat dark - Bias frame
Flat-field illumination = Flat frame - Short-exposure dark current - Bias frame
Astro image = (Light frame - Long-exposure dark current - Bias frame) / Flat-field illumination
(The importance of dark flats came up in a conversation on the DeepSkyStacker Yahoo Group and I want to thank the participants, especially Dr. Ray Butler, of the Centre for Astronomy, NUI, Galway, Ireland. I also want to thank several people who referred me to this DeepSkyStacker documentation, whose diagrams correspond to the formulae above, except that I give the methods in a different order.)
Gamma correction
Gamma correction is the last step. Brightness values on the sensor are linear — proportional to the number of photons collected — but the human eye sees brightness approximately logarithmically, and that's how computer screens and printers reproduce it. (More about that here.)
What this means is that if the maximum white and minimum black number for the image are correct, the midtones still need to be lightened drastically. If you are starting with a perfectly exposed digital image, you could do a correction like this:

In fact, in astrophotography you usually have an underexposed picture with overexposed individual stars, a non-black background, and so forth, so gamma correction has to be customized to each picture. See the detailed instructions above.
EXIFLOG gets updated (again!)
 For many years I've been making my "logbook" (or rather text file) about each
digital astrophoto session by first running
EXIFLOG, my homemade utility that reads the
image files and outputs some information about each of them.
The latest version (January 2018) is a major update. It uses Phil Harvey's ExifTool and can read all the metadata in almost any image file from any kind of camera (everything except FITS and XISF, which I obviously need to put in).
EXIFLOG is freeware and may also be useful to daytime photographers. Enjoy!
Newer Canon DSLRs
Do Canon DSLRs have bias? Yes...
Many of us have been told, and I have been guilty of passing along, a piece of misinformation — that bias frames are not needed with DSLRs because the bias subtraction is already done in the camera before the raw image is recorded.
The fact is that you don't need bias frames if you are doing dark frame subtraction because dark frames include bias. For the same reason, if you use flat frames and also flat darks, you don't need bias frames. But Canon DSLRs do have bias, and it's quite significant.
On my Canon 40D, the bias is close to +1024 in every pixel regardless of ISO setting. But there is a considerable amount of random (thermal?) noise, which is proportional to ISO and diminishes when multiple bias frames are averaged. And there is a persistent streaky pattern, which does not diminish when multiple frames are averaged, and whose amplitude is apparently proportional to ISO. Here's what it looks like (greatly stretched):
You are looking at an array of pixels whose mean is 1024, whose range is 964 to 1191, and whose standard deviation is just above 6. Those are very low-contrast streaks. But now we know they are present in the bias.
Why is there bias? Because the analog-to-digital converter (ADC) cannot output a negative number. Accordingly, it is not designed to output 0 at the voltage level expected for total darkness. If it were, slight variations in components, thermal effects, and aging might drive that voltage lower, into a region too low to report, and then you'd get 0 when there was a detectable amount of light present. Instead, the ADC starts at a specific nonzero level, and Canon's engineers apparently chose 1024. That's not as bad as it sounds. Instead of going from 0 to 16,383 as you might expect, the pixel values go from 1024 to 16,383, giving you 15,360 different levels, the equivalent of a 13.9 bit ADC instead of a 14-bit ADC. That's a small price to pay for insurance against aging and fluctuation.
A look at some Canon 40D dark frames
What's in a dark frame? To find out, I quickly analyzed some sets of 5-minute, ISO 800 dark frames taken with my Canon 40D, one set at a temperature of 40 F and the other at 70 F.
Naturally, each showed a lot of speckles, together with some faint streaks (attributable to uneven bias as described in the previous section). One of them caught a cosmic ray edgewise, making a dramatic bright streak — which is why you should always combine dark frames with sigma clip rather than by pure averaging.
The two sets of dark frames were remarkably similar. Each had a mean of about 1031 and a standard deviation of about 330 (down to about 250 when five dark frames were sigma-clip stacked).
This is a puzzling result, since dark current should be temperature-dependent. It has been suggested that Canon is doing partial bias subtraction, perhaps normalizing the bias to a desired value (not zero but +1024 as described above). This possibility is explored in more detail in an article by Craig Stark. He concludes that Canon is roughly normalizing the bias in order to make subsequent processing easier.
What temperature definitely does affect is noise. To test noise, I calibrated the first dark frame in each set against the sigma-clip average of the other four. Result? A standard deviation of 77 at 70 F, but just 18 at 40 F. This is in line with the widely expressed generalization that CCD noise doubles with every 10 to 15 degrees Fahrenheit of temperature increase.
Streakiness (as illustrated in the bias frame elsewhere on this page) also increased with temperature. There was no sign of "amp glow" (glow on one side of the image) or overall non-uniformity.
An easy modification most DSLRs need
There's one thing I hoped Canon would think of, when designing the 60Da, since I dropped some hints in that direction, but they didn't. Or maybe they have good reasons for not making the change.
They didn't change the self-timer LED from yellow to red. So your 60Da still emits bright yellow light when you're using delayed shutter release at a star party.
The cure is simple. Using a hole puncher, make a round piece of red vinyl tape, and stick it on the LED. You can still see it light up, but now it's a modest red glow instead of a bright yellow one.
Copyright 2018 Michael A. Covington. Caching in search engines is explicitly permitted. Please link to this page rather than reproducing copies of it. This page is not in any way connected with or endorsed by any photographic or software manufacturer. Many of the product names that appear on this page are registered trademarks of their respective owners.