


Corrections, Updates, and Notes to the Second Edition
Contents:
Updates since 2021 (read this first)
Misprints and errors of fact
Additional notes (2018-2021)
Now that we are more than just a couple of years past the publication of the second edition, I want to describe newer developments explicitly in this section, rather than just in notes to particular pages. Read on...
The move to mirrorless
DSLR makers are all shifting entirely to mirrorless cameras (which I still call DSLRs). The rationale for including the mirror, twenty years ago, was to allow the sensor to be turned off during viewing and focusing, so that it did not build up heat or run down the battery. Those are no longer problems.
Note in particular that Canon has introduced another astronomy-modified camera, the EOS Ra (about which I hear good things), and it is mirrorless (but rather expensive).
If you are not already a DSLR owner, you may want to seriously consider, as an alternative, a dedicated astrocamera with a DSLR-sized sensor; such cameras are no longer much more expensive than DSLRs. One example is the Altair 26C.
Unimportance of read noise
Both calculations by Dr. Robin Glover and extensive tests have shown that sensor read noise is much less important than we thought. Shot noise in the sky background (p. 290) is usually far greater than read noise. To ensure this is so, expose generously, to perhaps 1/4 or 1/3 of the camera's histogram (a little more than shown on p. 81). Doing this may require turning up the ISO setting; we weren't actually using the camera's whole dynamic range anyhow. At good exposure levels, the difference between Sony and Canon sensors, or even between third- and second-generation sensors, is often completely unnoticeable.
That is also why your dark frames probably do not need to be as numerous as your light frames. The dark frames do not have the shot noise of the sky needing to be averaged out.
Nikon quirks
Most Nikon DSLRs, including the popular D5300 and D5500, are stranger than we realized. Although they perform outstandingly in sensor tests, they deliver "raw" images that are not truly raw, and more has been discovered after I wrote the older notes near the end of this page. There are also scattered reports of similar quirks with Sony and Fuji cameras and even some of the latest Canon mirrorless models (possibly confined to low ISO settings).
The problems are discussed in full on two web pages by Mark Shelley, Nikon's Lossy Data Compression and Nikon's Hardcoded Image Corrections, and in a long conversation on Cloudy Nights Forums at this link. He also provides free software that corrects any effects introduced by compression.
In brief: not only is there lossy compression of some brightness levels (p. 282), which can show up in stretched astroimages, but there are also some odd low-level compensations that show up mainly in underexposed images, apparently intended to compensate for variations in color sensitivity of the sensor when light rays strike it at an angle, away from the center. Both of these problems most often show up as shadings or color gradients that are roughly in the form of large rings around the center of the image.
The workaround is, basically, to expose generously, around the middle of the camera histogram. (See however those web pages for more specific advice, model by model.) When you do this (by turning up the ISO if necessary), you are no longer taking advantage of the low noise and high dynamic range of the sensors. Perhaps you never were; astronomical images are usually stretched to use only a small part of the available dynamic range. See "Unimportance of read noise" above.
This does not mean you cannot use and enjoy a low-end Nikon DSLR for astrophotography. My D5500 serves me well. I've encountered the color-compensation rings a couple of times, and I thought they indicated some kind of circular reflection in my optics, so it's a relief to know they have another explanation. In my experience, the rings show up only in severely underexposed, strongly stretched images that would have looked bad with any sensor (I've done comparisons). They are bluish. My D5500 still gives me better pictures than I could get with an older-technology DSLR that lacks the D5500's quirks.
When the rings do appear, they are only in the blue channel, and can be removed by thresholding the blue channel (cutting off the leftmost part of the histogram in blue only). Red and green are not affected (in the D5500).
And my D5300, which is not filter-modified and is the Nikon that I tested for the book, actually does not have the compensation artifacts when attached to a lens or telescope that doesn't communicate with the camera's electronics. That is why I did not encounter them.
Lenses
Alongside telephoto lenses from camera makers, there are now special telephoto lenses for astrophotography, and their performance is often outstanding. The William Optics RedCat series comes highly recommended. Personally, I have had excellent results with an Askar SharpStar 200-mm f/4 astrographic lens. By omitting autofocus and electronic aperture control, manufacturers can afford to spend more on the optics and pay more attention to collimation, which is critical for astrophotography and often unreliable in secondhand lenses that have been banged around by sports photographers.
Software
Computer control of the camera is a more widespread practice, including the ability to focus by viewing a greatly magnified live image on the computer screen. BackyardNikon and BackyardEOS (p. 190) are being supplanted by N.I.N.A., which is freeware and is for astrocameras as well as Canon and Nikon DSLRs. I find it reliable.
For exploring raw image files, determining the levels in DN (ADU), viewing histograms, and the like, I find RawDigger very useful.
I no longer recommend my own BatchPreprocessingFD script in PixInsight. Instead, use the WeightedBatchPreprocessing script that comes with the software, and put in the flat darks along with the darks; PixInsight will distinguish them by exposure time.
Some of these may have been corrected in later printings.
(p. 10, bottom) Nikon vs. Canon vs. Others:
| change | Nikon DSLRs can only meter |
| to: | Low-end Nikons such as the D5300 can only meter |
(p. 15) Choosing the Computer:
| change | 8 megabytes of RAM |
| to: | 8 gigabytes of RAM |
(p. 47) Nikon Manual Movie Settings:
| change | 1/60 |
| to: | 1/60, 1/50, or 1/30 |
(p. 119, first line) Nikon:
| change | On most Nikon DSLRs |
| to: | On low-end Nikon DSLRs |
(p. 119) Lens Mount Adapters:
| change | control the aperture electronically |
| to: | control the aperture with mechanical tabs |
(p. 165) INDI and Windows:
| change | as well as Windows. |
| to: | and can be bridged to ASCOM under Windows. |
(p. 271) Matching Focal Length to Pixel Size:
In some of the first copies printed,
| change | ' | |
| to: | " | in 6 places. |
This was corrected in later copies. The new version has the same copyright page (it is not identified as a second printing) but is about 3% thicker, presumably due to slightly thicker paper.
(p. 300) Obtaining Data — PixInsight:
| change | IMG2394+3000−IMG2396 ... (Here 3000 is the constant added to avoid negative numbers.) |
| to: | IMG2394+0.1−IMG2396 ... (Here 0.1, meaning 0.1 times the maximum value, is the constant added to avoid negative numbers.) |
(p. 302) Formulae for dynamic range:
| change | Bias = the average (or preferably median) of the dark frame |
| to: | Bias = the average (or preferably median) of the flat dark |
(p. 330 line 7 from bottom) Research Literature On Line:
| change | (1950) |
| to: | (1952) |
(pp. 336-7) Exposure Tables:
| change | m" | |
| to: | m" | in table headings where it is not already in italics. |
(p. 341 lower right) Index:
shopping strategy should be indented 2 levels, to line up under manufacturer.
(p. 347 lower left) Index:
| change: | debayerization | |
| to: | deBayerization (deBayering) |
(p. 348 upper right) Index:
at appropriate place insert:
demosaicing see deBayerization
(p. 5) DSLRs without Mirrors: MILCs
The new Canon EOS Ra is a mirrorless camera designed for astrophotography, and my early
tests indicate it is a very solid performer, with low sensor noise, good H-alpha response,
good color rendition in daytime photography (like Ektachrome film, which is very sensitive
to H-alpha and yet well balanced for the full range of colors),
and some special features such as 30× magnification in Live View.
It is not the cheapest option, but it performs very well.
(pp. 7-9) Dedicated Astrocameras: The choice between a DSLR and a cooled astrocamera for serious deep-sky work may depend partly on your climate. If you do a lot of astrophotography in hot weather, the cooled astrocamera has an advantage. If your summer deep-sky sites are mountainous and cool, a DSLR may serve you just as well, and be easier to use.
(p. 10) Canon vs. Nikon vs. Others: On Canon vs. Nikon see below.
(pp. 11-12) Electronic First-curtain Shutter (EFCS): I have verified that even the Canon EOS XS (1000D), a low-end camera, has EFCS when pictures are taken in Live View. The availability of EFCS on low-end models is a Canon selling point.
The Nikon D7500 has EFCS (when enabled through the menus) and a sensor similar to the popular D5300 and D5500, or, if anything, slightly better.
(p. 13) Shopping Strategy: Don't overlook the possibility of renting high-end lenses, cameras, and even hydrogen-alpha or infrared modified cameras. Two reliable companies that offer all these things are www.borrowlenses.com and lensrentals.com. Rented equipment is often available for purchase, so this can be a painless way to try before you buy.
(p. 16) Transferring files from one computer to another: One method I use is to copy them to a 32-GB SD card. However, the default file system (FAT32) will not accommodate files larger than 4 GB, so you must format the card as exFAT or NTFS instead (which also makes it faster). With exFAT there is a further problem that some Linux systems do not timestamp the files correctly when Daylight Saving Time is in effect. NTFS works reliably, but then the card cannot be used in digital cameras, only computers.
(p. 19) Ethical issues: I wrote, "some people are likely to be put off by a picture of anything, no matter how beautiful, if it is astronomically false or impossible, such as a combined image of two separate nebulae or an eclipsed sun in front of clouds."
The latest thing is even stranger — motion pictures with fake and unrealistic movement in them, made from still pictures. I've just seen a motion picture of a well-known nebula in which the gas clouds are swirling around (not in any physically realistic way) and, some of the faint stars are running around in circles, as if something were chasing them. Very disconcerting, especially since people are going to see it and think the motion is real.
(p. 25) dcraw: See note to p. 228.
(p. 43) Bulb: Some low-end Nikons lack a "Bulb" shutter setting. You can still do a lot of astrophotography with 30-second exposures (the longest manual setting), and there are workaround involving camera-control software, although the same cameras have limits on computer control. See the discussion here.
(p. 47) Menu Settings: I am told the mirrorless Canon EOS Ra has a setting to allow it to take pictures when not attached to a Canon lens. By default, it refuses to do so, to protect daytime photographers from mistakes.
(p. 51) Limiting Light Emission from the Camera: The Nikon D5500 has a touch screen, which can and should be disabled from the menu settings before you put a red cover over the screen. If you can't disable the touch screen, you can still use a red cover, but it may prevent the touch screen from working. It is prudent to make sure your camera does not have essential functions that are only available from the touch screen.
(p. 54) Intervalometer: Many brands of intervalometers look alike and have the same LCD display. Internally, there seem to be two kinds, one of them temperature-sensitive (as you can verify by putting it in the freezer and checking the timing accuracy) and the other one not. More about that here.
(p. 57) Magnified Preview on the Screen: Remember that in Live View, the camera is taking 1/60-second exposures over and over. It can't show you what a 30-second exposure would look like, and it can see only the brightest stars. Focus on as bright a star as you can find.
If you have trouble seeing stars, try changing the focus, since out-of-focus stars disappear. Also make sure the exposure is set to B (Bulb) and the ISO is set to a high value (possibly higher than you will use to take the actual picture). Finally, magnify the screen image; on some cameras, stars are barely visible when magnification is turned off.
(p. 58) Bahtinov mask: I have found that a Bahtinov mask works very well with Live View focusing at high magnification. Each star image is surrounded by six diffraction spots. When they are positioned symmetrically (the middle one on each side halfway between the other two on each side), focus is correct. It is easy to detect very slight focus changes, such as those caused by tightening a focus lock.
(pp. 60-61) Dust on the Sensor: You also need a sensor loupe, a special illuminated magnifier for viewing dust on the sensor. This enables you to check for dust, determine whether you have blown it off, and recognize water marks, which will require swabbing. For more information click here.
Be very careful. There is always some risk of scratching the sensor, and if you do, fixing it costs hundreds of dollars.
If your camera moves its sensor, either for image stabilization or for a feature such as Pentax Astrotracer, be sure to follow the instructions so that it is locked into position and won't be damaged when you clean it.
Some hints on using Sensor Swabs:
(0) Watch the video on www.photosol.com before starting.
(1) The manufacturer offers a warranty against damage, but only if you use the swabs exactly as directed, with the same manufacturer's cleaning fluid, Eclipse or Aeroclipse. The latter fluid is slightly less effective but also less flammable, so that it can be shipped by air.
(2) Use relatively fresh fluid. After sitting on the shelf for several years, either of these fluids can become milky and unable to dry clean; that's because it has dissolved some of the plastic in the bottle.
(3) A common mistake with Sensor Swabs is not to press down hard enough. The tip of the swab is a sponge and needs to be flattened against the surface; if used too lightly, it will leave streaks.
(4) Another common mistake is not to use enough liquid.
(5) The appearance of streakiness after cleaning may just be traces of liquid that has not yet evaporated. Check again in ten minutes.
(6) Do not re-use the swab, but do save it for cleaning things less critical than optics, or for use as a disposable paintbrush — I have found used swabs very handy for both purposes.
(p. 82) Dithering not only controls hot pixels, it also reduces color mottle (chrominance noise) and streaky patterns in noise that are caused by repeated guiding corrections in the same direction.
(p. 82) Dark frames: The eyepiece cap is more important than I first realized; light can leak into the camera through the eyepiece, so now I always use the eyepiece cap not only when taking dark frames but also when taking the deep-sky images themselves. This is all the more important now that we often have a computer emitting small amounts of light in the vicinity of the camera.
If you have trouble with the rubber Canon eyepiece cap that is supplied on the camera strap, get a Nikon DK-5 eyepiece cap, which is rigid plastic and slightly too big, and line it with black vinyl tape.
When taking dark frames indoors, particularly for sensor testing, note also that your lens cap may not be perfectly opaque to infrared light, and light can even leak in through the lens mount. It is best to take dark frames in the dark.
(p. 85) Acquiring flat fields: There are two problems with using the daytime sky as the light source. One is that the color is so bluish that one risks overexposing the blue pixels while inadequately exposing the others. The other is that when first set up in the daytime, the telescope is not focused on infinity, unless you can focus it on the moon or a very distant terrestrial object.
Ten years ago, it was common to decolorize the flats by binning (averaging) pixels 2×2. We now know that one of the important functions of flats is to compensate for differences between individual pixels, not just dust motes and vignetting, so this is no longer recommended.
If you use an artificial light source, you need something that emits light equally in all directions that can enter the camera, including not only the field of view, but also light rays that could cause reflections. I had disappointing experiences with a small light box that was not equally well diffused at all wavelengths; I got shadows and irregularities in deep red. Currently I'm using an LED-illuminated, USB-powered artist's light box as a light source for flats. If you use an 8-inch (20-cm) telescope, bear in mind that some "A4 size" light boxes are slightly more than 20 cm wide, and some are slightly less; you'll need one that is bigger than the telescope objective, of course. Also look at it closely and make sure its brightness does not fall off sharply when you're not viewing it from a perfectly perpendicular direction.
(p. 86) Flat darks: Some software packages can apply flats correctly even if you have no flat darks or bias frames; they obtain the bias level (at least approximately) from data reported by the camera firmware. See note to p. 213.
(pp. 86-87) Bias frames: I have heard unconfirmed reports that some DSLRs (not Canon or Nikon) have different bias levels in M (Manual) mode than in B (Bulb) mode. You can find out by taking a dark frame in M mode and in B mode and comparing them in software that allows you to read out the pixel levels (see later chapters). If your camera has different bias levels in M than in B, this should not affect calibration from lights, darks, flats, and flat darks, but it may cause problems if you use a method that relies on bias frames or if your software treats the flat darks as bias frames.
(p. 108) Lens quality: The lens test web site that I rely on the most is opticallimits.com, formerly photozone.de. Another good one is www.lenstip.com. Their plots are not MTF curves, but rather the resolution at which 50% MTF is achieved, plotted versus f-stop. You want the center and edge readings (red and blue dots on the graph) to stay close together so that star images will be round. Most lenses nowadays are sharpest wide open or nearly so, and resolution falls off at higher f-numbers; that is normal. The publishers of this site are harsh critics of lens quality (just like us), and they share my impression that many of the best lenses are made by Sigma.
Another treasure trove of lens information is the blog at www.lensrentals.com, which contains dozens of highly technical (and sometimes amusing) articles about lenses and lens testing. They test lenses for MTF, and they, too, find that the newest Sigma lenses are second to none.
The newest lenses are very sharp, very fast (f/2 or even f/1.4), and rather expensive (think $1000 per lens). I have not yet used any of these newest-generation lenses (Sigma Art series, Zeiss Otus and Milvus, and their competitors from Canon and Nikon), but the test results are impressive, and $1000 for a good lens is not excessive when you consider what lenses cost in 1970 and factor in inflation.
(p. 144) Counterweights: It is generally better to use heavy counterweights closer to the center of gravity, rather than lighter counterweights on a long shaft. Of course, when the telescope is placed on the mount, the counterweights should be farther out than their final position.
(p. 152) Polar scopes: I found that when I tilted my head to look through my polar scope, I often misjudged the orientation of the reticle. The cure is to use the altitude adjustment of the mount to establish exactly what direction is vertical. Center Polaris, then use the altitude knob to move it to the very bottom or very top of the circle, and then go from there, using software or the chart on p. 153 to find out where to place Polaris.
(p. 158) A futile quest: See note to p. 160.
(p. 158) Noises from mounts: One aspect of mount performance that I didn't mention is noise. Computerized mounts with servo or stepper motors can make strange noises and move in irregular jerks when slewing. Noises mean nothing unless there is actually a problem with tracking performance and the noise is correlated with it. Some mounts squeal, hum, buzz, creak, and alternately fall completely silent at unpredictable times while tracking. As for irregular jerks, when the mount slews from one place to another, an algorithm manages the motor acceleration, and sometimes the criterion for using a higher speed is fulfilled for only a fraction of a second. As long as the telescope ends up pointed correctly, the noises it made getting there are of no significance.
NEW: (p. 159 bottom) RMS: Strictly speaking, the RMS error is the same as the standard deviation only if the mean is 0 (which is usually very close to the case). RMS error is referred to 0 and standard deviation is referred to the mean, whatever it may be, so if there is a constant error, it drops out of the standard deviation but not the RMS value. I thank James Gronseth for pointing this out.
(p. 160, bottom) Unguided subs: The length of unguided exposure that you can make with a particular mount is not inversely proportional to focal length. For example, if you can go 2 minutes with a 100-mm lens, that doesn't mean you can necessarily go 1 minute with a 200-mm lens.
The reason is that periodic error is periodic. It is an oscillation, not a steady drift. As you expose longer, the error doesn't keep increasing; it reverses itself and the tracking swings back and forth around the correct position. The error in a 2-minute exposure is anywhere from 1 to 2 times that of a 1-minute exposure, depending on the waveform. At shorter focal lengths, the error can be completely invisible no matter how long you expose, and then, at a particular focal length, it suddenly starts to make a difference even in short exposures.
The proportionality does work in the opposite direction. If you can expose 1 minute with a 200-mm lens, then you can expose at least 2 minutes with a 100-mm lens, possibly more.
(p. 160, bottom) Unguided subs, a further note: Once you get periodic error down to a certain level, the length of your unguided subs is likely to be limited by small errors in polar alignment whose effect is different in different parts of the sky, leading to widely varying results.
To keep drift down to 1 arc-second per minute of time (which is reasonable if you want to do 2- or 3-minute subs with a long telephoto lens), in the worst case you have to polar-align to within 4 arc-minutes, which is better than you can do with a polar scope or even Celestron's ASPA routine. At that point, drift alignment with a guidescope and guide camera comes to your rescue — but if you can do that, you might as well just autoguide! Devices such as the Polemaster (a polar alignment camera) are also very handy, but you have to bring along your computer, at least for polar alignment.
(p. 161) Backlash: It is important to distinguish worm backlash (which the telescope can wobble across) from total backlash (which causes a delay when you slew in one direction and then the other). Some newer mounts reduce worm backlash practically to zero by spring-loading or magnetically loading the worm.
Celestron tells me there can easily be 60 arc-seconds of backlash in the gearbox (not the worm gear); this is normal, and no adjustment of the worm gear will affect it.
Some mounts should be deliberately unbalanced (east-heavy) for better tracking, and some should not. Celestron recommends unbalancing the mount to the point that it might actually move when brakes are released. Don't do this with mounts that have spring-loaded or magnetically loaded worms, or whose instruction manuals do not recommend it.
Celestron's specification for total backlash on a mid-sized German equatorial mount is 60 to 180 arc-seconds. Zero backlash is not the goal.
Backlash of 120 arc-seconds (typical in a Celestron mount) is equivalent to 8 seconds of time (8000 milliseconds of time) if the guiding correction rate is 1× sidereal, or 16 seconds (16,000 milliseconds) if the guiding correction speed is 0.5× sidereal. Software such as PHD2 measures backlash in units of time, the amount of time that the button would have to be pressed to overcome it.
(p. 165) Communication with the mount: Regarding INDI see second note to p. 189.
You may be wondering why so many telescope mounts still use RS-232 serial ports instead of USB. There are two reasons. First, RS-232 signals are much better at traveling over long cables through electrically noisy environments. Second, unlike USB, the RS-232 standard does not require a device driver. Mounts tend to last longer than computers and may be used with computers that were not foreseen when the mount was designed. If the interface is RS-232, then instead of needing a device driver for the mount, the unforeseen new computer merely needs to emulate the old RS-232 standard.
(p. 166) When autoguiding with a color camera, bin the pixels 2×2 if possible, to eliminate the Bayer matrix.
(p. 169) Choosing a Guide Star: Strange things can happen if your guide star is a double star and you don't realize it. If your autoguider seems to be jumping back and forth or just not acting normal, try a different star.
NEW: (p. 170) Autoguider Settings: Current thinking, confirmed by my own experience, is that exposures should be shorter than originally recommended. In particular, multi-star guiding in PHD2 greatly reduces the risk of "chasing the seeing" and allows you to chase irregularities in your mount instead. Also, making corrections more frequently increases the chance that large corrections, when needed, will be successful. Exposures in the 1.0 to 1.5-second range often work well; even shorter ones are worth trying. See also Metaguide on p. 166. (I thank Jason Burns for useful discussion of this point.)
(p. 172) Interpreting Guiding Graphs: Infrequent jerks in right ascension (as often as one every few seconds) can also be caused by overtightening the right ascension clutch on the Celestron AVX mount, causing some kind of binding.
Yet another cause of sudden jerks is electrical — a dew heater that turns on and off with a thermostat, causing a fluctuation in the voltage. You may be unaware of the thermostat action. This is a good reason to power the mount from a different battery than the dew heaters.(p. 173) Alternation, especially if very rapid, can also mean that the calibration is incorrect or absent; that is, the autoguider doesn't know which way and how far it is actually moving the telescope.
Another autoguiding problem is runaway, when the autoguider quickly makes corrections in the wrong direction and runs away from the star with exponentially increasing speed. That can happen if you have done a meridian flip and the autoguider doesn't know about it. More generally, it means the calibration is backward (the movements are in the opposite direction than the autoguider intends).
(p. 173) Related to sawtooth and alternation is a graph like the following, where there are frequent sudden lunges or jumps in one direction, followed by rapid corrections:
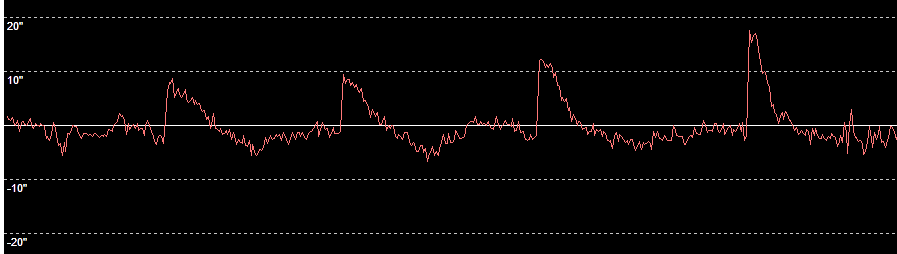
I first thought this was caused by the mount wobbling back and forth across its own backlash and being corrected quickly. But, based on further knowledge of the mount on which it happened, I now think this is an effect of stiction: attempted corrections build up tension but do not make the mount move until it suddenly breaks free of the friction and moves too far. Then, since the friction has been broken, corrections in the opposite direction are able to undo the excessive movement.
(p. 174) Right Ascension and Declination are Different: Right ascension backlash does not matter if the guiding rate (correction rate) is less than or equal to sidereal (such as Celestron's default of 0.5×). In that situation, the motor is only varying in speed, never reversing. If the guide correction rate is greater than sidereal rate, the motor is capable of reversing direction, and backlash can show up.
(p. 176) How Roundness is Measured: PixInsight has moved SubframeSelector from Scripts to Process, ImageInspection, and it runs much faster. If all you want to know is eccentricity, and FWHM in pixels, then you need not tell it the scale of the image or the gain of the camera.
(pp. 185-6) Alternative to lamp cord: The ideal power cable would be the same size (of wire and insulation) as lamp cord, but more flexible thanks to silicone insulation (rather than PVC) and wires made of many very thin strands. I've found a supplier of such wire, BNTECHGO, in China, and their product is available on Amazon at this link. Do not confuse it with other BNTECHGO products, nor with red and black "zip cord" from other sources.
(p. 189) Linux is better supported with every passing day: For greater long-term stability, many amateurs (including me) are migrating to Linux for telescope and camera control (a process I have nicknamed "defenestration"), and the available software is getting better rapidly. Open PHD Guiding (PHD2), FireCapture (for video), and KSTARS (for star maps), and especially Ekos (for camera and telescope control) have free Linux versions. PixInsight supports Linux and macOS as well as Windows.
(p. 189) Telescope controller need not be a laptop: If you're going to have a dedicated computer for your telescope, autoguider, and camera, it need not be a laptop. The latest trend is to use a very small computer that rides on the telescope and is accessed remotely.
The small computer may be a Raspberry Pi or an Intel Compute Stick, but ready-to-use solutions are becoming commercially available. One is the Stellar Mate, much cheaper than a laptop. The computer is small enough to ride on the telescope, runs on 5 volts, comes pre-configured with suitable software, and totally frees you from worrying about whether your main computer will remain compatible with your equipment-control software. Stellar Mate runs as an INDI server, which interfaces with your equipment and enables you to control it with Ekos or other software from the computer you are sitting at.
(p. 202) PixInsight dark frame optimization should not be used if the sensor has appreciable amp glow. It assumes the dark frames are genuinely dark.
(p. 213) DeepSkyStacker is now up to version 4.2.2, with support for newer cameras and improved performance.
DeepSkyStacker goes beyond the classic calibration algorithms by also looking at the bias level that is reported by the camera in the EXIF portion of the raw file. This may be a measured bias level (from the unilluminated pixels that many sensors have, off the edge of the field) or the bias level designed into the firmware.
Normally, this bias is subtracted from all frames of all types during processing. If you check "Set Black Point to 0" it is ignored, but during extensive tests, I was not able to find any situation in which checking "Set Black Point to 0" makes the picture better. There are many situations in which it makes no difference, because:
(A – X) – (B – X) = A – B
I am guessing that "Set Black Point to 0" was provided, during development, to allow the user to revert to a classic algorithm just in case.
Because it looks at the camera's reported bias, DeepSkyStacker has a superpower. If you're applying flats, and you have no flat darks or even no darks, DeepSkyStacker can still apply them more or less correctly. This ought to be theoretically impossible, but in fact the reported bias level is used as a substitute for a bias frame. Other software may have the same superpower; I haven't checked.
(p. 228) DSLR raw files: dcraw has been superseded by LibRaw, a new open-source raw file decoder, and PixInsight has made the switch.
(pp. 230-231) Lights, Darks, Flats, and Flat Darks (PixInsight):
A note here has been deleted. Further experimentation validates the
method given in the book but not the simplification that was briefly described here.
(p. 232 Fig. 12.20) BatchPreprocessingFD: Like PixInsight's "official" BatchPreprocessing script, the latest BatchPreprocessingFD has dropped the little-used "Export calibration files" feature. Get it here.
(p. 232, middle) BatchPreprocessingFD: There is a third way to proceed if you have lights, darks, flats, and flat darks. Simply tell PixInsight (or any other software) that the flat darks are bias frames. This is Method 2, and results are excellent. As we've established, DSLR flat darks with exposures under 1/10 second are indistinguishable from bias frames. This is faster than BatchPreprocessingFD.
(pp. 239-241) Flattening the Background: I have found it useful to do PixInsight's automatic background flattening twice in succession, before gamma correction, viewing with screen stretch. It can be done yet again later, after gamma correction, if necessary.
Before you do background flattening, crop off any abnormal pixels at the edges; some camera files decode with black or white pixels at the edges, and these confuse the background flattener.
(p. 243 Fig. 13.2) Automatic Background Extractor (PixInsight): If you are removing a gradient, rather than removing round vignetting or anything more complicated, it helps to open the "Interpolation and Output" sub-menu and select modeling with polynomials of degree 2 instead of the default 4. You'll have much less of a problem with erroneous correction near the edges.
(p. 264) Acquiring the Images: This is an excellent time to use the PEC feature of your mount, if you have trained it; it greatly reduces the planet's drifting around on the sensor.
(p. 277) Generations of DSLRs: Note that sensor tests don't tell you everything about a camera; it pays to ask the astrophotography community (e.g., on www.cloudynights.com) whether people are getting good results with a particular camera. For example, right now, the chit-chat says that the Nikon D5300 and D7200 (with Sony sensors) are a considerable step up from the earlier D5200 and D7100 (with Toshiba sensors) even though they look similar (or even slightly worse) on tests. I cannot vouch for this information myself, but it is wise to pay attention to such things.
(p. 277) Generations of DSLRs: My preliminary tests indicate that the new Canon EOS Ra definitely belongs to the third generation, with unusually low sensor noise.
(p. 281, p. 298) www.sensorgen.info is apparently defunct.
(p. 287) Amplifier Glow (Electroluminescence): Yet another source of a pesky glow of this kind is infrared emission from circuitry in an autofocus lens. I have heard of this happening only with cameras that have had the IR-blocking filter removed and not replaced with another filter that blocks deep infrared. The cure is to remove electric power from the lens by covering its contacts with tape. Of course, if you have this problem, it will occur only with one or a few lenses that contain electronics, not with telescopes.
(p. 292) Shot Noise: Not only image frames, but also dark frames have shot noise; that's why it is necessary to take a number of darks, not just one or a few. Usual practice is for the darks to be as numerous as the lights. However, there are situations in which darks are not helpful — cosmetic correction removes the hot pixels, and by not using darks, one does not add any noise from them. See http://www.elf-of-lothlorien.de/Art_Darks.html.
(p. 295-297, 302) Dynamic range as reported by PhotonsToPhotos is not the same as reported by DxOmark (even when derived from DxOmark data). PhotonsToPhotos uses a different SNR limit and produces values that are about 2.5 stops lower.
(p. 304) Here is Table 16.1 with a third-generation Canon added.
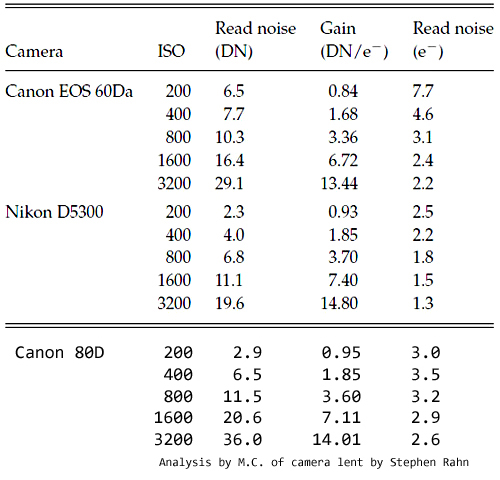
Canon 200D, 250D, etc., are similar to the 80D. Nikon D5500 and several others
are similar to the D5300.
NOTE: The numbers in this table are not precise.
They were obtained with the quick do-it-yourself tests described in the book.
Because of variation between cameras of the same model, variation in temperature, and other
factors, differences as large as 40% may be insignificant. Use these measurements to
distinguish basic types of sensors, but not to make fine distinctions between competitors.
See PhotonsToPhotos for more precise
measurements.
I don't plan to keep adding to the table indefinitely, but this step in technological progress is noteworthy. The Canon 80D and its kin are ISOless, like the Nikon D5300, but still have more read noise in absolute terms.
|
See also the later notes at the beginning of this page.
Both Canon and Nikon cameras postprocess their images so that the raw file that you get is not like the truly raw output of an astrocamera. Recently, the situation has become much clearer, thanks to research by Mark Shelley and others which you can read on the Cloudy Nights forum. Canon's postprocessing is apparently limited to normalizing the bias level, which has no effect on astrophotography. Any camera would have to set its bias level in some way. Nikon's is more complicated. In exposures of 1/4 second and longer, the Nikon D5300, D5500, and similar cameras reportedly perform hot pixel removal (cosmetic correction). The brightness of each pixel is clamped at some small multiple of the brightest of the 8 nearest pixels of the same color. This removes hot pixels, whether permanent or temporary (e.g., single pixels hit by cosmic rays). As a side effect, it makes dark frame subtraction much less necessary than it might have been. But my tests show that in 100-second dark frames with my D5500, a few hot pixels escape being removed (because another nearby hot pixel interferes with the algorithm), and I still get reproducible hot pixels, as well as a slight gradient (amp glow or the like) at the bottom of the frame, so I'm going to continue taking darks with that camera. There is a lot of variation between different Nikon models, and the discussion on Cloudy Nights is continuing. Nikon's postprocessing has the least effect if you expose generously (to about 1/3 to 1/2 of the histogram on the back of the camera) and don't do extreme stretching. Many of us thought for a long time that the lower measured read noise of the Nikon vs. the Canons in the chart above was due to Nikon's postprocessing. That does not appear to be the case. The QHY247C astrocamera uses the same sensor as the Nikon D5300 and D5500, and the advertised noise levels, in electrons, are very similar to those I measured on my D5300. Thus, I conclude that the current low-priced Nikon sensor indeed has less read noise than its Canon competitor. But the tests on PhotonsToPhotos show a smaller difference than my chart does, and the actual photographic difference is probably small and completely obscured by shot noise in the signal itself. Canon's other selling points are greater consistency between camera models, availability of EFCS in all models (for vibration-free lunar and solar work), and the ability to use clip-in filters. |
(p. 307) Filter Modification: Modified DSLRs can be rented — see note to p. 13. Unfortunately, clear weather cannot be prearranged to coincide with a rental.
(p. 307-308) Filter Modification:
Aftermarket filter modifications are generally satisfactory but often not quite
flawless. Besides dust, there is a slight risk of getting the sensor slightly tilted
(not perpendicular to the lens) or out of position (too far forward or back).
Problems of this type are much more noticeable with fast camera lenses than with telescopes.
If you have a camera modified and notice problems, send it back for
adjustment. The appeal of factory-made astro DSLRs (Canon 60Da, Nikon D810a, Canon Ra)
is that you get a factory-installed, dust-free, perfectly adjusted
filter.
(p. 308) Filter modification can bring out chromatic aberration in lenses. This point needs to be emphasized. With my Nikon 180/2.8 ED IF (non-AF) lens on a modified camera, the stars have bright red haloes. With some other lenses, it is necessary to "focus out" the red haloes, and the star images are not quite as compact as with an unmodified camera.
(p. 309) Benefit from filter modification: Here is a more dramatic example than the one shown on p. 309 and on the back cover.
These are the nebulae NGC 7822 (top) and Cederblad 214 (bottom) (conflated with NGC 7822 in some older catalogues), very thin red emission nebulae. Both are stacks of ten 2-minute exposures, taken in town (not at a dark-sky site), with the same 180-mm lens at f/4. Because the sensors had different size pixels, the scale does not match exactly.
Left: Nikon D5300, unmodified; right: Canon 60Da, which comes from the factory with a special filter for greater hydrogen-alpha sensitivity.

(p. 320) Aladin: Now see also worldwidetelescope.org, a joint project of Microsoft and the American Astronomical Society.
(p. 324 Fig. 18.5) Incorrectly reported orientation in Astrometry.net: This problem seems to have been corrected in the version of the software that is now on the nova.astrometry.net server, but I still advise caution. It has not been corrected in the versions that are available for you to run locally. The problem apparently arises from some ambiguities about the orientation of FITS files, and other files are converted into FITS for processing. What you really want, of course, is to identify objects and determine the arc-seconds per pixel, and those always come out correct.
(p. 324) Brief problem with astrometry.net web site: In November 2018, the web site was temporarily unavailable, and because it is considered a beta test, it may be unavailable again in the future. An alternative is to run the software locally (see below).
|
Running Astrometry.net locally under Linux:
The following is how I got it working under Linux Mint; the
same procedure works under Ubuntu, Debian, and Windows Subsystem for Linux (Bash on Windows).
(1) Acquire and install the Debian package: sudo apt update sudo apt install astrometry.net (2) Install the index files of star positions: sudo apt install astrometry.net astrometry-data-2mass-08-19 sudo apt install astrometry.net astrometry-data-2mass-07 sudo apt install astrometry.net astrometry-data-2mass-06 (3) Example of solving an image: solve-field --downsample 2 -L 0.1 -H 180 myfile.jpg Here --downsample 2 means to downsample the image before solving (this will not affect pixel size calculations; omit it if the image is small, and change it to 4 if the image is large). The parameters-L 0.1 -H 180 tell the software the field is between 0.1 and 180 degrees wide; you can save time by giving a more precise guess. You'll get dozens of messages saying that a certain set of objects at a certain scale "did not solve" — that is normal. Eventually, if successful, the program will write out several files. The most important are myfile-ngc.png (the annotated image) and myfile.wcs (coordinate information). You can render the latter into readable text using the command: wcsinfo myfile.wcs The other files are disposable. Most of them are FITS format data files but do not contain viewable images. See also /etc/astrometry.cfg for configuration settings that you can change, and use the command man solve-field for very concise instructions. Note that the Debian-packaged version does not identify NGC or Messier objects, only bright stars. That is because of copyright problems with the NGC catalogue that is bundled into Astrometry.net — the Debian repository system does not consider it legal to distribute. Simply adding the files does not help; the software compiled for Debian does not use them. Instead, you can go to https://github.com/dstndstn/astrometry.net, get the source code, and build the software yourself, or use one of several Windows plate solvers that use Cygwin and include the full set of files. I hope to add more information about this. |
Back cover: See note to p. 309.
Copyright 2019, 2020, 2021 Michael A. Covington. Caching in search engines is explicitly permitted. Please link to this page rather than reproducing copies of it. This page is not in any way connected with or endorsed by any photographic or software manufacturer. Many of the product names that appear on this page are registered trademarks of their respective owners.