 |
|
 |
2024
June
26
|
Final farewell to the University of Georgia Baptist Center

I've written in some detail about a place that was very important to Melody and me in
our student days,
the University of Georgia Baptist Center,
and the
plan to tear it down and replace it.
I've also
photographed what I could of its unusual stained-glass window.
Plans for demolition and replacement were stalled but are suddenly moving forward rapidly.
In just four days, the Baptist Campus Ministry will vacate the building.
It's been sold to the University, which will also be giving the Baptists a new lot just
to the north (on Lumpkin St. at Wray St.) on which to build a new building.
Given the poor condition of the old building and the fact that it doesn't meet the
organization's needs very well, I can't really object, but it is still a sad occasion.
A group of us met there this afternoon, including
Tommy Fountain, the current student president (Tyler Reinhardt), Barbara Ellard Porter, Rick Quarles, and Melody Mauldin Covington, and after some walking around, reminiscing, and taking pictures, we paused to pray in the chapel. I led a prayer as follows:
"Almighty God, we need to rely on Your omniscient memory to know all the things that we want to thank You for right now, all the good things that You have done in this building, the spiritual growth, the uplifting fellowship, the guidance, the friendship, and the love. As we prepare to leave this place for the last time, we now ask You for two blessings. We ask you to bless the BCM as it operates without a building and then moves to a new one. And we ask you to bless the University building that will eventually be built here, and the people who use it. May this always be holy ground even if no one knows it, because all ground is holy; there is nowhere in the Universe that you do not reach. In the mighty name of our Lord and Saviour Jesus Christ. Amen."
Then Barbara led us in singing the Doxology. And that was the last organized worship that will ever take place in that chapel.
I didn't get the definitive photograph of the stained glass window that I hoped for; a few structures that blocked part of it couldn't be removed. But here is what I got; it will at least serve as a record. Sadly, the window seems to have suffered some damage (since 2022) and I don't know if it can be salvaged, even if someone wants to. The photographs of the lower portion that I got in 2022 are actually the best, but today's best, the only
recent image that shows the whole west window, is shown above.
Permanent link to this entry
Hot!
As I write this, Athens' official temperature is 101 F, capping off a series of exceptionally hot days.
Our downstairs air conditioning failed on Saturday afternoon and wasn't repaired until this morning
(Wednesday). Fortunately, the upstairs system did a lot to keep the house cool, aided by the kitchen
window unit and some big, noisy fans. It's supposed to turn cooler tomorrow and maybe even rain.
Permanent link to this entry


|
2024
June
24
|
Astrophotos with no photographer?
A recent video by "Cuiv the Lazy Geek"
shows how new technology is raising some interesting questions.
Consider the following progression:
(1) Taking an astrophoto in my backyard under fully manual control.
(2) Taking an astrophoto in my backyard with the equipment controlled by SGP or N.I.N.A., "hands-off" for me much of the time.
(3) Same, but the automation continues while I sleep.
(4) Taking an astrophoto at a remote observatory by setting up the exact specifications myself, akin to (2) or (3) but remote.
(5) Same, but simply specifying the object and exposure time, and the images are taken for me when the telescope is available and the weather permits.
(6) Downloading raw images from the remote observatory that were already taken, not specifically requested by me, and then processing them myself. (Telescope Live offers this, I'm told.)
Now — All of these are good ways to get pictures of celestial objects. If you want to know what McNeil's Variable Nebula is doing, or something like that, then (5) and (6) are probably best, and are most like what research astronomers do.
But at what point does it cease to be my astronomical photograph? What is the role of the photographer?
Who is the author (in the legal and moral sense) of the picture?
A further issue is that, unlike nature or landscape photographs, astrophotos are mostly of unchanging objects
and should look very much the same when taken by any reasonably competent and well-equipped photographer.
There's less room for artistic vision.
That doesn't mean there's none, but we need to think about its role.
We may be becoming more like performers than composers of music.
Or have photographers always been more like performers than composers?
We never create what the camera sees — we take beauty supplied by nature, and render it.
For more than a century (starting with Isaac Roberts), amateur astrophotography has been basically a technical challenge (like automobile racing), pushing photography (or engines) to maximize performance by overcoming one technical challenge after another.
Our pictures were trophies of technical success.
I sense that we are getting toward the end of this, as good astronomical photographs can now be obtained with methods and equipment that are practically routine.
But did Eastman's handheld Kodak camera kill the photographic art? Far from it. We need to think about what is
going to happen to astrophotography as both art and science. Just when things threaten to get dull,
they become more interesting from an unexpected direction.
Permanent link to this entry


|
2024
June
22
|
N.I.N.A. Three Point Polar Alignment with
iOptron iGuider as the alignment scope and camera
This is the Daily Notebook, and today I'm noting down how I did something,
with no idea whether anybody else is going to read these notes. But here goes..
One of the handiest features of N.I.N.A. astrophotography
software is the optional plugin called Three Point Polar Alignment.
That enables you to measure and adjust the polar alignment of your mount
even if your view of Polaris is blocked. It moves the mount to three places
anywhere in the sky (preferably not directly overhead), uses plate solving to
measure the positions, and computes where the R.A. axis actually points.
Here's what it looks like when ready to start:
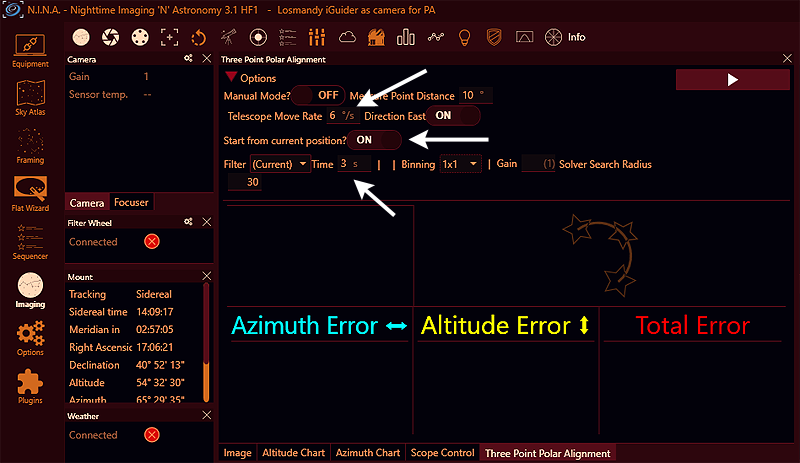
Note that I set the exposure to 3 seconds (the longest the iGuider will go)
and the move rate to 6 degrees per second (needed for Losmandy) and told
it to start at the current position of the telescope.
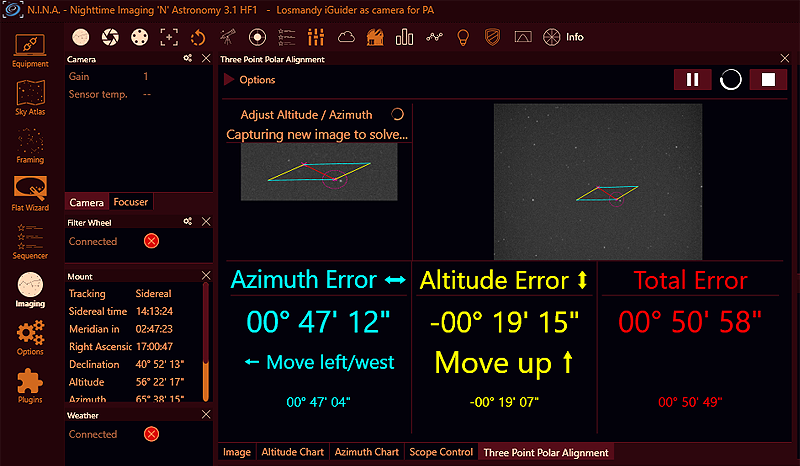
Here's how it looks when it has done its magic.
Note that it is constantly repeating exposures and updating the
position so you can adjust the mount.
But if you have had to make a large movement, it is better to
repeat the whole process afresh for greater accuracy.
You can do this with any setup that can photograph the stars under
control of N.I.N.A.
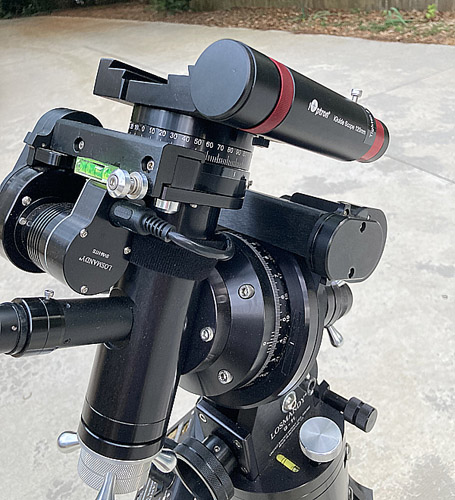
But I have set it up to use my
iOptron iGuider, which consists of a mini-guidescope and camera that I've
mounted permanently on the saddle of my Losmandy mount just
the way it goes on iOptron mounts,
so I can do polar alignment regardless of what else is on the mount.
Here's how to do that. I assume you already have N.I.N.A. and have set it
up to plate solve (I use ASTAP).
Create a N.I.N.A. profile that knows about the mount, the iGuider,
and nothing else. Make sure the iGuider parameters are entered in
Options/Equipment. Focal length is 120 mm, f/4, and the camera parameters
will come in automatically when you connect to it. It is best to make
these settings with the equipment turned on and connected.
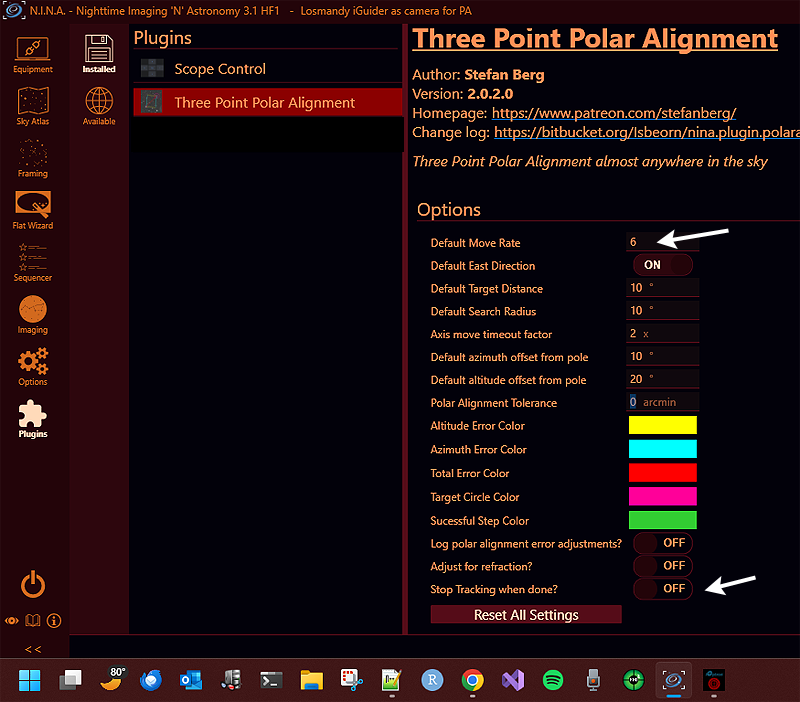
Install Three Point Polar Alignment and make a couple of settings in it,
as shown here. These apply to all the profiles that use it.
For my Losmandy mount I had to set the slew rate to 6 degrees per second,
not 3; that's important; Losmandy offers only a few speeds, and 6 will
apparently invoke their "slew" speed, which is what you want.
I chose also to disable "Stop tracking when done" and to choose a default
starting position above the pole, where I don't normally have trees
in the way.
For this Losmandy GM811G mount I also had to make one more setting.
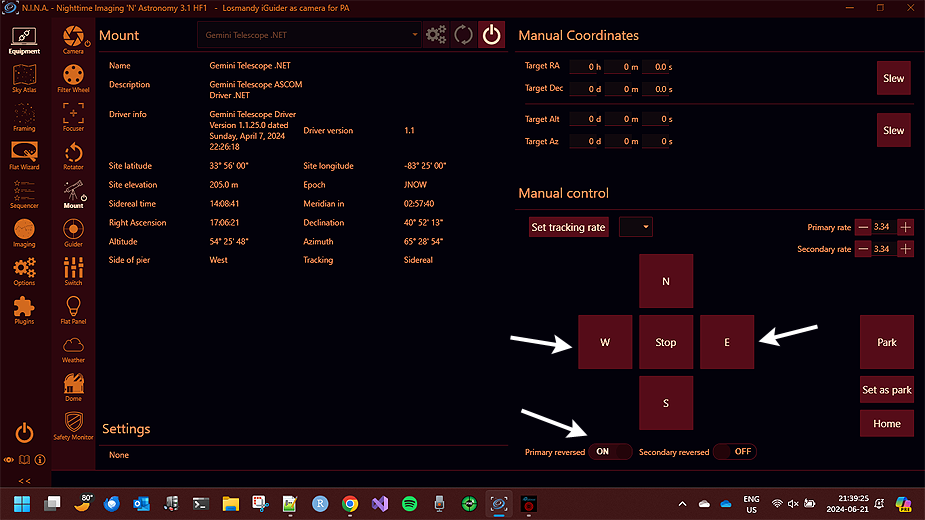
I noticed that "Direction East" in Three Point Polar Alignment
was backward; when it was selected, the telescope would move west,
and vice versa. To fix that, I had to go into Equipment/Mount
(not Options), where I found that the E and W slew buttons were also
reversed. I set "Primary reversed" and then all was well.
Go-to operations are not affected.
|
|
| |
Permanent link to this entry


|
2024
June
21
(Extra)
|
On posting the Ten Commandments in public buildings
[From Facebook.]
Fellow Christians and others:
You're being set up for a "whatever you do is wrong" situation.
This controversy about posting the Ten Commandments in public places is being used to divide us and set some of us up to look like hypocrites. Be careful.
If you are in favor of posting the Ten Commandments in government buildings, some people will take this to mean you think non-(Judeo-)Christians are second-class citizens.
And if you're against it, they'll say you're against the Word of God or basic morality.
I want everybody to know about the Ten Commandments. I wish they were more widely appreciated and obeyed.
I wish politicians and entertainers were expected to live up to them, too.
So... Advocate the Ten Commandments in context. Do not let anybody turn them into a political booby-trap.
Permanent link to this entry


|
2024
June
14
|
M13 reprocessed
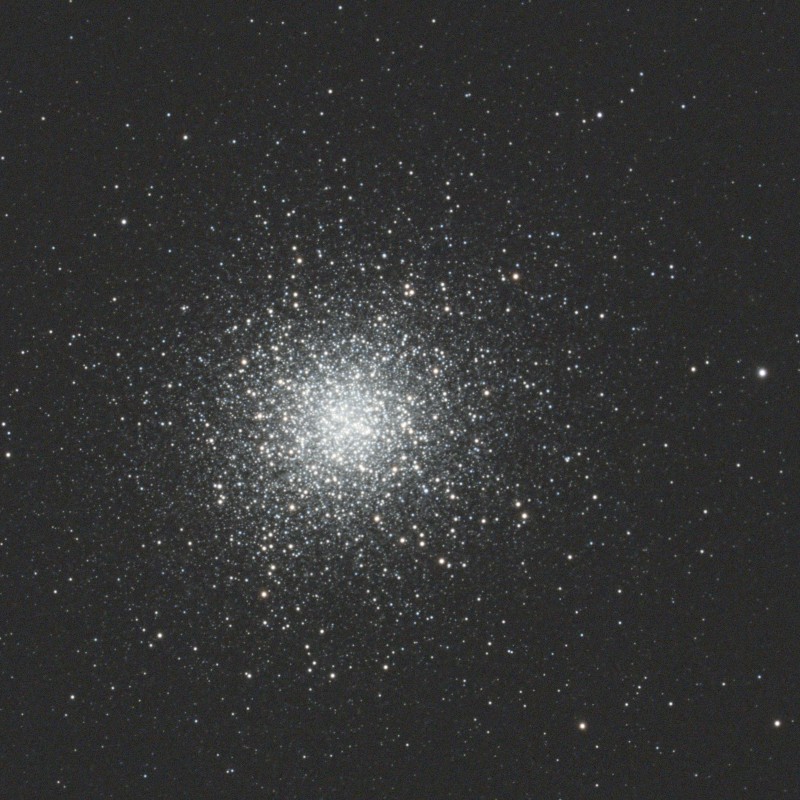
Here's my June 14 picture of M13, reprocessed with BlurXTerminator and presented
at higher magnification than before.
Stack of 15 2-minute exposures, Celestron 8 EdgeHD at f/7, Canon 60Da, in moonlight.
Permanent link to this entry


|
2024
June
19
(Extra)
|
M27 reprocessed
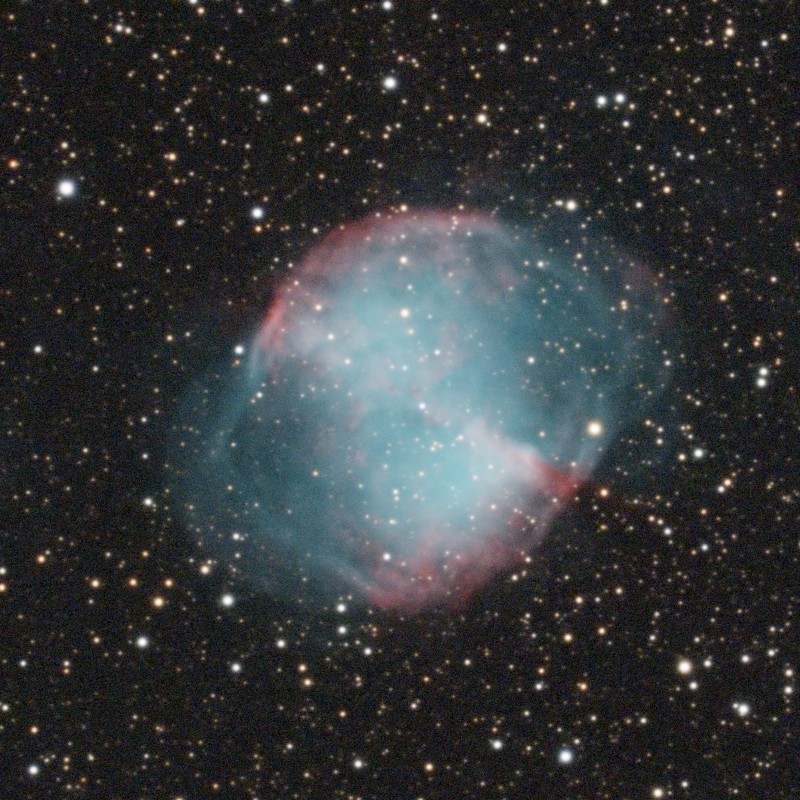
Here is my
September 2023 image of M27,
reprocessed with BlurXTerminator.
This is a stack of 80 1-minute exposures with the C8 EdgeHD
and Canon 60Da.
I am able to present the picture at higher magnification,
showing you more or less all the detail the 8-inch telescope captured.
This image also benefits from spectrophotometric color correction.
Permanent link to this entry


|
2024
June
19
(Extra)
|
Automatic deconvolution with BlurXTerminator
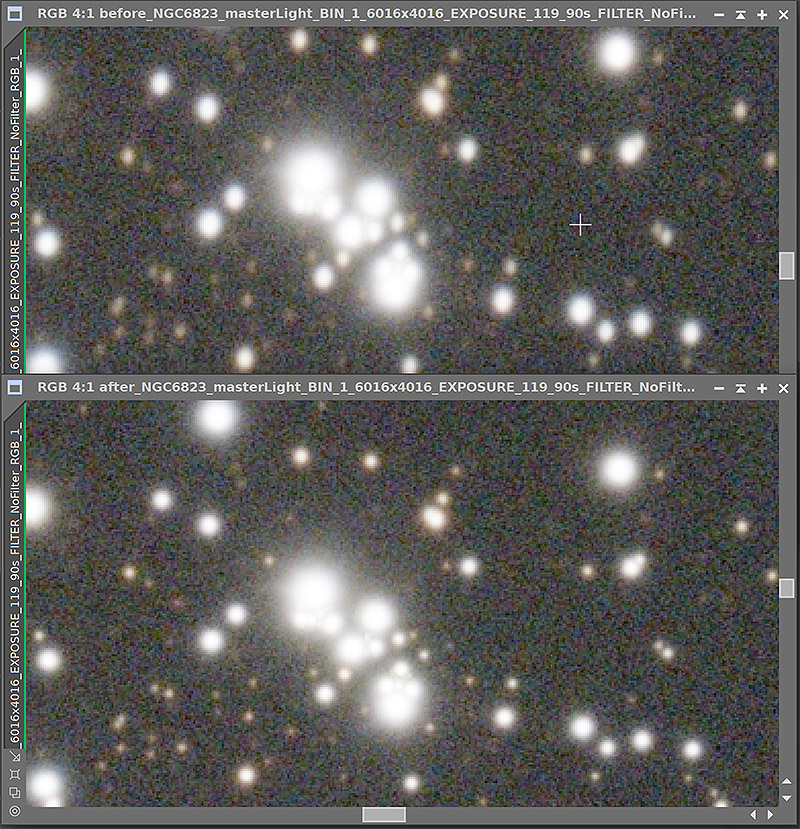
I've written many times about the use of deconvolution to sharpen astrophotos
that are slightly blurred by poor guiding or by optical effects.
It has always been a difficult process, requiring lots of tweaking of settings to
avoid getting rings, other artifacts, or at best a big increase in the background noise.
Today I am glad to report that
Russell Croman's BlurXTerminator
has solved the problem of automating it. You see an example above,
using my image of NGC 6823 from September 2022.
The key idea is, we're not just making the stars look better, we're actually
measuring the blur or smear and undoing it.
The idea is that any change applied to an image can be undone by computation,
if you know precisely what the change was.
And in astrophotography, we do: the stars are perfect point sources, so every picture
is dotted with hundreds of precise records of its own imperfections.
Part of the challenge is that this is what mathematicians call an ill-posed problem:
many different original images could have produced the same blurred image, because
blurring loses information.
The answer is that the deconvolution algorithm has to use a criterion such as maximum entropy
(make the original image as simple as possible).
BlurXTerminator does something smarter: assumes that the original image did not have
perfect point stars, but rather, round stars as they would be rendered by a slightly
better telescope with perfect tracking.
The other thing about BlurXTerminator that confused people for a while is,
it uses a neural network, but it does not simply "guess" detail based on
pictures it was trained on, the way some "AI" tools for daytime photography
have been known to do. They sharpen things by making them look like something similar
that they saw in a sharper picture during neural network training. This might
introduce spurious detail, even (in one notorious case) people in a crowd that
weren't really there!
Russell Croman has explained at great length that BlurXTerminator can't do that.
It is not reconstructing image details; it is determining the deconvolution function
and then applying it. That's all it does. It's no more unscientific than the other
sharpening algorithms that we use routinely. It's just smarter — think of it
as a sophisticated sharpening algorithm that makes its own settings.
In the example above, and several other trials, I used in it "Correct Only" mode,
to do no sharpening other than to correct the point spread function.
On my fast laptop, it took about 8 minutes to process a 24-megapixel image.
This is without GPU acceleration.
The processing requires a linear image, so I did it after calibration,
stacking, spectrophotometric
color correction, and gradient correction, but before altering the histogram.
I have not yet asked it to correct really bad tracking.
My practice will be to use it to take out the last bit of smear from tracking
that is good but not great.
Definitely a good tool to have in the toolbox.
Permanent link to this entry


|
2024
June
19
|
Another cloud picture
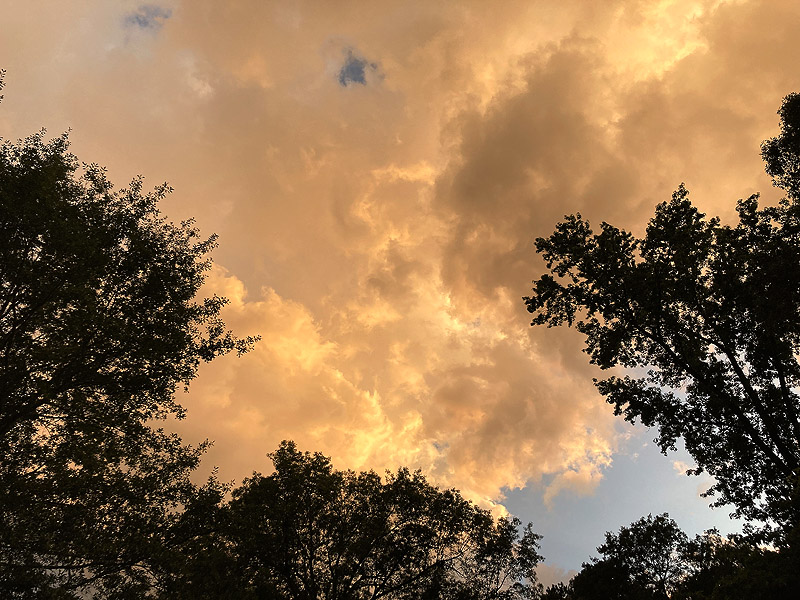
Taken with my iPhone during my evening walk on June 6.
Permanent link to this entry


|
2024
June
15
(Extra)
|
Lucian Holtzendorff, 1942-2024

I am sad to hear of the death, after a long illness, of my Valdosta friend
Lucian Holtzendorff, co-founder of The Action Trav'lers.
May his memory be eternal.
Lucian lived a long, full life, and his obituary is well worth reading even if
you didn't know him.
He achieved fame on his first day of life as the first baby born in the
United States in 1942.
As he grew up, he was one of a group of high-achieving, technologically inclined Valdostans
half a generation older than me, who were
an inspiration for me in my youth.
To see the full obituary (which I'm told was written by Robert C. Winter III),
click here.
Permanent link to this entry


|
2024
June
15
|
In praise of short exposures
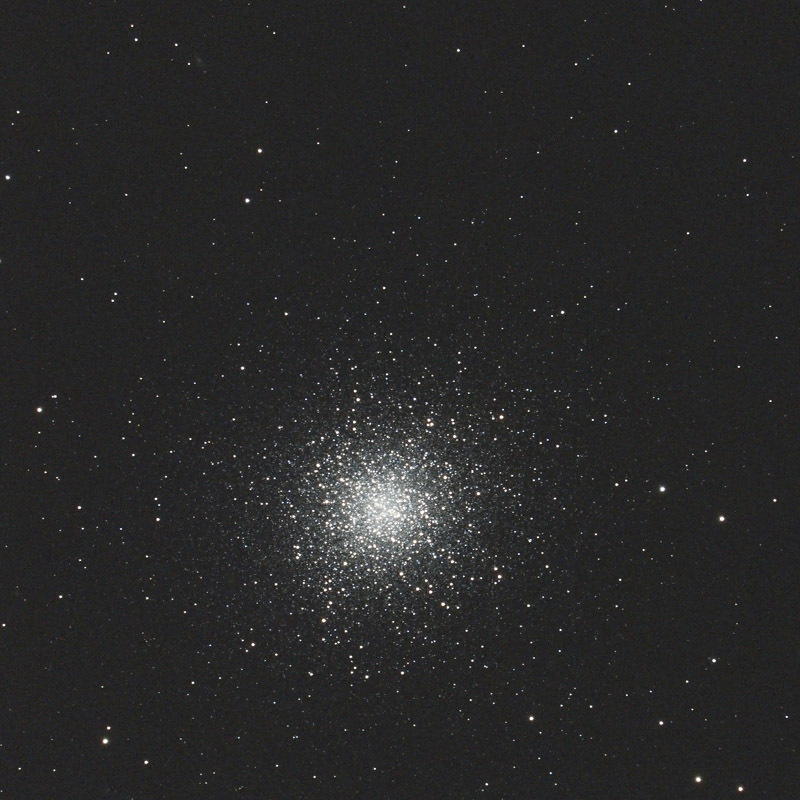
If the star images in this picture of M13 look a bit sharper than the ones in the
previous day's picture (below), there's a reason.
It's a stack of thirty 30-second exposures instead of fifteen 2-minute exposures.
What you are looking at is downsampled 3× from the original image,
so you may not see much difference. In the original, it's there.
(Don't compare the overall sensitivity, as this is only half as much total exposure.
But I don't see much difference.)
As you know, when I take long exposures with my Celestron 8 EdgeHD, the tracking isn't perfect,
and the stars are slightly elongated in an east-west direction. There
are several possible reasons:
(1) The image scale of 0.6 arc-second per pixel may set an impossibly high standard. Nobody tracks
quite that well. Good tracking is 0.6" RMS, not 0.6" peak-to-peak. That remains the case with more
expensive mounts and drives.
(2) Tracking in right ascension (west-east) is inherently rougher than in declination (north-south)
because there is always a motor running from west to east, to track the earth's rotation,
while the north-south motor runs only rarely, when corrections are needed.
(3) There could be differential flexure between the camera sensor and the guidescope.
That could be anywhere, and there's surely some of it in several places, but the main culprit
is almost certainly shifting of the C8's mirror. The telescope focuses by moving its main
mirror, so even though a lockdown mechanism is provided, the mirror isn't immune to movement.
Differential flexure of all types is worst when the telescope is aimed high in the sky
(as it was here) because the direction of gravity's pull is changing relative to the telescope.
Since upgrading Losmandy's firmware to give higher-resolution tracking, (2) is much less the case than before.
That leaves (3). In fact, the evidence that really incriminates (3) is that there is a shift from frame to frame,
not just within frames, and it's in the same direction as the star elongation.
One cure would be to use an off-axis guider. Those are tricky to set up, and I'll probably get into
that later. (Cameras with built-in off-axis guide sensors are starting to appear, but the only available one,
the ASI2600 Duo, requires a bigger illuminated field than this telescope gives.)
But in the meantime I did something else.
I changed guidescopes, so that instead of a large guidescope riding on top of the telescope, I'm using
an iOptron iGuider, 30 × 120 mm, bolted to the side of the mount saddle, so there's much less to flex.
With PHD2 multi-star guiding, it guides just as well.
And I switched to shorter exposures. I figured that whatever flexure might be happening in a 120-second
exposure, there'd be only a quarter as much in a 30-second exposure. And I was right.
At ISO 3200, at my site, the Canon 60Da still picks up enough light that the sensor noise is swamped by
the sky background (as it should be). That wouldn't work so well at a darker site; here the city lights
are working in my favor. (Or at least are prevented from taking their full toll.) This is comparable to
"high conversion gain" (HCG) on astrocameras, where we gain sensitivity, and cut the sensor noise measured
in electrons, at the expense of dynamic range. It doesn't matter, because stacking a large number of exposures
gives us the dynamic range back.
I'm going to experiment further with deep-sky imaging with perhaps 100 or 120 30-second exposures instead of
a smaller number of 2-minute exposures, when this telescope is in use. It's one more way to get the most
out of it.
[Added:] There are two more things I need to try.
One is adaptive guiding. If the shift shows up from one frame to the next,
then after a few exposures have been taken, the shift can be measured and
the autoguider can be told to account for
the shift during the exposures, gradually shifting the desired position of the guide star.
To do this, there is an experimental plug-in for N.I.N.A. 3 by someone I'm corresponding with.
If it is announced publicly, I will post a link to it here.
The other is automatic deconvolution. That is, figure out what distortion has happened to the
image, and undo it by computation.
This is possible because the stars are excellent test instruments. Stars as seen from earth are
essentially perfect point sources (under 0.1 arc-second in apparent diameter).
So the image of a star on the sensor is, essentially, a record of the system's optical imperfections,
including imperfect guiding.
Russell Croman's BlurXTerminator software
uses a trained neural network to analyze the distortion of stars in an astronomical photograph.
The neural network delivers the deconvolution function itself, not just the parameters for it,
and that led to concern that it might simply substitute aspects of a star image from the training set,
thus making your image unsuitable for scientific work. I've looked into this and am assured it is
not the case. All it's doing is deconvolution. I think I'm going to try that.
Permanent link to this entry


|
2024
June
14
|
M13 in moonlight
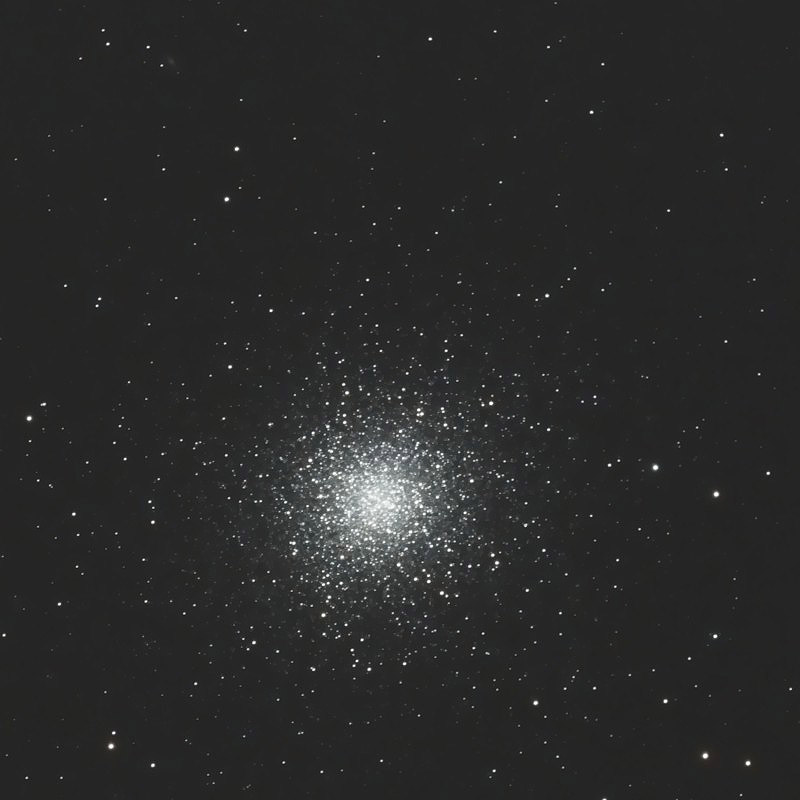
The globular star cluster M13 looks magnificent even when photographed under poor
conditions. I took this picture in moonlight, testing how well my C8 would guide
with an iOptron iGuider (a tiny 30mm guidescope) instead of the usual one twice as big;
it guided well. I was also putting N.I.N.A. 3.1 through its paces by doing a sequence,
where the system would photograph one object, then move to another, check aim by taking
a test exposure, and then photograph that. Again, success. This is a stack of 15
2-minute exposures with a C8 EdgeHD and f/7 compressor and Canon 60Da at ISO 800.
Near the top edge of the picture, toward the left, you can barely see the distant
galaxy IC 4617, magnitude 12.6.
Permanent link to this entry


|
2024
June
11
|
The dullest Messier object
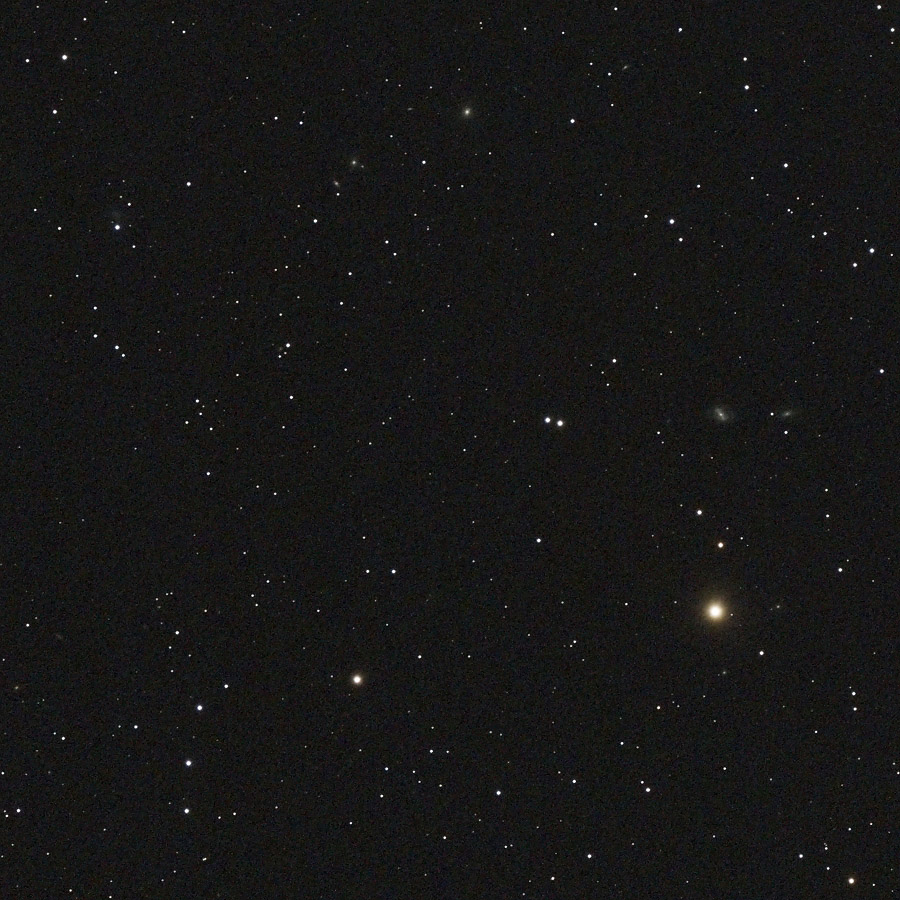
The dullest object in Charles Messier's catalogue of star clusters, nebulae, and galaxies
is M40, which consists of two stars.
Not even a double star — the two stars are not close to each other in space —
and there is nothing nebulous (foggy) about their appearance.
Messier included M40 because Hevelius had reported a nebula in that area, and,
finding none, Messier figured the pair of stars may have looked nebulous in a more
primitive telescope.
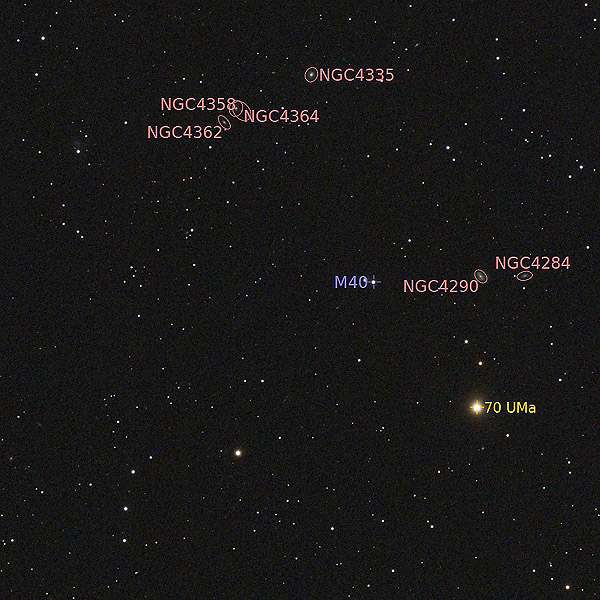
I took aim at M40 last night and was gratified to capture several distant galaxies along with it
(none of which are bright enough to have been seen by Hevelius or Messier).
Stack of 19 2-minute exposures, AT65EDQ 6.5-cm f/6.5 refractor, Canon 60Da at ISO 800.
This was primarily an equipment- and software-testing session, to become more familiar with
telescope control by N.I.N.A. 3.0, and the moon was in the sky.
M40 is to the right of center in this picture:
|
|
| |
Permanent link to this entry
M100 and other galaxies
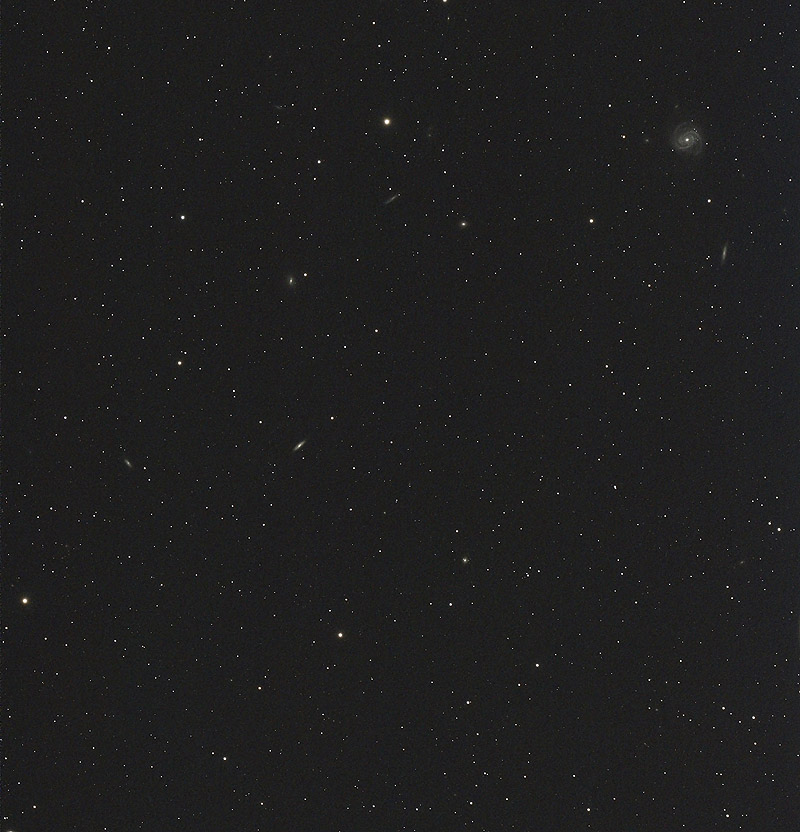
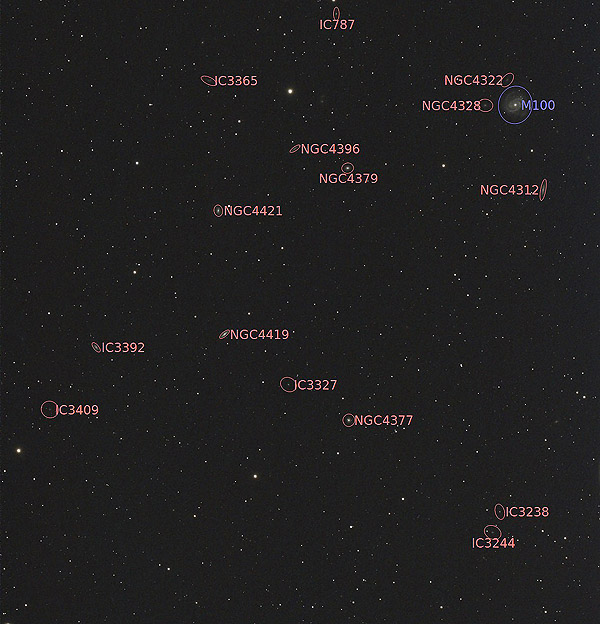
To test my ability to remote-control the telescope from inside the house, I then
selected a galaxy-rich field that includes M100 (the large spiral at the upper right in
this picture) and aimed the telescope at it, confirmed its position, and took 30 2-minute
exposures, one of which was marred by a satellite trail. So here's the resulting
stack of 29. This is not an impressive picture, and it was taken in moonlight,
but count the galaxies and think of how much of the universe you are seeing.
|
|
| |
And just when I got this far putting N.I.N.A. 3.0 through its paces,
I got the notification that N.I.N.A. 3.1 has come out.
Permanent link to this entry


|
2024
June
10
|
Laptops are slow to recognize Windows workgroup
Master Browser (Browse Master) under Windows 10 and 11
Problem: My laptops were often slow to recognize the Windows workgroup that they
belong to when I use them at home. After waking up a laptop, attempting to
connect to the server's shared files could take as much as five or ten minutes;
the first attempt would often report a timeout (network failure).
Curiously, while the problem was present,
ping servername would succeed, but
net view servername would fail, but
a second attempt at net view would generally succeed and would
clear the problem, whatever it was.
Apparently, the problem had to do with finding the Master Browser (the computer in the
workgroup that keeps track of who's who; the term has nothing do with web browsing).
That still works
the way it did 20 years ago
(despite scant documentation about it for recent versions of Windows),
and, apparently, adding the IsDomainMaster registry setting to the server
(a Windows 10 desktop) solved the problem, just the way it would back then.
Not to overlook the obvious, before taking that step, I checked that the server
was set never to go to sleep, since the initial symptoms seemed to indicate that
the server was in sleep mode.
Note added June 15: This seems to have largely but not completely headed off the problem;
I've still had it crop up, but much less frequently. I'm not sure whether this was the correct
cure or not. We have had Windows updates in the meantime. I checked, and they did not
take away the registry setting.
Permanent link to this entry


|
2024
June
9
|
Late-night astronomy
All through college, I never "pulled an all-nighter" to study.
In my whole life the only times
I had been up all night were medical emergencies,
overnight flights, one nearly-all-night entertainment event at Yale in 1980,
and one astronomy session at Yale in March 1982,
using an old observatory that was soon to be decommissioned.
But on the evening of June 7, I decided, after consulting Melody, to make the most
of unexpectedly clear weather by observing very late, then sleeping the next day (Saturday).
This is something I may do again, when the sky is clear and I have the following day free
(a very rare situation). Much of the time, I actually rested indoors, watching the progress
of my astrophoto session from a laptop computer through a network connection to the other laptop
that was controlling the telescope and camera. Below are the results.
Permanent link to this entry
What do I mean by "processing"?
My friends on Facebook have been waiting for me to "process" these pictures so they can see them.
What is meant by "process"? Why can't I give you the picture straight out of the camera?
Well, first, every picture has to be processed for you to see it.
The camera records digital signals, not anything you can look at.
(Just as a film camera recorded an image chemically, not in a form you could see.)
In daytime photography, our cameras usually do the processing automatically and show
us a picture immediately.
That doesn't mean the picture is unprocessed.
It means that a lot of decisions were made automatically by the software in the camera.
Second, astronomy is different from daytime photography.
The way the picture should render faint light is completely different and requires manual
intervention. Click here for more about this.
And third, there's a lot more going on.
Each of my astrophotos is a stack of dozens of individual pictures, taken one after another
and then combined by computer.
Along the way I reject the ones that are marred by trails of airplanes or satellites.
Also, I apply corrections ("darks and flats") to counteract measured imperfections of the
telescope and camera. Even a speck of dust on the sensor will be removed this way if it
stays in the same place throughout the session, as specks of dust normally do.
Permanent link to this entry
M102 and NGC 5906, Spindle and Splinter
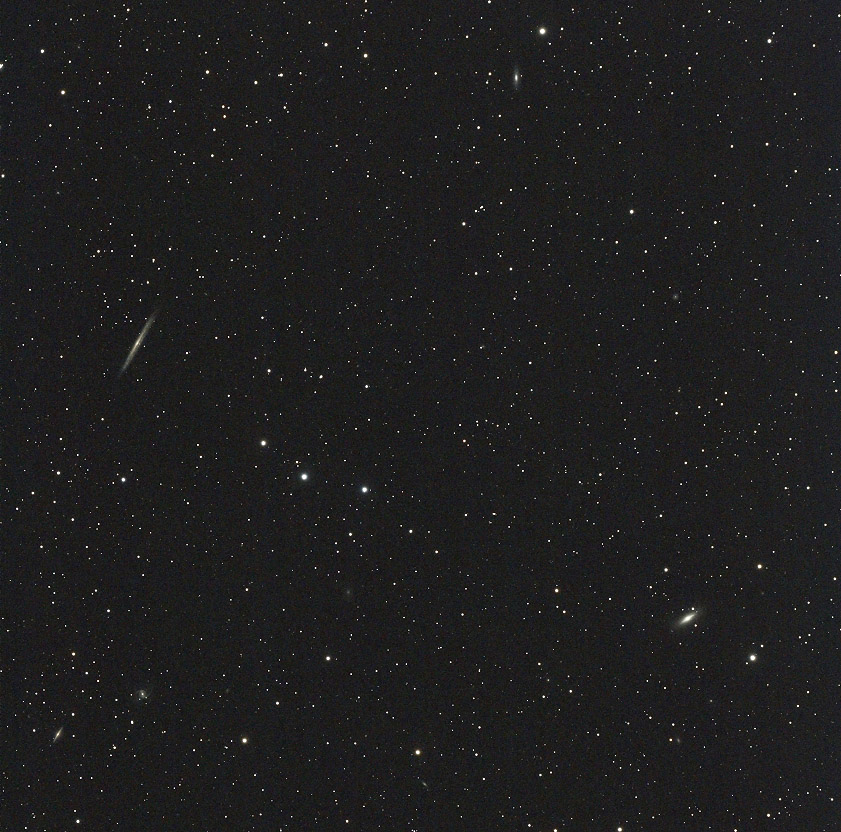
Here you see, on the right, the galaxy M102, and on the left, NGC 5906.
They are known, respectively, as the Spindle Galaxy and the Splinter Galaxy.
|
|
| |
You can also see a few other galaxies.
Here's the same picture, annotated by PixInsight:
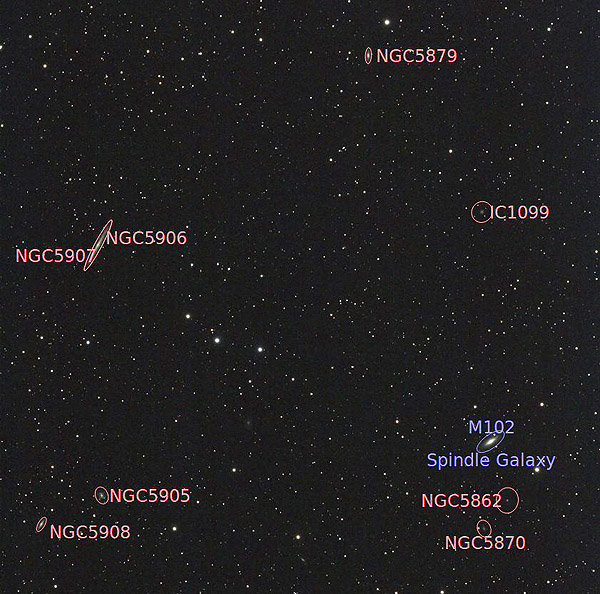
Stack of 30 2-minute exposures, Canon 60Da at ISO 800, AT65EDQ 6.5-cm f/6.5 refractor,
Losmandy GM811G mount, iOptron iGuider (30×120mm) guidescope, controlled by
N.I.N.A. 3.0 and PHD2 under Windows 11.
Recall that
M102 was once thought to have been a duplicate observation of M101
(and I did some of the historical research to finish establishing that it wasn't).
Comparing this picture to M101 below, you may wondering how in the world anyone
could mix them up. Well, the answer is that in a small telescope, you see only the bright
central region, which looks very much the same in both galaxies; in fact, M102 is easier to see.
Permanent link to this entry
M101
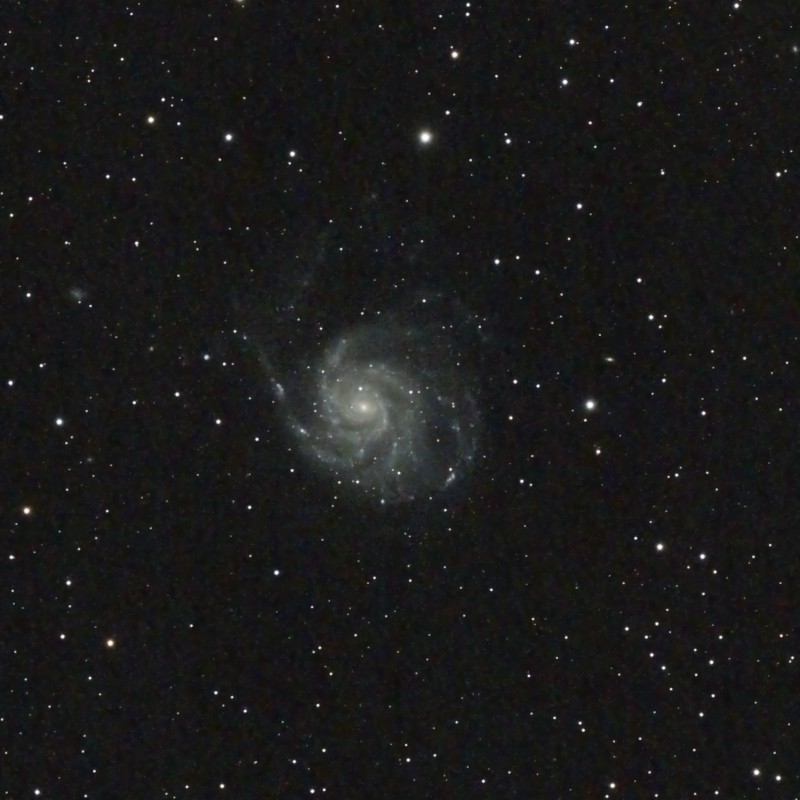
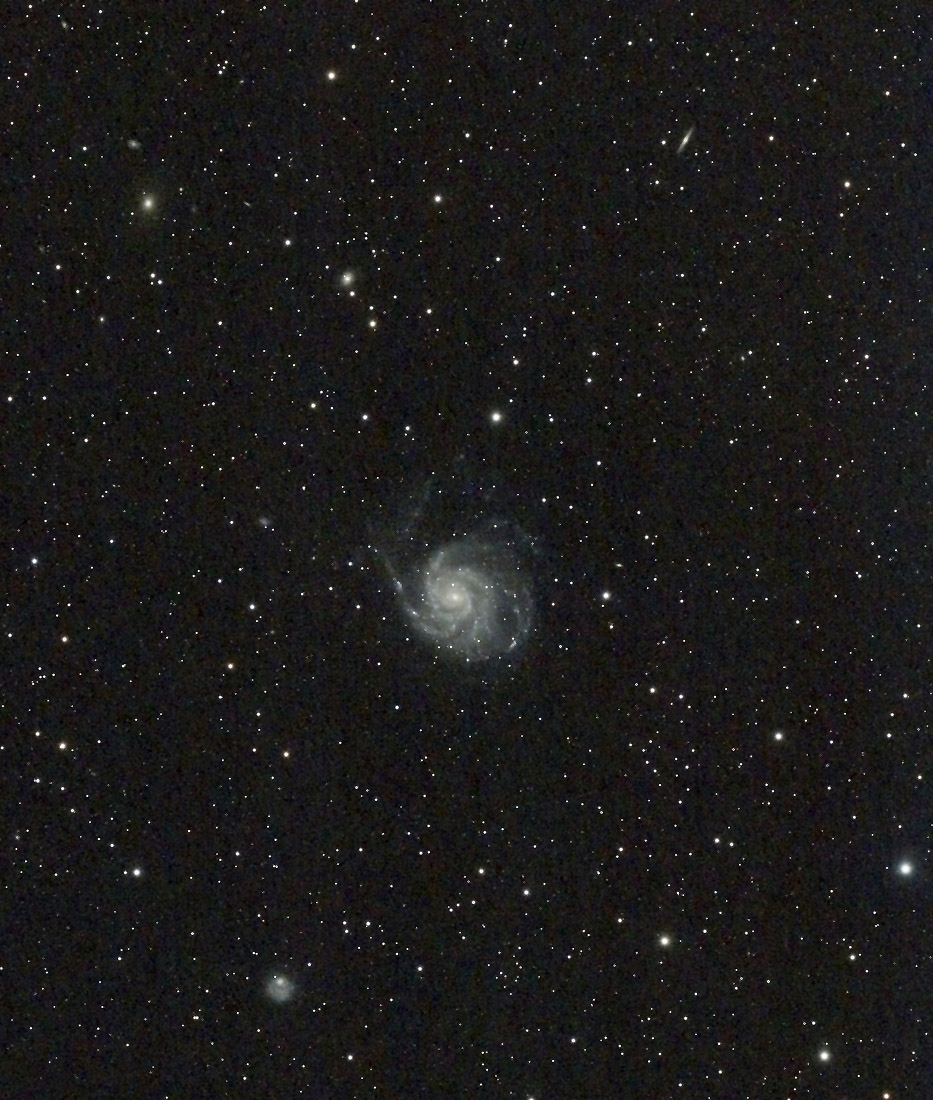
The magnificent spiral galaxy M101 was my first, and main, target for the night;
I used the same equipment as above but combined 49 exposures.
Here you see first the central region of the picture enlarged,
then most of the field, then an annotated version of the image.
|
|
| |
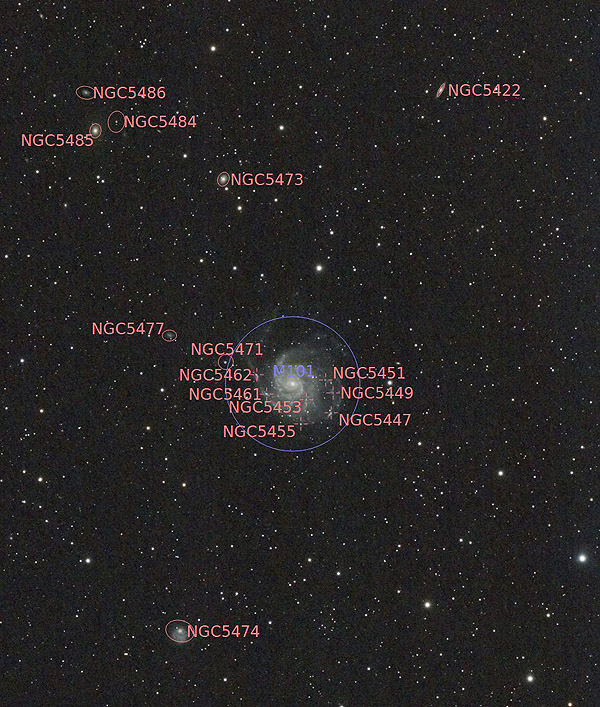
In the annotated image, you can see that several bright spots in M101
got NGC numbers of their own; nobody at the time knew they weren't separate objects.
Permanent link to this entry
Star clouds and Sharpless 2-101
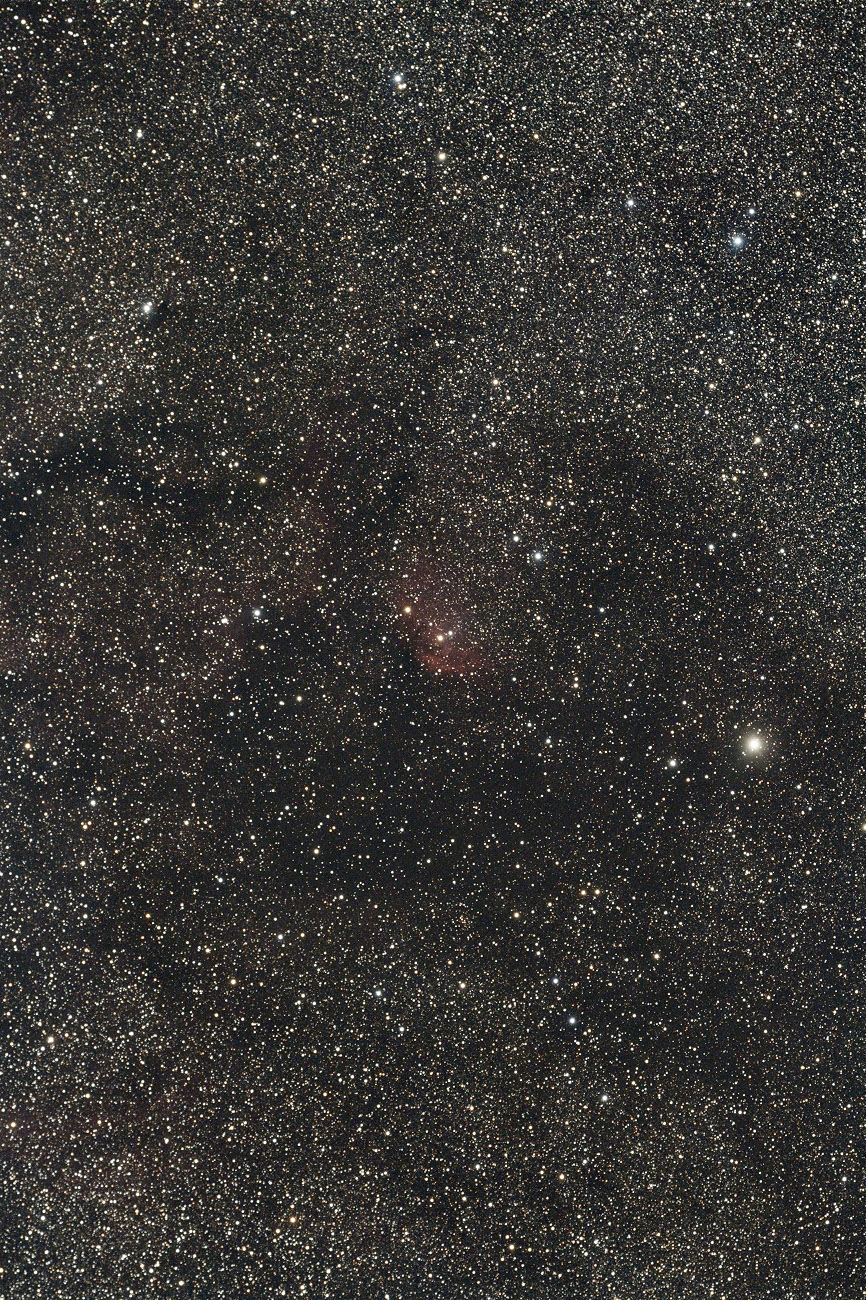
By 3 a.m., Cygnus had risen high enough that I was able to photograph objects in the
plane of our own galaxy. Stellarium (my computerized star atlas) showed an interesting-looking
nebula but did not name it. I found out from other atlases that it is Sharpless 2-101
(it doesn't have an NGC number). It's the red object near the center of the picture below.
Elsewhere you see clouds of stars partly obscured by dark clouds of interstellar dust.
The bright star is Eta Cygni.
|
|
| |
Permanent link to this entry


|
2024
June
7
|
Dad's Electrical Hints, #1:
How to fix flickering lights that are on a dimmer

If some of the lights in your house tend to flicker, and they are on a light dimmer
(whether or not the dimmer is turned all the way up), here is something that may
fix the problem.
Simply run the dimmer quickly back and forth from low to high, through its whole
range, about 20 times. You can do this with the lights turned on or off; it won't harm them.
This worked for me in no less than 3 places tonight.
The cause of the flicker is something I had long been familiar with in other electronic equipment:
dirty contacts in the potentiometer (variable resistor) that controls the dimming.
Running it rapidly back and forth through its whole range cleans the contacts to some extent.
If the cure doesn't last, you probably need a new dimmer.
Same goes for volume controls in your built-in speaker wiring, if any.
Turn them back and forth all the way, twenty or thirty times.
They are likely to come out sounding a lot better!
There are other reasons lights can flicker.
LED bulbs often flicker because of poor electrolytic capacitors in their current regulators,
and, paradoxically, improve with use — an electrolytic capacitor renews itself electrochemically
when a voltage is on it, but not when it's idle.
Or it may be a wiring problem. If lights in different rooms flicker in unison,
that's definitely what it is, and you should get it fixed immediately, since it's
likely to be a fire hazard.
Permanent link to this entry
Dad's Electrical Hints, #2:
Getting the words right
This is a plug:
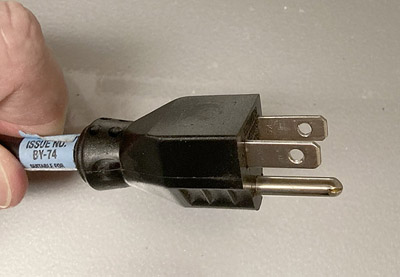
This is NOT a plug:
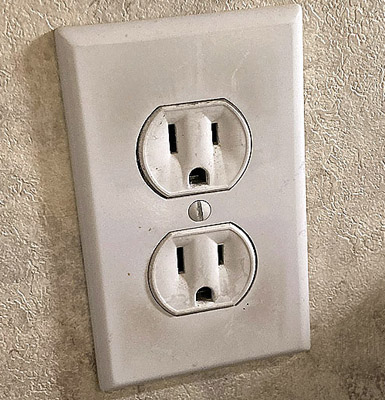
It is called an outlet, receptacle, or socket.
Definitely not a plug.
Yesterday I watched a very confusing video by someone who called both of them by
the same name and was replacing the "plug" (the outlet) because the "plug" wouldn't
make a good connection in it.
Please, people. A one-word vocabulary is not enough!
Permanent link to this entry


|
2024
June
6
|
More about the Super Amplifier
After more thinking and more circuit simulation, and some conversations
by e-mail with Gene Greneker, K4MOG, I've come up with another candidate
circuit for the Super Amplifier. This one has fewer parts, is more a 1960s-style
design, and, according to the simulation, should work with either silicon or
germanium transistors.
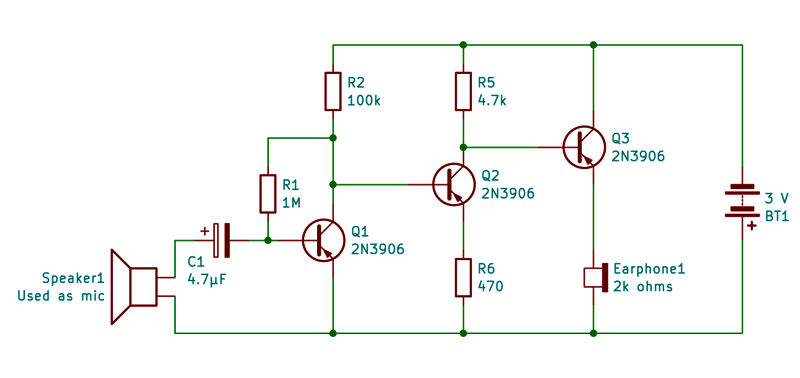
This isn't the only way they could have done it, but it's probably close,
or at least closer than yesterday's proposal.
It's a high-gain direct-coupled amplifier, as advertised.
It expects a low-impedance microphone (using a speaker was recommended).
And it would be damaged if an 8- or 4-ohm speaker were connected to the output —
but would drive a 45-ohm speaker with reasonable volume.
Q3 was included to account for those last two observations.
If the output were always going to a 2000-ohm earphone,
the earphone could go in place of R5, and Q3 would not be needed.
But the manufacturers probably didn't want to make the gain of the
amplifier depend on the resistance of the earphone.
(Embarrassed note: How did I get the designation R5 in a circuit with only four resistors?
By simplifying the earlier circuit and not renumbering.)
When high-gain direct-coupled amplifiers are mentioned, one thinks of
Darlington pairs. But although they make great emitter followers,
a Darlington pair does not actually make a good high-gain common-emitter
amplifier. The reason is that the gain is limited by the emitter resistance
re, which is no lower than with a single
transistor. Also, my understanding is that for leakage reasons, they work
much better with silicon transistors (although Mr. Darlington invented them
during the germanium era).
Also, with its 1.4-volt base-emitter drop, a silicon Darlington pair is hard to
use with a 3-volt supply. If, as the brochure seems to indicate, the Super
Amplifier also operates on 1.5 V, then a silicon Darlington pair is completely
ruled out.
This circuit still hasn't been built and tested. It is not even the
top project on my workbench at the moment. But stay tuned...
Additional note: The best free circuit simulation software that I can find
comprises two packages given away by Texas Instruments, Tina-TI (not revised since
2018) and Cadence PSPICE-for-TI (current). (These are for serious analysis,
not beginning hobbyists.) Both support a wide variety of devices, including
the TLC555 timer, and both can import SPICE models from other sources (as I did
to get germanium transistors). I'll probably post some notes about these in the
near future.
Permanent link to this entry


|
2024
June
4
|
Remembering the Super Amplifier
My father and I did three memorable electronics projects together
in 1965 and 1966, before his untimely death.
The last and most elaborate was an analog computer;
click here to see the details.
Before that was a crystal radio that I plan to write about
(I lost the original but built a replica in the 1990s).
But the first of them was the Super Amplifier.
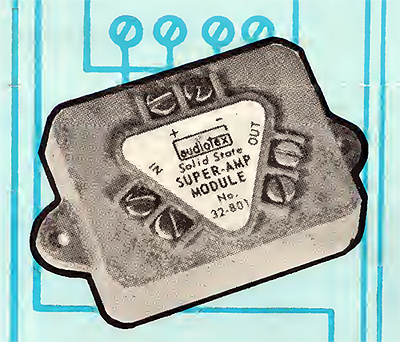
Click to see the whole page
This happened in the summer or early fall of 1965, when we were living in a rented
house on Ridgewood Drive in Valdosta.
At Specialty Distributing Company, my father bought for us a module called a
Super Amplifier described as follows:

I've learned that the list price was $7.95, which is something like $90 in today's money,
so it was not a trivial project.
We mounted it on a scrap of 2x6 lumber from our new house under construction on Lake Drive.
It was powered by two C cells in a Keystone metal battery holder of a type that I think
is actually still made. I don't recall an on-off switch; to
turn it off, we just took out the batteries.
We used a speaker for input and a dynamic headphone
(from my Knight 100-in-1 kit)
for output. Sure enough, we could hear at great distances —
the sound of my dog (Blondie) sitting and panting, six feet away,
almost overwhelmed it.
We also heard voices that we thought were a radio or TV in some house
nearby; I now think it was probably stray pickup of WGAF, whose signal
in northwest Valdosta was very powerful.
Later, in the new house, we built a crystal radio and used the Super Amplifier to
amplify the output. WGAF came in loud and clear.
We found that the Super Amplifier would drive a speaker
(which was a 45-ohm intercom speaker, though I don't think either of us realized at the time
that it was different from common 4- and 8-ohm speakers).
After several experiments with this, the Super Amplifier stopped working,
and that was the end of it.
My dim recollection is that it failed when a regular 4- or 8-ohm speaker
was connected to it.
In later years I've found that this Super Amplifier module was surprisingly little known.
The manufacturer's brochure has somehow made it onto Archive.org
(click here to see it).
This line of modules was advertised very briefly in Radio-Electronics in 1965 (September, page 80)
and later popped up as a Radio Shack product (Radio-TV Experimenter, October-November 1967, page 13).
Our module was gray, but apparently they were also made in red, as shown on the cover
of Popular Electronics, March, 1966. And that's all the knowledge the world has preserved about them.
Maybe the total number made was unexpectedly small, or the prices were too high.
So... How did it work? The brochure describes it as "direct-coupled," which is an important
clue about the circuit. We also know that it failed when driving a low-resistance load,
but first, it successfully drove a 45-ohm load for a while with good volume;
that suggests that the output was an emitter follower. And we know the overall gain.
And it ran on 3 volts (the diagram in the brochure, intriguingly, says 1.5).
With all that in mind, I used Tina-TI to simulate some circuits, and here's a plausible
candidate. This is a bit anachronistic because it uses silicon transistors; they were on the
market then but cost over 50 cents each, so unless Audiotex got a quantity or surplus
discount, they more likely used germanium. Germanium transistors are now rare and hard to get;
electric-guitar enthusiasts have slurped up the world's remaining supply to make sound-effects devices.
So here's a circuit using silicon 2N3906's. It should work with germanium transistors
if two resistors are changed as marked. The other slightly anachronistic thing about this
circuit is the large number of resistors for stabilization; that is late-1970s practice,
probably considered a bit pedantic in 1965, so they may have cut some corners that I didn't.
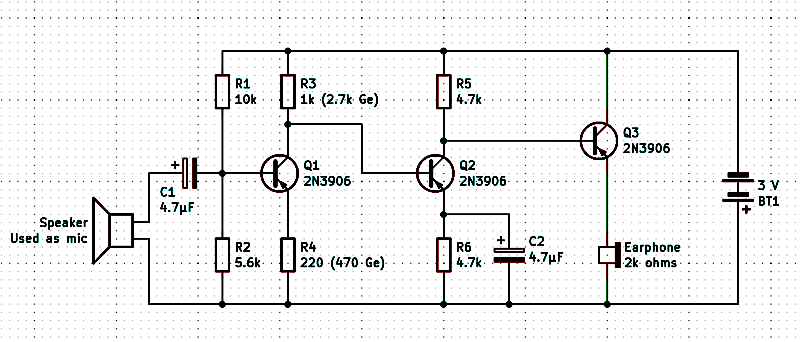
This has not yet been built and tested; I hope to get to that soon. (The last time I hoped to
get to it soon was 5 years ago, so don't expect too much.) At least I wanted to record the
information shown here, in case this is as far as this project goes.
See also the next entry, above.
Permanent link to this entry


|
| |

|
|
|
This is a private web page,
not hosted or sponsored by the University of Georgia.
Copyright 2024 Michael A. Covington.
Caching by search engines is permitted.
To go to the latest entry every day, bookmark
https://www.covingtoninnovations.com/michael/blog/Default.asp
and if you get the previous month, tell your browser to refresh.
Portrait at top of page by Sharon Covington.
This web site has never collected personal information
and is not affected by GDPR.
Google Ads may use cookies to manage the rotation of ads,
but those cookies are not made available to Covington Innovations.
No personal information is collected or stored by Covington Innovations, and never has been.
This web site is based and served entirely in the United States.
In compliance with U.S. FTC guidelines,
I am glad to point out that unless explicitly
indicated, I do not receive substantial payments, free merchandise, or other remuneration
for reviewing or mentioning products on this web site.
Any remuneration valued at more than about $10 will always be mentioned here,
and in any case my writing about products and dealers is always truthful.
Reviewed
products are usually things I purchased for my own use, or occasionally items
lent to me briefly by manufacturers and described as such.
I am no longer an Amazon Associate, and links to Amazon
no longer pay me a commission for purchases,
even if they still have my code in them.
|
|


